

Introduction: Matrix Code - Visual Basic
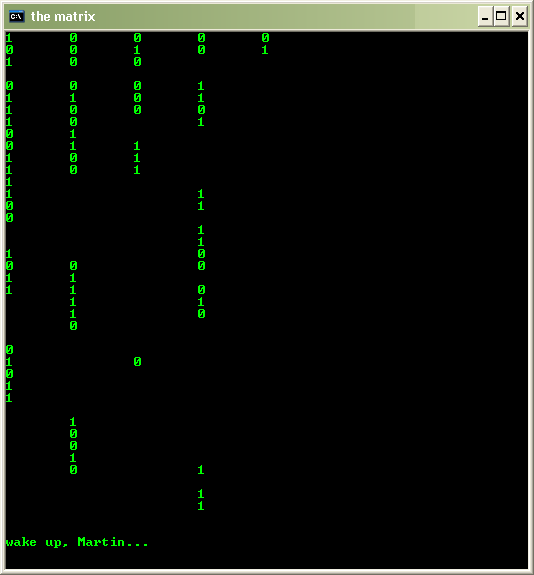
New and improved Visual Basic code will display a "Matrix"-like effect, with scrolling One's and Zero's. It then cuts to the Matrix "Wake Up Neo" sequence, and then continues to scroll numbers.
I realize this isn't exactly how the sequence goes within the movie, but there were people asking for this functionality, so I added it.
I think the way I randomize the display of the columns of One's and Zero's is the neatest part of the code. I discuss exactly what I did later.
This Instructable is in response to Brennn10's "Welcome to the Matrix in Command Prompt" Instructable. The code that makes up this Instructable was based initially on code posted in a comment by DarkJoker on the above Instructable.
I've intentionally been rather explicit with my explanation of the code as I've gotten quite a few requests for clarification since I first posted this solution.

Step 1: Grab My Code
I've attached my code below.
Save both files (startMatrix.itsabat and matrix.itsavbs) within the same folder on your machine, and remove the "itsa" portion of the filename, i.e. rename the files to startMatrix.bat and matrix.vbs. Bat files and vbs files are executable, and therefore I can't upload them with those extensions here. This is why you must save and rename them locally.
Step 2: Executing the Code
If you want to run my code, follow the below instructions. If you don't want to execute something on your machine that you don't know anything about, you're smart. You should go on to the next step, where I walk through the code and show you that I haven't done anything devious.
However, if you just want to get to it (or you're on someone else's machine and don't care), here's how to kick off the code:
Step 1: double-click on "startMatrix.bat".
That's it. Now go on to the next step to read about the coolness you just saw.
Step 3: Understanding the Code, Part 1
Let's take a look at the code, starting from the beginning. Hopefully you can learn enough about VB from my code that you'll go off and learn how to code in VB better than me :)
So first things first, we have 2 files: a bat file and a vbs file. If you edit the bat file, you'll notice that it executes the vbs file, after setting up the window, text color and window title. Let's move on to the more interesting stuff in the vbs file.
FYI, I'm only going to touch on the most interesting lines of code here.
Also, pay particular note to the lines starting in a ' ( tick, or single quote ). These are comments, and WON'T BE EXECUTED.
The first few lines of matrix.vbs say "Set my error messages to the explicit level" but at the same time "Don't let any mistakes I made be fatal." No real discussion needed.
Line 5: Our dim statement here sets up all of the variables that we'll use throughout the life of our little program. We don't need to declare types for these variables, or initial values for them, like we might in some other languages. VB is "powerful" like this.
Line 12: objSysInfo lets us gather some information on the system on which we're running. We create the object here, and on Line 13, objSysInfo.UserName returns the name of the currently logged in user that's executing this code. This will be used later in place of "Neo", so that our Script can say "Wake up, Martin..." if it's being run on my machine, or "Wake up, Brennn10..." if it's being run on Brennn10's machine and if that was his username.
Using the System's user name allows you to throw it on your buddy's unlocked machine and it will pull his name automatically, without having to alter the code.
Let's move on.
Step 4: Understanding the Code, Part 2
Line 16: sub waitfor is our first subroutine. A subroutine can be called from a different place in the code, will execute the code within the body of the subroutine, and will then return program control to the calling code. waitfor sets up our shell for us. By doing this in a loop with a "sleep" within the loop, we allow the activation of the shell to complete prior to control being returned, which is a very good thing.
Line 26: sub matrix is our second subroutine, and takes a parameter called "elements". This subroutine does the printing of the cool numbers that appear to "fall", as in the movie.
I've taken a few things for granted here. Hopefully by explaining them you'll understand where I'm coming from and can do it better than I.
First off, I assume that you only want 5 columns of numbers, and that "elements" is divisible by the number of columns (5). This was easy to guarantee because later on I declare the parameters passed to "matrix" to be 200 and 100 (it's called twice).
I also assume that you want all 5 columns turned on by default. I think that it looks OK, but you could change a few of these to FALSE if you wanted the first line of numbers to seem as random as the rest of the rows will be.
OK, so we have 5 columns, we have 200 / 5 = 40 lines of numbers to display (linesToWrite), and all of our columns are turned on by default.
Line 41: we enter into two "for" loops, the first of which (Loop A) cycles through our linesToWrite and the second (Loop B) that cycles through the number of columns. In Loop B, we Select on the value of the loop variable loopB, and depending it's value we evaluate an If-Else statement. If the column in question is Enabled ("TRUE", or "turned on"), we will print, via "wshshell.SendKeys", the value of Int(Round(rnd())), followed by a tab. Otherwise, we'll print only a tab, such that the column appears empty.
So what's the value of Int(Round(rnd()))? rnd() returns a random floating point number between 0.0 and 1.0, Round() will take that value and round it to the nearest Integer value, and Int() casts the result to an Integer. This last step could be considered overkill, since the Round() call should give us 0 or 1. I did it just because of habit. At some point someone must have told me that it was safer, and I apparently haven't forgotten it yet.
On to Part 3...
Step 5: Understanding the Code, Part 3
Continuing sub Matrix, here are the next few lines of VB...
' This flip-flops columns,
' so if a column is OFF, it will be turned ON 30 percent of the time,
' and if a column is ON, it will be turned OFF 30 percent of the time.
turnOffMax = 0.30
turnOnMax = 0.30
Toggling each column 30% of the time makes the number columns "fall" in a random fashion similar to how they do in the movie. Not exact, but close.
' Column 1 flip-flop
flipMe = rnd()
If ((col1 = turnedOn) and (flipMe < turnOffMax)) Then
col1 = turnedOff
Else If ((col1 = turnedOff) and (flipMe < turnOnMax)) Then
col1 = turnedOn
End If
The above block handles how we determine whether we're going to display a number in the given column during the next iteration, for the next row of numbers. The code reads "if the column is on, and the random number called flipMe is less than 30%, turn off the column. Otherwise, if the column is off and flipMe is less than 30%, turn the column on."
That wraps up sub Matrix.
On to sub key...
Step 6: Sub Key()
The key method is below.
sub key(msg)
' do printouts of "the matrix" messages, and erase them
wscript.sleep 1500
length = len(msg)
for position = 1 to length
wshshell.SendKeys mid(msg, position, 1)
wscript.sleep 250
next
wscript.sleep 3000
for position = 1 to length
wshshell.SendKeys "{BACKSPACE}"
wscript.sleep 75
next
end sub
This method prints out a string "msg". It'll print anything you pass it. This method is called later on in the code.
The first FOR loop prints out each character in the string, one at a time, and pauses for 250 milliseconds in between each character. We then sleep for 3000 millis (3 seconds) and write out a backspace for each character we previously printed, sleeping this time a little less.
That's all there is to it. On to the main body of the program, where everything comes together.
Step 7: Main
The main execution of the program calls waitFor and matrix (which we've already covered) to set everything up and write out 200 binary digits, spread over 5 columns.
The name of the current system user is then grabbed and manipulated to be printed out as a part of the "wake up" sequence.
We then enter a FOR loop, which we know we'll only iterate over 4 times because of the "1 To 4" constraint. We then SELECT on our loop variable (loopA), which matches the first CASE statement the first time through, the second CASE statement the second time through the loop, etc. Each iteration of the loop, myString is set to the correct string representation of the verbiage we want to print, and the key subroutine is called to actually do the printing. There are obviously many other ways to design this loop, and I'll leave that as an exercise to the reader.
Once we exit the FOR loop, we once again call the matrix subroutine to print out more numbers. As the comment in the code says, you can put this final call to matrix() in a loop if you'd like, or you could just call it with a larger number, etc.
Finally, our call to quit() aborts program execution (always good practice :P ).
Hope everyone has fun taking my example and making it better! If this Instructable has piqued your curiosity with VB, Google can provide a ton of good resources to learn more about it than I can tell you. Happy coding!
martin


