

Introduction: Microcontroller Fabric Tone Generator in C-code


At the end of October last year instructables user carmitsu sent me a message after seeing my lunchbox synth. From his message:
I teach music in elementary school. We play a lot of recorder music. i.e. the kids play little flutes...... I have several special needs kids who can are using these black poster boards with circles that have the name of the note on them. These students push on the circles with notes names at the same time the rest of the students are playing a song..... Most of the special needs kids can do this fairly well and in time with the music.
What I am looking to to is build a very simple sound generator so that these kids could play the same pitch as those being played by the students on their recorders. I would only be a few pitches. I thought I could attach some kind of small button to the bottom of their round circles so that when they push on them the sound would come out of a small speaker, loud enough so they could hear.
Having a mother who is a teacher and having liked school, how could I resist? Truth be told I couldn't. This is pretty much a chronicle of the project and instructions on how to build your own.
Step 1: The Beginning or Why I Couldn't Stick to Analog

The good stuff starts on the next page. If you want to know how I ended up using the parts I did, read on.
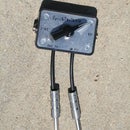
The veritable timer:
After giving the project some thought I immediately thought of the piezo tone generator from my op-amps Forest Mims III book. Seemed like a good way to go, it's just a piezo, an 741 IC and a couple passive components. No big deal right? Well it has 2 problems, 1) when you depress the switch, it's possible to change the pitch 2) it's damn near impossible to tune. The first could likely be overcome with with some debounce technology, though i didn't know how to do that without adding another counter. It could also be an issue with using a piezo. The second issue just got unwieldy when you started trying to hit a certain pitch. What about the 555? The datasheet shows a time dlay function based on resistors and capacitors. Which is great until you start typing in actual values of real world parts, that's when you'll find hitting a 440Hz pitch starts to get a little difficult. You can use trim pots to get it tuned in, but over time they tend to move. Constantly tuning the instrument, compiled on top of rapid increase on cost and quantity of parts, and my wife making the pitch change when she pushed the button killed the 555 for this project.
Op-amp:
No problem, people have been making synths with op-amps since before I was born. How hard could it be to make a really simple one, with few parts and specific notes? Harder than I thought. Most of the designs out there are very over complicated for this project. Synth designers are out for the perfect waveform/tone. This directly conflicts with a project that is supposed to be cheap enough for school or teachers budgets. Building a keyboard is easy enough, it's just a bunch of resistors and power or a bunch of diodes and power. It's the rest of the circuit design, and the cost of custom pcbs that starts to get out of hand for someone at a beginning electronics level.
Project redefinition:
So the project got redefined before i even really got going. I needed something that could toggle a speaker pin, in time, with the press of a button. I didn't want to have to design and buy a PCB. This had to use as few components an possible, and be assembled as a beginners kit. It was staring me in the face the whole time. Duh!! Microcontroller!
Microcontroller:
So after purchasing both an Modern Devices Bare Bones Arduino kit and an Evil Mad Scientist Simple Target Board and letting them sit on my desk for months not being used, I had the perfect introductory project. I started looking at the time it takes to put both together, the learning curve for the code, cost, the additional parts needed and make it do what I want and settled on the target board.
Cost was pretty even, $15 plus a $20 FTDI cable for the Arduino, $12 plus a $22 USBtinyISP programmer. I already knew C++ from the little college I could stand and figured C for microcontrollers wouldn't be that bad, while other than blinking a light to make sure I put my kit together properly, I had no Arduino experience. Both could be mounted. It was pretty much a toss up, so I decided on the fewer parts of the two, the target board.
Step 2: What You Need Rev 1

Parts Cost
USBtinyISP AVR Programmer Kit (USB SpokePOV Dongle)
v2.0 $22.00
http://www.adafruit.com/index.php?main_page=product_info&cPath=16&products_id=46
Evil Mad Scientist labs ATmegaXX8 Mini Dev Kits $12
Headers, 6-pin DIP, 5-pk $2.75
http://evilmadscience.com/tinykitlist/74-atmegaxx8
Speaker (8-ohm Mini) $2.79
http://www.radioshack.com/product/index.jsp?productId=2062406
SPST Normally Open Momentary Switches (we used 5) $3.49(4pack)
http://www.radioshack.com/product/index.jsp?productId=2062539
"AAA" Battery Holder $1.79
http://www.radioshack.com/product/index.jsp?productId=2102735
SPST Submini Slide Switch (optional for power switch) $2.69(2-pack)
http://www.radioshack.com/product/index.jsp?productId=2062490
LED and resistor (optional, if you want a power light) $should be free if they're lying around
Wire $should also be lying around
Silver solder (if this is going anywhere near children you should probably not use lead, parents get pretty weird about that sort of thing ;) )
Rubbing alcohol (to remove flux)
If you want some places to save money, you don't have to get parts from RadioShack. I did because they're close and predictable.
Step 3: Assembly Rev 1


Put your parts together as shown. Be sure to use rubbing alcohol and a flux brush when you are done to get rid of any flux from soldering.
Schematic is below for those who prefer it. D1 and R1 can be whatever you want, it's just a power light. C1 is just to help make the power a little more consistent. I used a 10uF. This schematic is the same for the later versions, just swap out push buttons for fabric switches. in the last revision I added switches to PC4 and PC5 or pins 27 and 28.
Step 4: What You Need Rev 2

You need:
Multiple colors of fabric, or one color if you want every note the same color. The quilting section of your closest fabric store is the best place to get this cheaply. Quilting quarters are $1.50 and you can get a ton of switches out of one.
Conductive fabric, I suggest the Flectron fabric from LessEMF it's $20 for a 12"x54" piece
Eyelets for attaching the wire to the fabric. You can get them at most fabric stores cheap. JoAnn has the tool and 25 for $2 You will need a hammer for this.
Wire, I used 22AWG, I suggest smaller if you have it.
Fusing, to get the colored and conductive fabric to stick together. Ask at the store and you can probably buy it by the yard. This would probably work fine, though I do suggest you ask someone
Batting, I used a really loose stuff at first, then switched to something tighter knit. I suggest you just try a couple different ones till you find what works best.
Heat shrink tubing, this made the whole thing a lot more manageable. heat shrink wires together as they pass each other and they'll stay a lot better.
Step 5: Assembly Rev 2


Lay the multi-colored fabric over each other and cut a out a square, it doesn't have to be perfect. Iron the fabric to get any folds out, layer them on top of each other again and make sure the edges all match. Cut any edges that don't.
Cut the top and bottom round, leaving the left and right sides straight. You're going to invert the switch after sewing so don't make the rounded sides too round and leave enough height on the flat sides to push the switch through easily when you're done. Round out the flat side of the first and last switch.
Head on over to your sewing machine and put two of the rounds together so that the good side faces each other and sew a seam on the flat parts.
Once the tops of the buttons are sewn, cut squares out of the conductive fabric and fuse one side. Cut wire to length and strip one end. solder the wire around one of the eyelets. (the solder will not likely stick to the eyelet) Cut a smallslit in the fabric at one corner and hammer the eyelet to attach the fabric and wire. remove the backing from the fusing and fuse the conductive fabric to the back of the colored fabric. Repeat for all the switches. To make things easier, you can heat shrink tube the wires together whenever one wire passes the the wire for the next switch.
Get or make a piece of fabric the length of the switch set and cut a strip of conductive fabric the length of it. Unlike the colored switches, this is one long piece. This will be what the buttons touch to make the connection. Cut a small slit and attach a wire to it with an eyelet, like the colored switch tops. Fuse it to the back of the bottom fabric.
Sew the top and bottom together with the conductive fabric facing out, use a yard stick to invert the set after it's sewn.
Cut a few small holes in the batting, I used a chopstick to get a circle then just remover the chopstick and make the cut. Cut them to shape and insert them into the switches. This is what holds the conductive fabric apart.
It may be easier to insert the batting while you are inverting the switches instead of after. The stuff I used tore up pretty bad while I was inserting it and I had to get different batting.
Finally hook the wires up to the target board and you're all set. The long bottom strip will be ground.
Step 6: What You Need Rev 3
So, here's the new parts you need:
Snaps, Just got them from JoAnn's. They came with an install tool not to bad for $7 I would suggest one of the pliers tools instead as I had to take my tool apart to install the snaps in the middle. Sew ons would be a good alternative, though they take longer to adhere.
Conductive thread, Spark Fun has stuff that can go in your sewing machine. I had to go really slow in my machine or the thread would break. Your mileage may vary
Step 7: Assembly Rev 3


This revision was a lot better than the than the last in terms of time till built. Plus, having removable switches saved my sanity more than once.
Start off by making the base. It's just one quilting quarter folded in half. Put a layer of batting on the top and sew, leaving a hole to invert it. Push the thing through the hole and you basically have a pillow type thing. I quilted it so it was easier to work with. Use plain thread and go nuts. I did diamonds on this one, but maybe next time I'll put a dragon in back, or something cool.
Now, on to the switches. I like this design because you can basically make a ton of these ahead of time and just use what you want. start by using a scrap piece of cardboard, paper, or fabric and cut a pear shape out of it. Use that as a guide to cut a top and bottom for each switch. I cut one color for each bottom and a different color for the tops, but you can be creative and do what you want.
Cut down your guide to a lollipop shape that will easily fit inside the switch. Lengthen the "stick" so it can wrap over the edge of the "pear." Cut the shape out of the fusing and conductive fabric and fuse one side of the conductive fabric.
Remove the backing from the fusing material and fuse it to the top of the fabric that will be on the bottom and the bottom of the fabric that will be on the top. Wrap the extra bit around the top.
Head on over to your sewing machine and put batting with holes between the top and bottom fabric. Sew outside the conductive fabric and skip over the "stick" part of the switch. I found that it's possible to sew the top conductive fabric to the bottom creating a short. It's better not to sew through the conductive fabric. Attach snaps and the switch is done. I found it easier to use the male snap for all the bottom/GND connections and the female snap for all the tops. This makes all the switches interchangeable.
The circuit:
The thing about cutting rounds is that you have a lot of extra bits. I took my scraps, fused big pieces of fusing to big pieces of conductive fabric and used those to cut out the smaller rectangles I used as pads. Roughly lay out your switchesand fuse the pads to the base with enough room to sew a line to them and have a snap. The foot of the sewing machine I used didn't take kindly to being real close to the snap, so keep that in mind and give yourself some space. Since I got conductive thread that could go in my sewing machine I just sewed a line from pad to pad and back. I had to go slow or the thread would break, but it was a ton faster than hand sewing. Also with conductive thread on the bobbin and needle, I got a really good solid connection. The stuff frays like crazy, but a little craft glue or Elmers clears that right up. Try to keep the lines well away from each other and you shouldn't have any issues.
Final assembly:
Snap on all your switches, connect the board, load code and you're done. I used wire to get from the board to the pad and then just sewed the wire to the base by hand. For the next version, I will mount the board in a plastic box with snaps to attach it to the base so that idle fingers do not pull it apart.
Step 8: Code

If you have never programmed a chip before, this is a somewhat daunting task. It doesn't help that the tools are flaky and most of the time you have to perform the same operation multiple times. The two best resources I've found for getting an understanding of what's going on is the page for the USBtinyISP, http://www.ladyada.net/make/usbtinyisp/ and the crash course in programming the noise toy, http://blog.makezine.com/archive/2008/05/noise_toy_crashcourse_in.html These should be able to get you started.
A lot of people like Arduino for this coding and there's nothing wrong with using it, except I feel it adds a lot of bloat to a normally simple program. Also, I knew C and don't know Arduino. Maybe one day, if there's time. :)
Code:
{{{
#include
//Use a pin to turn on the SPK
/// Typedefs //////////
typedef unsigned char u8;
int main(void)
{
u8 btnState0;
u8 btnState1;
u8 btnState2;
u8 btnState3;
u8 btnState4;
u8 btnState5;
u8 btnState6;
DDRB = (1 << DDB6); //Set SPK for output
PORTD =(1 << PD0) | (1 << PD1) | (1 << PD2) | (1 << PD3) | (1 << PD4); //Set Button High
PORTC = (1 << PC4) | (1 << PC6);
TCCR2B = (1 << CS21); //Set Up Timer
while (1)
{
btnState0 = ~PINC & (1 << PC5);
btnState1 = ~PINC & (1 << PC4);
btnState2 = ~PIND & (1 << PD0);
btnState3 = ~PIND & (1 << PD1);
btnState4 = ~PIND & (1 << PD2);
btnState5 = ~PIND & (1 << PD3);
btnState6 = ~PIND & (1 << PD4);
if (btnState0)
{
if (TCNT2 >= 190)
{
PORTB ^= (1 << PD6); //Flip SPK Pin
TCNT2 = 0;
}
}
if (btnState1)
{
if (TCNT2 >= 179)
{
PORTB ^= (1 << PD6); //Flip SPK Pin
TCNT2 = 0;
}
}
if (btnState2)
{
if (TCNT2 >= 159)
{
PORTB ^= (1 << PD6); //Flip SPK Pin
TCNT2 = 0;
}
}
if (btnState3)
{
if (TCNT2 >= 142)
{
PORTB ^= (1 << PD6); //Flip SPK Pin
TCNT2 = 0;
}
}
if (btnState4)
{
if (TCNT2 >= 126)
{
PORTB ^= (1 << PD6); //Flip SPK Pin
TCNT2 = 0;
}
}
if (btnState5)
{
if (TCNT2 >= 119)
{
PORTB ^= (1 << PD6); //Flip SPK Pin
TCNT2 = 0;
}
}
if (btnState6)
{
if (TCNT2 >= 106)
{
PORTB ^= (1 << PD6); //Flip SPK Pin
TCNT2 = 0;
}
}
}
}
}}}
Where do the pitches come from? A little math was needed. The timer clock on the atmega 168 runs at 1MHz. That's much too fast for audio so we have to use the prescaler /8. Then since we need to flip the output pin high then low in order to make 1 cycle, we need to divide the answer by 2 in order to come up with the right pitch. The formula looks like this,
Pitch to put in code= (1000000/8)/(Target frequency*2)
For A(440) this would be 125000/880=142.045 or 142 for our purposes, since the value must be an integer.
The target frequencies of notes can be found just about anywhere online and are generally all the same.
I still want to add a case statement instead of using a bunch of Ifs and use PWM to better control the volume and pitch of the speaker, but for now, this works.
Participated in the
Art of Sound Contest


