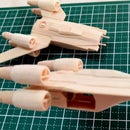
Introduction: Mini UFO Interceptor Popsicle Stick Model
.... Check A-OK.....
Direct from Gerry Anderson's 1970 UFO Series.. A project to craft a UFO interceptor. These spacecrafts were based on the moon and were the first line of defense against "the aliens" - humanoids that extract body parts from abducted earthlings.
Dedicated to craftsmen around the world (specially followers of the popsicle mini-models series), the project was a little more difficult due to the less angular design of the spacecraft, not to mention tiny struts for the landing gear....
Step 1: Materials
Materials for this project were standard popsicle sticks and various sizes and shapes of toothpicks that can be purchased at your local supermarket.
Step 2: Tools
-
Dremel minimite with the following really usefule bits:
- Drum sander (course & medium grade)
- Disc Sander (fine grade)
- #125 High Speed Cutter
- Grinding Stone (Cone shaped & drum-shaped)
- Olfa Handsaver art knife (w standard blade/s)
- Elmers multi-purpose white glue
- handy clamps
- fine tweezers
- ruler and mechanical pencil
Step 3: Schematics
As with an earlier project I posted, the very first step was to look for schematics and specifications in the World Wide Web. Google images search key is "UFO interceptor".
I would like to thank the foundation3d.com folks for the attached schematics. You guys render it and I'll try to craft it!!!
Here is the link for the image: URL: http://www.foundation3d.com/forums/showthread.php?p=221436
Step 4: Fuselage
To shape the fuselage, I turn to the schematics in the previous step and scale it so as to match the size of a regular popsicle stick.
The basic shape of the fuselage was cut using an Olfa Cutter. You'll need to cut and glue together 5 separate pieces to form the basic 3D shape of the fuselage. A smaller piece (you'll need to craft two of them) was glued to the bottom side to complete the basic shape of the fuselage. A lot of sanding and grinding (using the Dremel Mini-mite with the drum sander attachment) was done to 'round off the edges' and form the shape of the fuselage to conform with the design schematics.
Smaller scrap materials make up the housing for the maneuvering thrusters. The 'tiny' maneuvering thrusters were installed at a later stage...
Step 5: Main Thrusters and Tail Fin Mount
The main thrusters were carved out from parts of the popsicle sticks, glued and sanded into shape. The nozzle was drilled using the #125 high speed cutter from dremel. Be very careful when drilling holes in laminated popsicle sticks.. Make sure that the glue is completely dry in order to prevent accidental 'splitting' of the laminated pieces.
The secondary thrusters were carved out from a toothpick and sliced carefully to achieve a 'cone' shape.
The Tail fin mount was formed similar to the main thrusters albeit a trapezoid shape (instead of a cylinder).
Two (2) tiny maneuvering thrusters were cut from a thinly shaped (and rounded!) toothpick.
The thrusters (main, secondary and maneuvering) and tail fin mount were positioned and glued to the main fuselage and set aside to dry.
A triangular tail fin was cut using the olfa cutter and sanded into shape with a disc sander. The tailfin will be installed in the next step.
Step 6: Tail Fin and Wings
For the 'skeletal' rudder, toothpicks similar to the ones used in crafting the maneuvering thrusters were used. The Tail fin fabricated from the previous step will be mounted on top of the 'skeletal' rudder. You can always refer to the specifications for the appropriate size and placement of the individual parts.
To craft the wings that shall support the landing gear, scraps of popsicle sticks were used, cut and sanded into shape.
The 'skeletal' rudder, tail fin and wings were then glued in place using the schematics downloaded from the internet and used as a guide..
Step 7: Landing Gear
The most difficult part of the build was to model the landing gear from shaped toothpicks. The individual parts were very very small and frail (as shown in illustration from http://ufoseries.com ... interceptor test renders (link) ... thanks guys!!!).... and it takes quite a while for the white glue to set...
The skids were carved from a much 'larger' toothpick and set aside while the tiny struts were shaped and glued into place. I used scrap popsicle sticks to prop up the fuselage while waiting for the white glue to bind the struts to the wing and fuselage. Again, you can always refer to the available illustration(s) and specifications on where to position the individual struts and skids.
Step 8: Main Armament - Single Missile
The single missile was less difficult to craft. Pieces were cut from regular popsicle sticks (you'll need to laminate three pieces together), glue and sand them to shape using the Dremel with a drum sander attachment....
Step 9: And Finally... Mounting the Missile
Mounting the missile was as straightforward as drilling a pilot hole using the #125 cutting bit, positioning the missile with scrap popsicle sticks and gluing it in place until the glue has completely dried...
And ......... A lunar-based UFO interceptor ready to take on aliens!!

Participated in the
ThinkGeek Sci-Fi Contest

Participated in the
Instructables Design Competition


