

Introduction: Morse Code Decoder

In this project, my sister and I use an Arduino UNO board along with a push button switch and a serial monitor to decode Morse code. It is a very simple project and any Arduino beginners will have fun doing it.
This is the first project I am uploading on instructables.com. So any feedback is welcome.
Step 1: Parts Required
Parts required for building this project:
- Arduino UNO
- Breadboard
- Tactile switch (Push button)
- LED 5mm
- Resistor 220 Ω
- Jumper wires Male-to-Male (4 nos.)
- Laptop/Desktop computer for Serial Monitor
Step 2: Connections

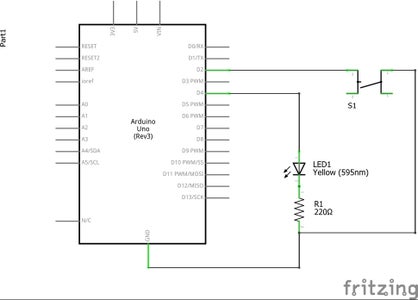

1. Connect one end of the push button to the digital I/O pin no. 2 of the Arduino UNO board and the other end to the ground.
2. Connect the anode of the LED to the digital I/O pin no. 4 and the cathode to the ground through a 220 Ω resistor.
3. Connect the Arduino UNO to a PC using the serial communication USB cable.
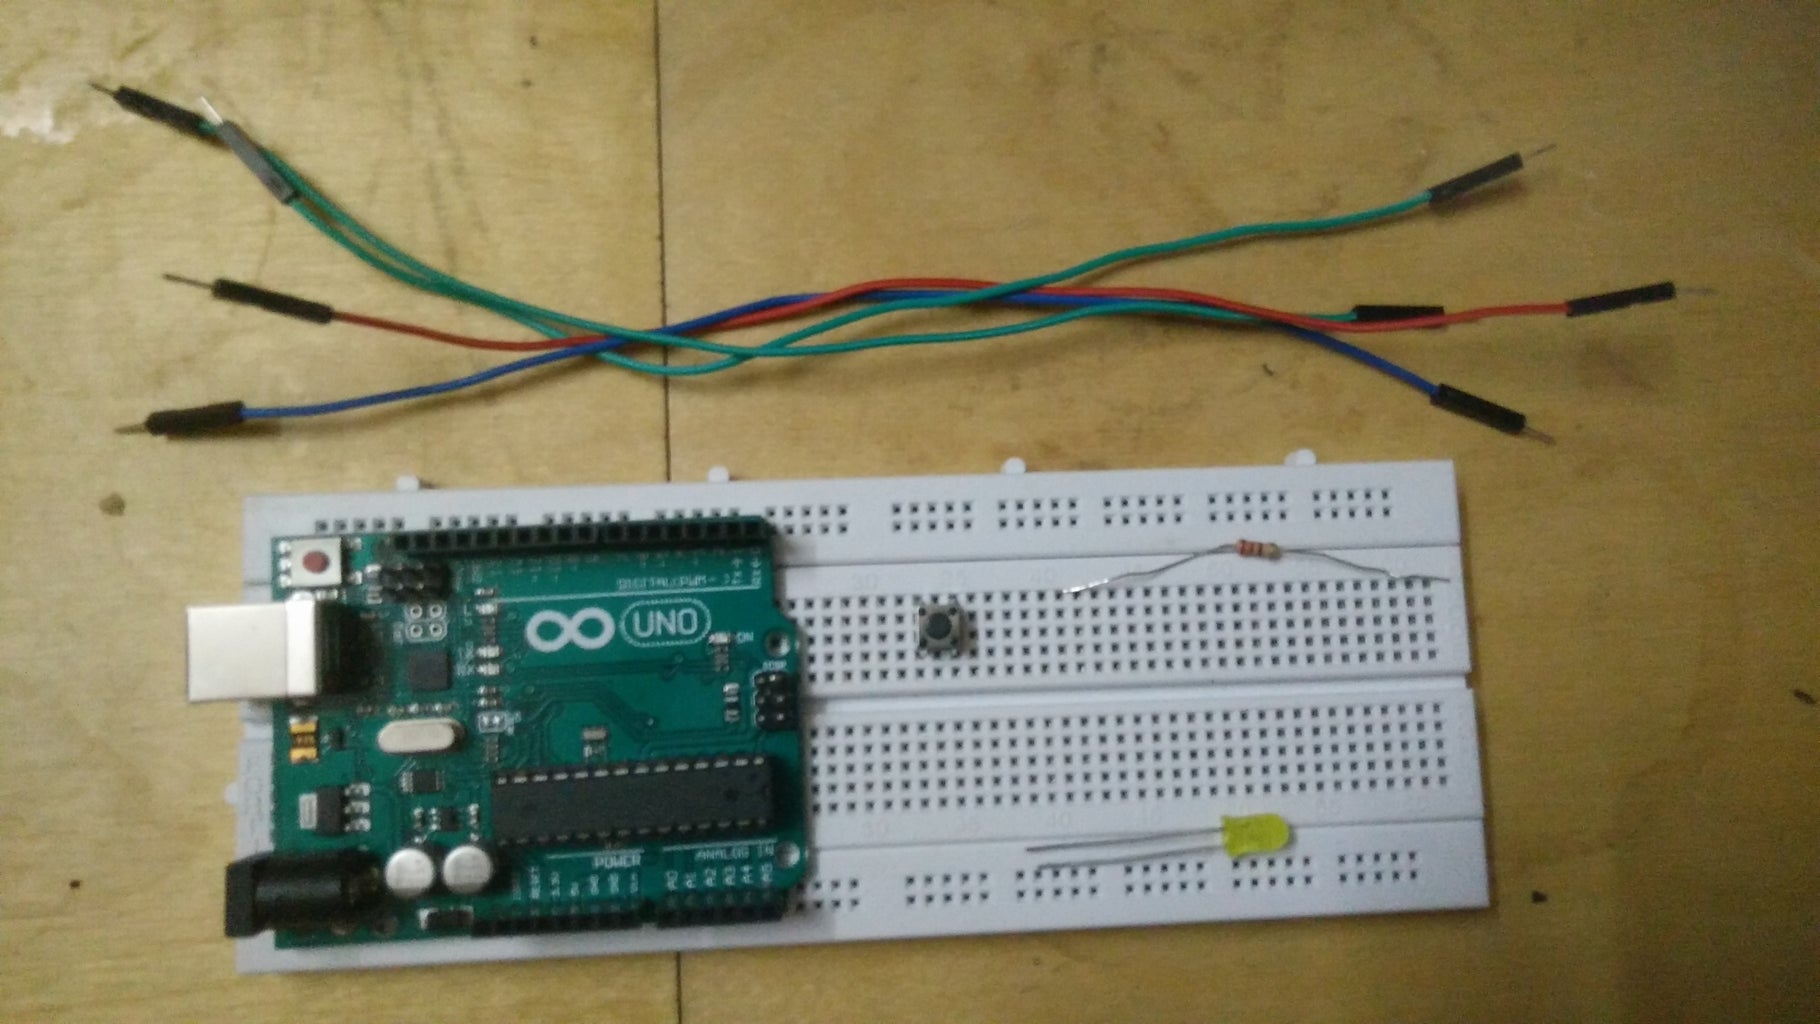
4. After completion, your circuit should look similar to the given picture.
Step 3: Arduino Sketch
Initialize all the variables:
unsigned long signal_len,t1,t2;   //time for which button is pressed
int inputPin = 2;                 //input pin for push button
int ledPin = 4;                   //outpu pin for LED
String code = "";                 //string in which one alphabet is stored
Setup the serial connection and I/O pins:
void setup()
{
Serial.begin(9600); pinMode(inputPin, INPUT_PULLUP); //internal pullup resistor is used to simplify the circuit pinMode(ledPin,OUTPUT); }
Main Loop for running program and decoding:
void loop()
{
NextDotDash:
  while (digitalRead(inputPin) == HIGH) {}
  t1 = millis();                            //time at button press
  digitalWrite(ledPin, HIGH);               //LED on while button pressed
  while (digitalRead(inputPin) == LOW) {}
  t2 = millis();                            //time at button release
  digitalWrite(ledPin, LOW);                //LED off on button release
  signal_len = t2 - t1;                     //time for which button is pressed
  if (signal_len > 50)                      //to account for switch debouncing
  {
    code += readio();                       //function to read dot or dash
  }
  while ((millis() - t2) < 500)           //if time between button press greater than 0.5sec, skip loop and go to next alphabet
  {
    if (digitalRead(inputPin) == LOW)
    {
      goto NextDotDash;
    }
  }
  convertor();                          //function to decipher code into alphabet
}
Function for reading dot or dash:
char readio()
{
  if (signal_len < 600 && signal_len > 50)
  {
    return '.';                        //if button press less than 0.6sec, it is a dot
  }
  else if (signal_len > 600)
  {
    return '-';                        //if button press more than 0.6sec, it is a dash
  }
}
Function for converting dots and dashes into alphabet:
void convertor()
{
  static String letters[] = {".-", "-...", "-.-.", "-..", ".", "..-.", "--.", "....", "..", ".---", "-.-", ".-..", "--", "-.", "---", ".--.", "--.-",
                             ".-.", "...", "-", "..-", "...-", ".--", "-..-", "-.--", "--..", "E"
                            };
  int i = 0;
  if (code == ".-.-.-")
  {
    Serial.print(".");        //for break
  }
  else
  {
    while (letters[i] != "E")  //loop for comparing input code with letters array
    {
      if (letters[i] == code)
      {
        Serial.print(char('A' + i));
        break;
      }
      i++;
    }
    if (letters[i] == "E")
    {
      Serial.println("");  //if input code doesn't match any letter, error
    }
  }
  code = "";                            //reset code to blank string
}
Download attached file for the complete code.
Upload the code on Arduino using the serial USB connection.
Attachments

Step 4: Using the Morse Code Decoder

Once you have uploaded the program to the Arduino board, you are ready to use your morse code decoder.
You can refer the attached morse code chart to try out your decoder.
The LED helps to know for how long the push button is pressed, so that you can differentiate between a dot and a dash.
You will have to open the serial monitor from your Arduino app on the PC. All decoded morse codes will appear on the serial monitor.
I have attached a youtube video where I am using the morse code decoder to decode a message.
In case of a any doubt, feel free to contact me or comment.

Participated in the
Microcontroller Contest 2017


![Tim's Mechanical Spider Leg [LU9685-20CU]](https://content.instructables.com/FFB/5R4I/LVKZ6G6R/FFB5R4ILVKZ6G6R.png?auto=webp&crop=1.2%3A1&frame=1&width=306)


