

Introduction: Mounting Deer Antlers


A homemade deer antler mount that looks good enough to hang up in your house.
Step 1: Shoot a Deer!

In order to get your deer antlers it would probably be good to shoot a male deer (a buck). You might be able to get some from a hunter friend or something like that if you aren't a hunter yourself.
Be sure to leave the top/front portion of the skull attached which is necessary for the mounting.
Step 2: Stuff That You'll Need


Materials
Antlers
Luan Plywood
Bolt
2 Nuts
Gorilla Glue
Crayola Model Magic Clay (Air Dry)
Cloth 1/2 Yard (your choice of color)
A Plaque
Wood Stain
You're also going to need some basic tools like a ban saw, a sander, a staple gun and a drill with a couple different types of drill bits.
Step 3: Creating the Plate for Mounting the Antlers to the Plaque


In this step you will make the piece that connects the antlers to the wooden plaque.
First I drew two overlapping circles onto the luan to make a nice teardrop shape. I used a little container and a spray paint can for the circles and connected them to help get the nice rounded shape.
Next you need to cut out the shape. I used a belt sander to smooth out the edges.
Step 4: Attaching the Antlers to the Mounting Plate


Trace your antlers onto the mounting plate so they can be easily aligned for drilling.
Drill a hole in the center of your antlers big enough for your bolt to fit through.
Also drill a hole through the luan board that is lined up with the hole in the antlers.
Step 5: Attach the Antlers to the Mounting Plate


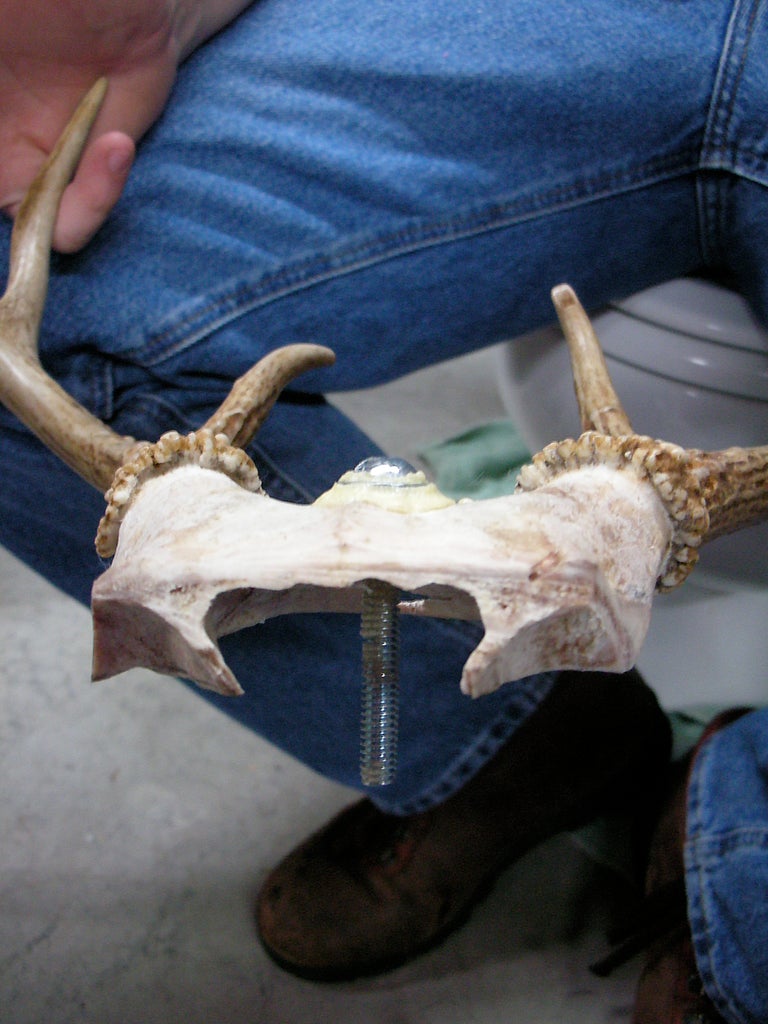


I used gorilla glue to fasten the bolt to the antlers.
Simply slide the bolt into the hole in the skull and glue it on. I had to use a washer so the bolt would line up correctly to fit into the hole in the luan and the plaque.
Now the antlers can be bolted to the mounting plate.
Step 6: Prepare the Plaque


In this step you will need to drill three holes.
The first will be the size of the bolt so it can fit through the plaque.
The second hole will be on the front of the plaque. This needs to be wide enough and deep enough only for the nut on the back of the mounting plate to fit flush up against the front of the plaque.
The third hole will be the same size as the second but on the back of the plaque. This will allow the second nut, attaching the mounting plate to the plaque, to be flush in the back. This will allow your antlers to sit flat on the wall when you hang them.
I don't have any pictures of this, but at this point I chose to use a keyhole router bit on the back of my plaque so when i hung it on the wall it would be flush and look nice.
Step 7: Shape the "head" of the Mount


Use the crayola clay to shape the top of the "head."
You want it to be nice and smooth so when you pull the cloth over it it will be free of lumps and indentions. It may take a while to get the exact shape that you want, so be patient and work the clay until you like it.
Also be sure to push the modeling clay down around the base of the antlers as shown in the picture so the cloth will fit snugly around them.
The clay needs a day or two to harden before you continue so it keeps it shape.
Step 8: Stain Your Plaque. (Optional)


I chose to stain my plaque to give the project a nice finished look.
Use a paper towel or a brush to apply the stain to the wood.
Always remember to follow the grain of the wood when staining.
Step 9: Covering the "head"


This is a tricky step, but if you've ever upholstered a piece of furniture or anything it wont be to hard.
Lay the fabric over the top of the "head" and begin stapling the fabric to the back of the mounting plate. Work the fabric all the way around the bottom of the mounting plate, making sure that the front is pulled taut and smoothed out. Trim the excess fabric off as needed to make it easier to work.
When you have worked both sides of the fabric up the back of the mounting plate, cut a slit in the fabric at the top of "head" and wrap the cloth around the base of antlers. Again, cut off any excess material as needed.
Staple the fabric on the back of the mounting plate at the top as well, pulling the fabric taut around the antlers and over the top of the "head."
Make sure that you leave about a centimeter of extra fabric around the base of the antlers during this whole process. Use a small screwdriver to press this excess fabric into the space that was left between the modeling clay and the bottom edge of the antlers. This will leave a nice, clean looking edge around the base of the antlers with the fabric.
Step 10: Attach the Antlers/mounting Plate to the Plaque

Now, all that is left is to slide the rest of the bolt through the hole in the plaque and bolt it into place!
There you have it. The finished project. Now just go hang it up on the wall somewhere.


