

Introduction: Mr. Hyde Halloween Robotic Top Hat


I was inspired by the Mr. Hyde character in Nightmare Before Christmas to make an animated top hat. I also loved the cable control creature that Dug North detailed in last year's Make Halloween edition. I wanted a creature that could pop up partially or fully and also move its head and open its mouth.
I have been learning the Arduino board and so thought it would be a great controller.
The Scary Terry web site <http://www.scary-terry.com/> details using digital sound recorders. I also wanted to have sound with my animated hat.
Step 1: Create the Head Sculpture


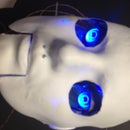
My first step was to create a sculpture of the head. I already had a costume hat, so I measured the approximate size that seemed likely to hide completely inside the had.
I used Roma non-drying clay and made a quick sculpture. I had some costume jewelry around, so I selected a large and medium fake pearl for eyes.
Once the clay looked good, I brushed on a layer of liquid latex. To give it some body and yet keep it from getting too heavy, I added layers of toilet paper onto the wet latex and then brushed on another layer to seal it in.
Next I added Liquitex paint into the latex and brushed on a thin color layer.
After it dried, I powdered it thoroughly (baby powder or makeup powder) to keep it from sticking to itself and destroying the little mask.
Step 2: Create an Underskull

The little mask has no real structure, so I made an underskull out of aluminum roof flashing (available at hardware stores). It is very lightweight, and you can cut it with heavy scissors. I added a little brace in the back to act as a pivot so that the head could turn.
I also created a jaw and upper palette (the silver metal) so that the mouth could open and close. Black duct tape acts as a hinge between the two pieces.
A very little bit of hot glue attached to mask to the underskull.
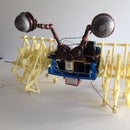
Step 3: The Lift Mechanism


Dug North used parallel arms to lift his creature's head. I knew that I wanted my hat to be "normal" height so that nothing would give away the effect.
I decided on a scissors lift mechanism to raise it up. After experimenting with cardboard and paper fasteners, I came up with a good size to fit in the hat and yet lift up the head enough to clear the rim of the hat.
I used some vacuumforming styrene plastic I had handy. Anything relatively rigid and yet lightweight will work. I used #6 bolts and nuts along with washers and Loctite to create the pivot points.
The lower part took some working and reworking. I ended up using square brass tubing and creating a channel for the servo arm to slide along. A 1 1/2 inch #6 bolt connected the lower scissor lift arm to the arm attached to the servo. #6 bolts ran through a piece of luan (1/4 inch thick wood) with a spacer so that the long #6 bolt can ride along the length of the brass tubing.
I found a powerful but cheap servo on ebay (133 inch ounces) to run the arm. A standard servo wasn't strong enough to raise it.
I originally used foamcore for the base, but the servo was so powerful that it buckled the foamcore.
Step 4: Putting It All Together


I added some very small cable control sheaths and cable and ran them to two micro-servos. One operated the mouth, and the other moved the head back and forth. I used sewing elastic to pull the parts back into place after the servo released tension.
The Arudino was programmed to control the servos. I got the basic code from the main Arduino page <http://arduino.cc>. I connected the Arduino to the EFX sound board. Using the simple Macintosh Sound Studio program I recorded sounds and then edited them for the sound I wanted. The EFX chip has the capability to play several different recorded sounds.
The main servo takes a lot of power, so I attached three 9vdc batteries to run all of the electronics.
Finally, I ran a ribbon cable out to a pad of four buttons and an off/off switch. This would run down my sleeve and into my palm.
The Arduino program read the buttons and activated four different routines.
Step 5: It's Done


Otherwise, the hat was a Halloween success!
You can find a video of the Hyde Hat in action on YouTube Mr. Hyde Hat
<http://www.youtube.com/watch?v=FE9nvD7tDS4>
Participated in the
DIY Halloween Contest


