

Introduction: Mug Music: Turn Water Into an Instrument With Arduino and ChucK


What if you could turn any conductive surface into an instrument? Like, say...a mug of water? Best of all, it's cheap; you'll only need $1 worth of extra electrical components (not including the Arduino).
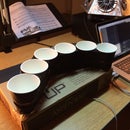
For this project, my friend Harvest and I combined Disney's Touché touch-sensing system with Arduino, and then used ChucK to generate music based on the input. Rain falls gently in the background, and when the user approaches, they can trigger notes on a whole-note scale by touching the mug. Touching the water directly results in some lovely raindrop-inspired, high-pitched notes. Finally, touching the water while also touching a grounded surface will trigger a thunderclap!
Some thank-you's are in order:
- Disney's original Touché paper
- madshobye's Touche for Arduino Instructable
- madlabdk's github project, which implements a more human-readable, less efficient encoding for the data, which we used, because it made it easy to feed the data into ChucK
- The makers of ChucK, because it's an awesome programming language for synthesizing music (OK, I'm biased, it's from my school)
Prerequisites:
You will find this Instructable much easier to follow if you have a basic understanding of circuits. Additionally, if you want to edit the musical behavior, you'll have to use the ChucK language.
Common problems, things to watch out for, etc:
Make sure your laptop is properly grounded when you do this (e.g. plug it into a wall). Otherwise you'll get some weird readings. Additionally, you may have to alter some of the values in the springshowers.ck file in order for this to work for your personal setup. We used a plain ceramic mug.
Github:
A .zip download of all code is available at the next step, but here's the github repo if you want to download the code from there as well.
More projects:
Check out my blog at bonnie-eisenman.tumblr.com to see what I'm up to.
Step 1: Materials and Setup


HARDWARE
You will need one each of the following:
Resistors: 10k, 1M, 3,3k
Capacitors: 100pf, 10nf
Diode: 1N4148
Coil / inductor: 10mH
We purchased these from Mouser. This sample shopping cart contains enough materials for 3 such projects. It comes out to about $1.11 per project for all of these components, not including shipping!
Additionally, you will need an Arduino, breadboard, jumper wires, and an alligator clip -- all of which should be pretty standard.
SOFTWARE
Install ChucK and the Arduino IDE. Then download the mug-music-master.zip file from this step, which contains all necessary code.
CIRCUIT
See attached image for the circuit image, taken from this Instructable, which includes instructions on how to setup the circuit.
You'll want to set up the circuit on a breadboard, and connect an alligator clip to the end where the "object" should be. We then dunked the free end of the alligator clip into a mug filled with water, and plugged the Arduino into our USB port.
Attachments

Step 2: Upload the Arduino Sketch
The attached Arduino sketch is taken from madlabdk's github repository. The only difference is that we added a delay() line to slow the rate of new data.
Upload it without modifications to your Arduino. (This file is attached here, or go back a step to download all relevant code.)
If you want to change the frequency of notes later, you can change the delay duration, but for now this will work.
Attachments
Step 3: Run the ChucK Code

Take a look at the full directory of code; you should see two ChucK files.
simplest.ck is a demonstration of the bare minimum necessary to interact with the Touche output from ChucK. It contains a simple sin wave oscillator and interprets input as MIDI notes.
springshowers.ck is what you see in the YouTube video, and is more complicated. For fun, I suggest running springshowers.ck first. :)
You can experiment with ChucK and simplest.ck to do some cool things on your own, afterwards!
Run either as a normal ChucK program. You have two options:
- Using MiniAudicle: open the file with MiniAudicle, start the Virtual Machine, add the correct serial port number as an argument, and click "add shred." If you don't know the serial port number, skip that step -- it will output your options when you run it. Pick whichever corresponds to your USB port.
- Command line: run "chuck springshowers.ck:[port number]"
Both should have the same effect.
That's it! You're done. Have fun playing around with your new instrument!
Attachments

Participated in the
Arduino Contest


