Introduction: Multitasking on Arduino: Use MILLIS() Instead DELAY()


When you use the delay() function in your sketch, the program stops. The program waits until moving on to the next line of code. So, in this dead time you can’t process the input data from sensors, as well as the outputs.
The delay() function is easy to use, but good only if you don’t have something else going on during the delay. Otherwise, you have to use millis().
Millis() can seriously affect your project when you have to run multiple actions simultaneous. It’s the function that lets you do multitasking on Arduino.
It’s pretty simple to work with the delay() function. It accepts a single number as argument representing the time in milliseconds. Using millis() takes a little bit of extra work compared to delay().
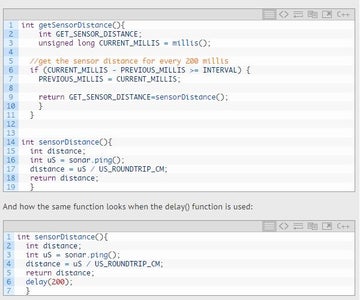
Calling the millis() function in the Arduino sketch returns the number of milliseconds that have elapsed since you start to run the program.
Below is an example of millis() function used for the HC-SR04 ultrasonic sensor to run an autonomous robot able to detect and avoid obstacles.
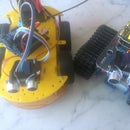
Step 1: