

Introduction: Neon Cubes


This is a series of artistic explorations using neon and aluminum, created during my Artist in Residency at Pier 9, Autodesk In particular, I'm attempting to push the personalities and characteristics that are innate in the materials.
Neon is
- Emissive (emits light)
- defined by edges
- fragile and light
- imprecise, rotund
whereas CNC'd aluminum is
- reflective when polished/coated
- defined by a volume
- monolithic, heavy
- very precise, square
Playing with these properties and intermixing their roles is what this series explores.
Step 1: Radiant: Giving Neon Strength


Radiant explores the transition of aluminum into more amorphous forms. Using harsh lines, the machined aluminum takes the harsh colors of the raw electrified neon and multiplies it into many other lines in its curves. The neon mimics the cubic shape, as if enveloping the aluminum.
The neon was bent and filled at The Crucible in Oakland, and the aluminum was machined on a Haas VF-2SS Mill at Pier 9.
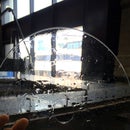
Step 2: Coolant: Intersecting Volumes


Because neon is defined by lines, volumes can intersect, causing the edges to be connected as if through the base. Coolant explores how neon can create volume through edges, while occupying the same space as aluminum. Multiple cubic forms come about through the many right-angle reflections.
The argon-filled tubes were bent at The Crucible and the aluminum milled on the Haas VF-2SS at Pier 9.
Step 3: Voxel: Space-filling Lines


In Voxel, I wanted to create precise cubes made of neon. Precision and neon often don't go together, but precision is necessary to convey a simple geometric form. Constrained by how tight the bends could be and some prototypes in 5mm glass tube, the form eventually came to be a space-filling curve. Many, many broken cubes later (from bad glass-bending and general clumsiness), three cubes in cyan, magenta, and yellow came to form this sculpture.
The yellow and cyan lights are single-electrode phosphor-coated tubes filled with mercury-doped argon gas. The magenta is a purple tube filled with neon gas with a single electrode.
One interesting fact: only the cyan and yellow cubes need to be electrified. They produce an inductive field strong enough to light up the magenta. In fact, plugging the magenta cube in makes it worse, dimming and flickering it.
Step 4: Appendix


Some ways I prototyped with neon before bending the real tubes:
- Software can render the lights and bends well. In particular, I used Autodesk Inventor because it can create 3D sketches (that i can then loft) better than other modeling programs.
- Before bending a complex shape, a bent it using 5mm clear glass tubing. This is much quicker and you do not need to pressurize the tube again with a blow hose. It also gets me thinking about how I'll orient the glass in the flame so as not to burn myself.
- Reflections can be easily generated in rendering software
A couple other things:
- Rubber o-rings are great as an interface between the neon tube and any hole it has to go through. It holds it in place and distances it electrically and physically.
- Hot glue does not hold AC transformers in place. Obvious now, but they heat up :(.
- Bubble wrap is your friend. Spending the extra 30 seconds to make sure your hands are free is worth the hours of work you might have to do if you break it.`


