

Introduction: Olympus Evolt E510 Remote Cable Release (Version 2 With Auto Focus on Remote)


Yesterday I built a simple one button remote for my Olympus E510. Most cameras have a shutter release button (the one you push to take a picture) that has two modes. If the button is gently depressed, the camera will auto focus and meter the light without shooting; this is sometimes referred to as a half press. If the button is depressed fully, the camera will typically auto focus, meter and shoot all in one step. This is usually reffered to as a full press'.
Yesterday's instructable only supported full press shooting. Version 2 supports both half press and full press shooting modes as well as a BULB switch for timed exposures.
This instructable will build on the previous remote and add the functionality of auto focusing (half press) and shooting from the remote.
I find this to be a great replacement for the $57 Olympus RM-UC1. My total material cost for this project was about $9 (including the disgusting gum). This is a very fine deal.
This should work for the following cameras (thanks Lori!):
E-410, SP-510UZ, SP-550UZ, SP-560UZ, E-410 and E-510
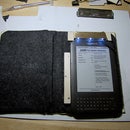
For those unfamiliar with a Remote Cable Release, this device allows a photographer to shoot a picture without directly touching the camera. Using the remote ensures that the camera does not move during the exposure. This is especially useful for taking macro photographs, photographs with long exposure times or photographs in odd positions.
Standard Disclaimer
Your camera is probably pretty nice. You probably spent a lot of cash on it. If you are afraid that you might hurt it and that hurting might make you sad, don't even think about trying this project. I'm not an electronics expert, but I'm fairly certain that none of what I'm about to tell you can possibly hurt you or your camera, but I could be terribly mistaken. This project should leave you with an excellent remote and a satisfying feeling. There is a small possibility however, that following my directions could lead the sun to burn out, your house to fall down or cause your medical insurance rates to go up. Use these instructions at your own risk. Your mileage may vary.
Cheers!
Aaron
Step 1: Gather Your Materials


- A prepared 12 pin remote cable. Follow the Olympus Evolt E510 Remote Cable Release instructions through step 8. Then return to this Instructable to complete the release. Check ebay for cables. I have found that most Olympus cameras use the same 12 pin connector as the Evolt series.
- An enclosure for housing your project such as Herseys Ice Breakers Sours Gum
- Two SPST Momentary push button switches Radio Shack PN 275-1571
- Radio Shack Multi Purpose PC board PN 276-150
- One DPDT slide switch Radio Shack PN 275-403
- Hookup Wire (22 gauge works well)
- 2 6-32 1/4" machine screws and nuts (for securing the switch)
- Small zip tie
- Dremle Tool or similar high speed rotary cutting device with ceramic cutting blade for cutting PC board
- Drill
- Utility knife
- Soldering iron with pencil type tip
- Solder
- Screw drivers
- Needle nose pliers or forceps
- Implements of Destruction (As this was made on Thanksgiving, an Arlo Tribute was necessary.)
- Patience
Step 2: Pepare the DPDT Switch

The DPDT switch has six connections on the bottom. Prepare it by connecting two hookup wires to the center connectors and two wires to either the left most connectors. The wires should be at least 7 cm long for now.
Check your switch with a multi meter if you have one handy.
The two center terminals (green) will be GROUND. Black is Pin 11, red is pin 3.
Step 3: Prepare the Enclosure Part I

Cut a hole 11mm long and 7mm tall on the hinge side of the enclosure using a utility knife or Xacto. Locate the hole about 15-16mm from the corner of the box and no more than 5mm from the hinge. Be sure that your switch will have a flat surface to mount to; the curve in the corner of the box will interfere with mounting if the hole is cut too close to the corner.
When cutting the hole, first draw out the shape and size needed with a marker. Then begin cutting by very carefully scoring the exact length of each line. Repeat this process, cutting slightly deeper each time. With patience it is possible to cut a very precise opening.
Insert the switch into the opening and mark the holes for the mounting screws. Drill the holes. Use the utility knife to enlarge the holes as necessary.
Measure the diameter of the cable. Drill a hole of slightly larger diameter in the edge of the enclosure to accommodate the cable. Locate this hole in any edge that will make holding the remote comfortable.
TIP!
For a better look, cut the holes from the INSIDE; this will help hide any accidental slips with the utility knife.
Step 4: Prepare the PC Board


If necessary, cut the wires for the DPDT switch so that they are a convenient length for the enclosure. Leave some slack to allow easy installation of the switch later.
Solder the components to the PC board using the schematic provided.
- SW1 - DPDT slide switch
- SW2, SW3 - SPST
- DPDT switch should result in a full button push - the camera should focus and release the shutter immediately.
- SW2 should wake the camera from lite-sleep (monitor off) but do nothing else on its own
- SW3 should auto focus and meter
- SW3 and SW2 pressed together should result in focus and shutter release. Press SW3 to focus and then SW2 to release shutter when ready.
TIP!
If you are unfamiliar with electronic schematics, the circles on the left side of the diagram indicate the connections to the cable for pins 3 and 11. The circles on the right side with a "-" next to them indicate ground. solid boxes on lines indicate connections between wires. Crossed lines do not connect unless there is a box over them.
Note, The schematic below is mislabeled; pin 4 should ACTUALLY be pin 3. Thanks to everyone that pointed this out!
Step 5: Prepare the Enclosure Part II
Measure the distance between the center of each push button switch. The distance should be around 10mm if the Radio Shack parts were used.
Find a comfortable position on your enclosure and make two marks separated by the distance measured above. These will be the openings for the switches. Make sure the PC board has sufficient clearance INSIDE the enclosure. In other words, make sure it will fit inside the box.
Measure the diameter of the switches and drill two holes of that diameter. Check the clearances by gently inserting the switches. Use a knife or dremel tool to enlarge the openings as needed.
Step 6: Mount Everything
Push about 2-3mm of cable inside the box and secure a small zip tie just inside the opening. This will prevent the cable from pulling on the PC board connections when it is dropped or mishandled.
Close up the box and label the buttons.
Remember:
- If the bulb switch is set to ON the camera will operate as if the shutter release button is fully depressed. In bracketed or continuous shot modes the camera will continue shooting as long as the switch is set to ON.
- The camera will shoot immediately when the cable is plugged in if the switch is set to ON; in short, leave the switch in the off position unless you are actually are using it.
- The camera will not be ready to take another picture until the BULB switch is turned off. Leaving it on is like holding down the shutter release indefinitely.
- To use BULB mode on the E510, switch to full Manual mode and decrease the shutter speed below 60". In this mode the shutter will remain open as long as the button is pressed (or switch is set to ON).
- Pressing the shoot (red button) will have no affect on the camera other than to wake it from a lite sleep (screen off).
- Pressing the focus (black button) will focus the camera and meter each time it is depressed.
- Pressing the focus and shoot buttons together will focus and then release the shutter.


