

Introduction: Orange PI HowTo: GPIO Led Blink Application by Cross Compilation From Windows PC


The quick essence of this instructable may be expressed just in one sentence:
"The applications created by raspberry pi crosscompiler are compatible enough with the Orange PI to be able to solve most of the simple tasks, like blinking a LED and so on."
Sapienti sat. Those, who feel that this info is enough for them to proceed may finish the reading and go coding, since they won't find here anything new or interesting. This instructable is for those, who want to know, how EXACTLY it could be done.
PREREQUISITES AND PRELIMINARY NOTES
- A desktop PC, Windows running and having Internet connection;
- An Orange PI, properly set up. It means You have already solved the problems with power supplies, with Linux installation, with display plugging in and setup. Some keyboard and mouse are also recommended to be attached to Your Orange PI. Otherwise You will be unable even to login, not to mention navigation in the file system and running Your executable. One may do the same things using some 3.3V rated USB-to-TTL adapter, through a remote consloe, but it is more exotic and requires certain skills. (If You prefer this way, You can easily adapt the approach given here to Your conditions.);
- Some computer and some programming skills.
In this instructable we will create a simple program for Your Orange PI. Certainly You will need some compiler and (preferably) some IDE (integrated Development Environment). I will tell how to do this using the Code Blocks IDE, however You can use one You like (e.g. Dev-Cpp, Eclipse, etc...). This case You'll need to find out how to configure Your tool to operate with external compiler.
Step 1: INSTALL IDE


(ON THE DESKTOP PC)
If You've followed my previous instructable You are probably already using the Code::Blocks IDE. Otherwise go to https://sourceforge.net/projects/codeblocks/files/Binaries/ and pick some version to download. You may choose one with mingw compiler - it will come handy if You want to do some code practice for Your desktop PC. The other handy version is the one with preinstalled compiler for AVR (so called Arduino builder version). This one will be of extensive use if You are going to do embedded projects with Atmega's or Attiny's. Download the choosen Code::Blocks version and install it.
Step 2: GET THE VERSION OF GNU C COMPILER ON ORANGE PI

(ON THE ORANGE PI)
Turn on, boot Linux, login and navigate to \usr\include\c++ You should see some files or folders there and their name vill correspond to the version of GNU c++ libraries and headers installed on Your Linux. Write down (or try to memorize) the gnu c++ version number, we will need it further on.
Step 3: DOWNLOAD AND INSTALL CROSS COMPILER


(ON THE DESKTOP PC)
Connect the Internent and navigate to http://gnutoolchains.com/raspberry/ (Yes, "raspberry", since no special fork of the gnu toolchains exist for the orange PI)
There You will see a table, offering several versions of the gnu toolchain for download. Remember the gnu c++ version, that You've got at step 2? Look at the table and select the toolchain sample that has GCC of the same version number as Yours.
For Orange PI Debian v0.9.1, that has gnu c 4.9.2 You may take the
http://sysprogs.com/.../raspberry-gcc4.9.2-r4.exe
or
http://sysprogs.com/.../raspberry-gcc4.9.2-r2.exe
For Your own responsibility You may try "universal" version and try to update its sysroot. In my own case several tries to come through the sysroot update procedure lead to the arm-linux-gnueabihf folder got fat by 3 Gb and still there was no success in compiling a valid Linux executable. It seems simplier to use some ready version and rely on the mentioned above limited compatibility between Orange Pi and Raspberry.
Install the chosen version of the cross-compiling tools.
Step 4: SETUP THE IDE FOR THE CROSS-COMPILER


(ON THE DESKTOP PC)
Now You need to introduce the newly installed compiler to the IDE of Yours. For the Code::Blocks the procedure is rather simple. Navigate to Settings->Compiler... menu. You will see a window entitled "Global compiler settings". In the upper dropdown menu choose "GNU GCC Compiler for ARM" Find and click a tab "Toolchain executables" just below that drobdown box.
A bit lower You will see An edit-box, where You need to type a path to the installation folder of Your cross-compiler. Let it be "C:\SysGCC\Raspberry" You may use dotted button nearby to navigate to the needed folder using graphics user interface. Note that You should pick a root folder of Your compiler installation. It shhould look like "C:\SysGCC\Raspberry" , and not like "C:\SysGCC\Raspberry\bin" or like "C:\SysGCC\Raspberry\lib" either.
Even more below You will see a tab entitled "Program Files" with a list of all filenames of the utilities. To the right of the filenames will be clickbuttons with dots. They're used to pick a new file from the existing ones on Your hard disk. For example click the dotted button near the C-compiler name. In the opened common dialog window navigate to the root folder of Your cross-compiler installation. And then then go further to bin subfolder: "C:\SysGCC\Raspberry\lib".
There will be a list of executable utilities. Its rather easy to find the necessary ones. Pick arm-linux-gnueabihf-gcc.exe where You had arm-elf-gcc.exe in the unmodified settings. Pick arm-linux-gnueabihf-g++.exe where You had arm-elf-g++.exe. Pick arm-linux-gnueabihf-ar.exe where You had arm-elf-ar.exe. And pick new make.exe where You had make.exe.
By clicking OK in the bottom of the window You have Your compiler installed.
Step 5: CHECK THE SETUP


(ON THE DESKTOP PC AND THE ORANGE PI)
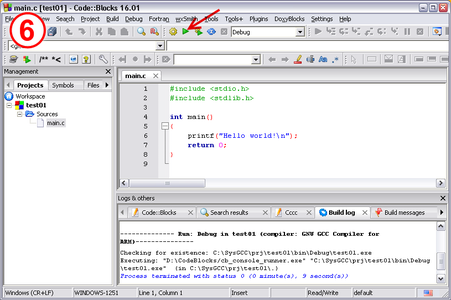
To check its operationability click "Create a new Project" icon in the start screen of the Code::Blocks. Choose "Console Application", further choose "c" and enter some project name on the next screen. You may also choose the folder to place the project here. ATTENTION! In the next window choose "GNU GCC Compiler for ARM". And now You can click "finish" to create sample "Hello world application"
Click the nice green triangle to compile the sample application. If things went right You should have an executable in the Release or Debug subfolder of Your authogenerated project, If not - check for the error messages. At this stage (if You did not modify the program manually) the errors indicate that some path had been configured incorrectly. If they are, return to the beginning of this step (STEP4.) and reconfigure the paths.
Case of success You will have a file named _Your_Project_Name.exe in \Your_Project_Folder\Debug\ or \Your_Project_Folder\Release\ dependently to the compilation options. Dont'worry. This .exe file is not a Windows executable. It is an ELF - executable linux file. To check it up, You can copy this file to some folder of Your Orange PI and start it. However we can always do it later.
Step 6: DOWNLOAD AND PREPARE OPI WIRING LIBRARY


(ON THE DESKTOP PC)
To proceed further we'll need some programming library to control our GPIO pins easily. Here we're lucky enough since there exists a special library, providing almost direct access to those pins like Arduinos or BluePills do. This library is named "Wiring for Orange PI" or, shortly, "Wiring OPI".
Go to https://github.com/zhaolei/WiringOP and pick a zip of sourcecodes.
Further on we will need our IDE with ARM linux compiler having been installed and with an Orange PI project created. Create one if You haven't done it at the previous step. Again choose "Console Application", further on select "c" as the compiler, decide a working directory of the project and (IMPORTANT!) select "GNU GCC Compiler for ARM" as the compiling tool for the project.
The WiringPi library zip archive (the one You've just downloaded) contains a subfolder "wiringPi". If You have a toool that can operate with subfolders in archives (like a good file commander) unpack the wiringPI subfolder of the sources zip file into the folder of Your newly created project. If You have no such a tool, just unpack the whole archive and copy the WiringPI directory of the unpacked sources into Your newly created project's folder.
Then go to Your Code::Blocks and find the project management window. It should be docked to the leftmost border of the Code::Blocks interface if You havent changed the layout.
In the management window find the string, containing the name of Your project and right click it. Select "add files recursively" in the dropdown menu. (If You cannot find a string, containing the name of Your project, that can be clickes for the correct dropdown menu, check the tabs of the "Management" window. The "Projects" must be selected. Not "Symbols" or "Files" or anything else.)
OK, after You've clicked "add files recursively" in the dropdown menu, in the mini file browser window find and click the "WiringPI" subfolder of Your project - the place where You've put the contents of the "WiringPI" folder from the downloaded sources' zipfile. The Code::Blocks will now show You a window, where You can select which files to add and which files not to add.
Rely on defaults here - press "OK" bravely. To be sure You can compile the project at this point, however You'll need the reference to pthread and libc libraries. More on this further on.
Step 7: SET UP COMPILER AND COMPILE THE LIBRARY


(ON THE DESKTOP PC)
In the Code::Blocks (You should have it running from the previous step, with opened sample project and Wiring PI sources added) navigate to File -> New -> Build Target... Then choose "Static Library" and press "Go". Further on type "Library" in the target name and select "GNU GCC compiler for ARM". Click "Finish".
Then go to the project management window (it should still remain docked to the left border of the main frame) and find "main.c" thing under _Your_project_name\Sources\_Your_project_name location. Right click the main.c and select "Properties" in the appeared menu. Select "Build" tab in the "Properties of "main.c"" window. Uncheck the checkbox, corresponding to the library type target.
Then find a "Build target" select box in the top menu of the Code::Blocks and select "Library" there.
Then use Build -> Rebuild or Ctrl+F11 shortcut. Wait until done. Blue text in the bottom log window indicates the success.
Search for lib_Your_Project_Name.a file in the ...\Your_Project_Name\bin\library\ subfolder. This file is Your compiled Wiring library for the Orange PI. Save it for future use. It also may be better to rename this compiled library to something like "libWiringOPI.a" for better search and use.
Step 8: ADD HEADERS OF WiringPI TO COMPILLER


(ON THE DESKTOP PC)
On the subsequent steps we will need only the compiled library file and the set of the headers (*.h) files from the WiringPI folder. You may even add the folder with these headers as a permanent search path for all Your further projects. (Top menu of Code::Blocks -> Settings... -> Compiler... Here select "GNU GCC Compiler for ARM" and go to the "Search directories" tab. Then click "Add" button and point to where You keep the headers from the OPI Wiring library.)
Step 9: SET UP THE EXAMPLE


(ON THE DESKTOP PC)
Start again a new project in Code::Blocks. Yet again choose "Console application", choose "C" as the language and set "GNU GCC Compiler for ARM" as the default compiler for the project. The wizard will again create the "Hello world" type, c-standard, console text application.
Now we are to develop a "Wiring Hello world" from it. Since it've became common that in the world of embedded systems "hello world" has a shape of blinking of a light emitting diode (LED), we fill follow this tradition too. You may proceed by one of the next ways: by hand editing the "main.c" file existing in Your project, or by replacing it with blink.c file, which comes in the examples subfolder together with the OPI wiring sourcecodes set. In the first case add:
#include "_Your_WiringPI_headers_folder\wiringPi.h"
string to the beginning of Your "main.c" file. Where _Your_WiringPI_headers_folder - does obviously designate the path to folder, where You keep Your wiring headers (*.h files).
Or alternatively You may add the
#include <wiringPi.h>
string instead, if You've added the folder with the headers as the default search path for the compiler.
Then add the next strings:
  wiringPiSetup () ;
  pinMode (0, OUTPUT) ;
  for (;;)
  {
    digitalWrite (0, HIGH) ;
    delay (500);
    digitalWrite (0, LOW) ;
    delay (500) ;
  }
just between the line
printf("Hello world!\n");and the line
return 0
of Your "main.c" file.
In the second case just do as decided. Remove "main.c" from the project (Management window, right click on the main.c file and choose "remove from the project" option.) Then get "blink.c" file out from the "examples" subfolder of the Wiring PI sourcecode set and copy it into Your project's folder. Then in Management window of Code::Blocks right click the name of Your project, select "Add files..." and navigate to the "blink.c" file. You may need to edit the #include statement in the blink.c however, if You havent set the default path to the wiringPI headers.

Step 10: ADD LIBRARIES AND COMPILE THE EXAMPLE


For the successfull compilation You will need one more thing:
Go to the top menu of Code::Blocks, navigate to Project -> Build Options... Click the Linker settings... tab and under the Link libraries box click "Add" button. Add the library file (libWiringPi.a) You got on the previous steps.
Then click "Add" again and add
/ARMlinuxEABI_PATH/arm-linux-gnueabihf/sysroot/usr/lib/arm-linux-gnueabihf/libpthread.a
Then click "Add" again and add
/ARMlinuxEABI_PATH/arm-linux-gnueabihf/sysroot/usr/lib/arm-linux-gnueabihf/libc.a
Where ARMlinuxEABI_PATH - designates the path to where You've installed Your compiler.
You should add libraries EXACTLY in this order: libWiringPi.a - FIRST, libpthread.a - NEXT, and libc.a - THE LAST.
Finally You have the necessary executable file. It is located in
..\Your_Project_Name\bin\Debug
-or-
..\Your_Project_Name\bin\Release
folder dependently to the build target settings.
To finalize this step just transfer the executable to Your Orange PI. It is robust to do this through the FAT partition of the Orange PI bootable flash card. However some OS'es (e.g. like armbian) do not use FAT partition on their bootable flash. There You will have to find another way to put Your files. Maybe by using some other USB flash memory dongle.
Step 11: PREPARE THE HARDWARE

OK, now then. We can already start the executable under Linux on Orange PI, but we'll see nothing of interest, since our light-emitting diode (LED) is still not connected. Now we are to connect the LED to GPIO. The most necessary knowledge here is that the WIRING LIBRARY HAS ITS OWN PIN NUMERATION! This enumeration differs from the electronic standard like counting of pins on multi-pin connectors. And it differs from the numeration of input/output ports. Refer to the picture.
It's not an invention of mine. I got it from https://github.com/.../wiki/GPIO-Pinout so all credits towards there.
Step 12: WIRING


Here is another picture. This is how You are to connect the LED for Your blinking example to work.
Best of all if You can use some breadboard to install the LED and the resistor, and when You have some jumper wires nearby to make all the connections. Another option is to solder the resistor to the diode, to solder the wires to the resistor with diode, and to insert the ends of wires directly into the holes of the GPIO connector. Yet another option is to use twist joints instead of soldering. However this one is known by its faily connections.
Use any option to connect Your LED to the GPIO port.
Step 13: RUN THE APPLICATION


(ON THE ORANGE PI)
Find where You've put Your executable at the end of step 7. Navigate to this linux folder using Your Orange PI. It is handy to use some file manager here. Like midnight commander for example. When You've reached the folder, where Your application is placed, just start it, by any manner You like. You can select it by the midnight commander pointing string and press enter. Or You can type ./Your_Project_Name.exe by hands.
Enjoy Your blinking LEDS.
Finally (as usual) for Your convenience I've prepared a single zip-file archive OPIGPIO.ZIP, containing the precompiled LED blink example, together with its sourcecode and ready-to-use Code::Blocks project file. In the "libWiringOPI" subfolder of the archive You can find a copy of the wiring library source codes, the precompiled libWiringOPI.a library, ready to link with Your applications and a ready-to-use Code::Blocks project file for compiling the sources into the object code library.
Attachments
Step 14: NOTES:
- The "Orange PI", "Code::Blocks", "Windows", "Linux", "Sunxi-Tools", "Allwinner", etc... are the correspondent trademarks of their respective owners.
- For running Your applications under Linux You may (or may not) need the rigths of THE ROOT, thats' why I've recommended You to login as root. (Of course, do so if You're not planning to connect Your Orange PI to the Internet. Otherwise the login as root may sound like a bad idea.) As an alternative You may like to use sudo here: sudo ./Your_Project_Name.exe


