

Introduction: Organic Table Saw Fence / Work Bench


This is a story about modifications to a table saw to make it an even more useful tool. I find that it is the center of my workshop, both physically and emotionally. Unfortunately it also ends up being the workbench on too many occasions. This project seems to be organic, in that it starts in one direction, then grows in another direction as the requirements and materials change. Most of the parts for this have been salvaged or repurposed from some other parts. I did buy a spring clamp, and some welding rod. My welding skills are pretty poor, but I am getting better with a grinder to hide my flaws.
I am offering this more as a philosophy of what can be done, rather than a step by step what you should do. Feel free to take any of the ideas posted here and adapt them to your situation. You can give me hints on what I should do better or differently. Just don't comment on the general messiness of the shop.
Right now I know how large the project is. But it will probably grow, which it has already done. Subscribe to this thread so you will get future updates as they happen.
Step 1: Fence


I have a very nice 10 inch table saw. The only problem is the fence. It has a nice arm, but the cast iron t-square/tightening mechanism is terrible. It may be cracked. It flexes. And the tightening cam is sloppy. Therefore accuracy is a relative term.
I would like a Besselmer (SP?) fence, but the cost is prohibitive. I started out by making the t-square. It is a couple of pieces of scrap 2” angle iron welded together at a 90 degree angle. I bolted a piece of 3” square tube to the front of the table, offset a little so the t-square can ride on it. Exact instructions for this will depend on your individual saw/table combination. A piece of angle iron was added at the rear of the saw to support the rear of the fence.
Step 2: Fence "bearings"


A friend had a very expensive fence that had a high density plastic (think Ikea cutting board) bearing mounted on an extruded aluminum arm near the midpoint to support the weight of the fence. I t felt nice, but was VERY expensive and required a large unusable flat area to the right of the fence. My idea was to use a roller at the end of the fence, riding on the rear angle iron. The larger the roller, the smoother the ride, so a roller skate wheel was used. I welded a small plate to the end of the fence arm, drilled a hole, and welded a bolt for an axle. Nut on the outside allows for wheel replacement.
I added a piece of the Ikea cutting board as a between the front support tube and the t-square head to act as a bearing. It glides like it is on butter! The 8020 people call this a “linear bearing”. They charge $40 for one.
Looking at the pictures reminds me how much I need to sand and paint the t-square
Step 3: Wood Fence Cover


Many table saw jigs use some kind of roller system and clamps to attach to a large fence. I decided to make a wood “cover” for the fence to allow use of other jigs. And it is sacrificial, so if I saw into it I am hitting wood, not steel. If it gets banged up I can replace it, or add another layer to the outside.
I was going to bold the cover with a lateral bolt front and rear. But this puts steel parts perilously close to the saw blade, and potentially a router blade (More to come on this later). I added a couple of pieces of 2” square tube with wood inserts to allow for fastening the cover. The cover is screwed into the wood spacer blocks.
Step 4: Tightener


Then I got lazy. I didn’t have a good idea for a tightening mechanism to keep the fence in place. This is why I didn’t like my old fence, remember? So for six years I have been using a c-clamp to hold it in place. Not precise, doesn’t square up automatically, is a pain in the butt; but it is fast. Fast forward.
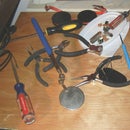
I have been shamed into finally doing something about the tightener. Some kind of exercise equipment was acquired as future building materials. It has a pair of ½” oilite bearings set in a steel brace. Cut in half and welded to the t-square this would be the basis for the tightener.
I installed a lever pivoting on a bolt run through the two oilite bearings to clamp the fence in place. The lever is a piece of angle iron (must have followed me home one day) with a plumbing nipple (welded (badly) to the back. The bolt runs through the oilite bearings and the nipple to provide the pivot. A spring clamp to allow quick, painless tightening of the t-square. After using it for a few days I noticed the sharp upper edge of the angle iron. I fabbed a little cap from scrap pieces of wood and a mahogany cap. The finishing touch.
Step 5: End Vice


The braces for the fence extend well beyond saws table top. This provides an open work area that is the same height as my main work bench and chop saw table. A leg and brace were added at the end to make it more stable. I have been using this as a left-side support when using the chop saw.
I read an article about someone making an end vice for his workbench, and his seems like the perfect place for it. First we have the structure of the table. I added a couple of pieces of square steel tube with evenly spaced holes as a mount system for some 2x4's. I think the tubes were from a sign post, but I disavow all knowledge of their origin. A piece of 1x6 was added as the inside surface of the vice. It was attached by inserting a piece of wood into the tube and screwing the face to it. This seemed sturdier in theory, so some blocks were glued on afterwards and screwed into the in-the-tube wood.
Step 6: Work Surfaces


I had a couple of pieces of 2x4 laying around, so I drilled holes in it to use carriage bolts to align with the square tube underneath. This gives me a great place to clamp down pieces being glued up. It is infinitely flexible. The 2x4 also has holes drilled down the center to mount dogs to aid in clamping.
I made a set of square dogs with an offset hole to allow for adjustments. The hole is 1" from one side, 1 1/4, 1 1/2, and 1 3/4 from the others. A carriage bolt is used to run through the 2x4. The bolts were salvaged, and will be cut to a more appropriate length. This aids in clamping. I will be making some Bernoulli clamps (thing sailing jam cleat) when I have a chance to use the laser blaster.
Step 7: End Vice


I read about and end vice in some on-line forum. The author was very happy with how he could buy some vice hardware and add it to the end of his bench. He ended up with a much more usable tool. I loved the article until I got to the part about the $360 for hardware. There has to be a better way.
First I found a pair of jacks from some foreign car in my "will be useful some day" pile. If I added a pair of nuts to each one I could make a bracket and have a long adjustable screw. But the threads were "acme", which means not available locally, and $8 - $10 per nut from Amazon or eBay, plus shipping. Second try was a pair of 1/2" pipe clamps attached to the square tubes. This sounded good, but proved to be impractical due to my table design. maybe you can get this to work on yours, but I think getting your hands on the loosening lever on the clamp may become a pain.
So, if I have two movable 2x4's on top and the adjustable dogs as a back brace, maybe I don't need a wide range, fast action vice after all. If I can get some plain steel (i.e. not plated) nuts I can weld up a cartridge to run a long threaded rod. Square ones would be a bonus, since they offer more surface area for the weld. Now a note on diplomacy. When you go to your local hardware store in search of parts, don't ask the man behind the counter if he has square nuts. Especially if you are in South Carolina and have a New York accent. It does not go over well.
Coastal Fastener had square nuts, and some 18" threaded rods on the surplus bench. I got six nuts and two rods for something under $8. I was a very happy, if embarrassed camper.
Get a couple of pieces of angle iron. Weld the nuts to it. Keep the nuts on the rod to provide perfect alignment. I went crazy in the welding, because I don't trust my ability. If this was professional produced it would probably have two spot welds per nut. I went all the way around all adjoining surfaces. And did a lot of grinding to hide my bad welding. I also made a couple of wing nuts by welding angle onto the last two nuts. This will be finished in wood to be more at home in the workshop.
The cartridges will be mounted to the square tubes and the rod will run through holes on each side of the face plate. But when I lined them up I found a pair of lag bolt heads right where I wanted my cartridge to sit. Get out the grinder again. The hardest part was holding the cartridges in place while welding them. Bar clamps to the rescue. I tore up a coke can to keep spatter away from the threads.
This is the end for now. More updates will be forthcoming. If you have ideas on this project, send them along. I may have missed something, and it will make life easier for anyone following my tips. Thanx for taking the time to read this.
Step 8: Bernoulli Clamps

I added some Bernoulli clamps to surface clamp workpieces to the workbench 2x4's. Complete instructions here:
https://www.instructables.com/id/Workbench-Bernoulli-Clamps/


