

Introduction: OwnCloud 9 on Raspberry Pi - DIY Dropbox


Everyone has data, and whether you store it locally, or pay for a cloud-based service, there never seems to be enough storage space to go around. In this project we are going to take control of our data using a small chip computer known as the Raspberry Pi. After you are done, you will have a cloud-based storage solution for a fraction of the cost a service like Google Drive or Dropbox.
Some features of OwnCloud:
- Free
- You are in control of your data
- An iOS and Android app to sync files, and more importantly, photos and videos, automatically
- Accessible from anywhere
EDIT: This Instructable has been superseded by my NextCloud Instructable, while OwnCloud is still available and relevant, I would HIGHLY recommend it over OwnCloud.
Step 1: What Do You Need?

For this project, you will need...
One Raspberry Pi, I would recommend the Pi 3 because it is the fastest model, and has a built in WiFi chip, all for the standard price of $35. The older models will work, (with varying degrees of success) but I do not recommend the Zero, it has no display outputs, and is substantially less powerful.
One SD card for the Pi, make sure to get the right one for your Pi, some require a Micro SD, while others take a full size SD card. For those of you with a Pi 3, you will need a Micro SD. It should be at least 8GB, otherwise, you will run out of space.
One data drive, I use a Seagate External HDD, this works extremely well, although I am sure that this tutorial will work with other models as well. Another option is to just buy a very large SD card, and store the data locally. The only disadvantage to this is that you will not be able to unplug the drive from the Pi, and be able to view the data from a computer, which I have found to be quite helpful.
Step 2: Install the Operating System

The first real step in this process is to get the OS installed on the Pi. To start, you will need a few things...
- Win32 Disk Imager, a program that will write the OS to the SD card
- The image file, this is the actual operating system
You can download Win32 Disk Imager from the link below
https://sourceforge.net/projects/win32diskimager/files/latest/download
You can download the Operating System by clicking below
https://downloads.raspberrypi.org/raspbian_latest
Once you have all of these files and programs, get them extracted and running on your computer, once that is done, look at Win32 Disk Imager. If you click on the little folder icon, it will pull up a window that lets you find the extracted image file. Select that file, and with the SD card plugged in, click write. Make sure that you are writing the correct drive though! It will ask you if you want to continue, and just click yes until the process starts. Once that finishes you are ready to move on to the next step.
Step 3: How to Acess the Pi?

To begin work on your server, you have a few options, the first is to just plug the Pi into a monitor and add programs through the terminal, but this can be a little tedious. What I do and would suggest for anyone is to access the Pi through SSH, which basically means that you are using a computer to access the Pi from your home network. Something to consider is that SSH only provides the terminal, there is no GUI, but this should not be a problem.
As a side note, there is a virus going around the internet known as Mirai, and it infects IOT devices, such as the Raspberry Pi when they are open to the internet and still use the default password. Because of this the Raspberry Pi foundation disabled SSH access by default in the latest OS release. I still have an old copy, so I have used that one to start with SSH enabled, and from there immediately change passwords and update the OS from the terminal. They claim that there is a way to enable SSH by placing a file titled ssh in the boot directory, and that will tell the kernel to turn it on, but I have not figured it out. This means that you may have to connect it to a screen, at least to enable SSH access.
For those of you who want to use a SSH client, I use PuTTY, which you can download by clicking the link below
https://the.earth.li/~sgtatham/putty/latest/x86/putty.exe
You access the Pi through this program by inserting the Pi's IP address , which can usually be found in your router configuration page, or by running the command ifconfig in the terminal, and then clicking Open. It will warn you of some stuff, but it is your Pi, so you can click yes. Make sure to change the default password if you are using this method.
Step 4: Install OwnCloud

This seems a little counterintuitive, but installing OwnCloud first installs the necessary programs to run a website. This means that you install one program and get more than one. This makes for an extremely easy install, you not only get OwnCloud, but you also get Apache, and the necessary programs that allow Apache to read php files.
To install OwnCloud, you must elevate to root. This can be done in the terminal by typing sudo -i
Next, you need to copy some things into the terminal.
First,
wget -nv https://download.owncloud.org/download/repositories/stable/Debian_8.0/Release.key -O Release.key
Then,
apt-key add - < Release.key
Next,
sh -c "echo 'deb http://download.owncloud.org/download/repositories/stable/Debian_8.0/ /' > /etc/apt/sources.list.d/owncloud.list"
Then,
apt-get update
Finally,
apt-get install owncloud
These commands will install OwnCloud, however I am not sure they will install updated versions as they are released. As of today, the 20th of December 2016, the latest version of OwnCloud is 9.1.3, and if you want to make sure that you are installing the latest version, you can find these commands at the link below
https://download.owncloud.org/download/repositories/stable/owncloud/
Step 5: Install Dataplicity

So, now OwnCloud is up and running but it is only accessible from your home network, to make it accessible from anywhere, we will use a service called Dataplicity. There are other options, but I have found that this works the best when compared to other services, like using a DNS service like No-IP, because they provide an unsecure connection, that you can secure with a self-signed SSL certificate, which your browser does not trust. Dataplicity is the best option.
Start by going to
and creating an account, then copy the code that it displays into the terminal of your Pi. Once the install is finished, go into the website, it will direct you to your Pi, click on it and you will see a terminal similar to what you have been using to edit the files on your Pi. If you want, you can use this website to edit your Pi from anywhere, not just your home network.
Take a look around, and click on the "Activate Wormhole" button, this creates a secure website for your Pi, and you can access it from anywhere. It opens to the Debian Default Page, which is completely worthless to us, which leads us to the next step...
Step 6: Redirect to Owncloud

As I said before, the Apache Default page is useless, so it would be really great if we could simply redirect you to the OwnCloud homepage instead.
Download the text file at the bottom of this step to get started,
Copy that long series of numbers in your web address for the Pi, and replace the x's with it. (There are three lines that you have to change), then copy this text.
Type in the terminal,
sudo nano /var/www/html/index.html
and a page with a lot of text should open. Delete it all, and paste in the text from the file you just modified. This will redirect you to the OwnCloud homepage.
Save and exit by following the onscreen commands. (The up arrow means "control")
Attachments

Step 7: Configure the Storage Device

So before you setup OwnCloud, we first have to setup the storage device to be used as the data directory. Whatever you do, do not do anything to OwnCloud through the website just yet!
**It has been brought to my attention that I did not specify a file system for the drive. For this tutorial and fstab permissions to work, the drive MUST be formatted as NTFS! I do not know the equivalent FAT32 permissions, and have run into problems when attempting to use that FS. Make it easy on yourself and use NTFS!
The first step is to make the data directory, you can do this by pasting the command below into the terminal.
sudo mkdir /mnt/clouddrive
Then, you should check where the drive is located in the system by typing,
sudo blkid
The output for the drive I am using is
/dev/sdb1: LABEL="Seagate Expansion Drive" UUID="5E2EC4372EC40A4B" TYPE="ntfs" PARTUUID="19216f8a-01"
And the important thing to notice is the /dev/sdx part. This will be important when we mount the drive.
Next, I have found that Raspbian automatically mounts my HDD, so to mount it where I want it (/mnt/clouddrive) i need to unmount everything by typing
sudo umount -a
Then I can mount it by typing
sudo mount /dev/sdb1 /mnt/clouddrive
When you do this, change sdb1 to whatever you saw when you input blkid for your drive, if it's the only drive plugged in to the Pi, it will probably be sda1.
So now the drive is mounted, but this is not permanent, if you turn the Pi off, it will have to be remounted. But fear not, there is a solution. Open fstab by typing
sudo nano /etc/fstab
Download the text file below to edit.
This will ONLY work if your drive is formatted as NTFS, otherwise, the Pi will think that is uses a different File System!
You will notice that I have one line that is different, and this is the line that I use for my fstab. You have two options...
- Leave the file as is, but replace the UUID with the UUID you get from running blkid, and then copying the new line into fstab on the Pi
- Or replacing UUID=############ with /dev/sdxx (your devlink from running blkid) and
then copying the new line into fstab on the Pi
The reason I give you these options is simple. The first one is the most complicated, but it will ensure that your drive always mounts to the same point, even if you plug in more drives. The second option is easy, but if you plug in more drives, it is likely that your storage drive will not mount to the same place, and OwnCloud will not know.
Attachments
Step 8: Setup OwnCloud

This next step is super simple, all you need to do is go on to your server's website, and it will ask you to create an admin account. Do that, but before you click finish, change the data directory by clicking on the "Storage and Database" button. If you guessed that you should change it to /mnt/clouddrive , then you are correct, change that, and then you can click finish. It will open to a first run wizard, which you can read over, if you want.
Step 9: Extra Parts

So at this point you are pretty much done, but there are some steps that I would highly recommend doing to make sure that your server is functioning at its peak.
- Enable a php accelerator, this will drastically decrease loading times for the pages of the site, and I can say that this is a must for anyone who wants to use this as a practical solution for their life.
- Enable external storage and install smb client, for me, I have files on my HDD, and I want to see them from OwnCloud, but when I open the site, they are not there. For people who have preexisting files on their drive, this is a huge time saver.
- Setup hdparm, this is program that automatically spins down your hard drive when not in use, for anybody using an external hard drive, this will undoubtedly extend the live of your drive.
- Expand the upload limit, who doesn't want to upload bigger files? Remember if you have to put a large file on the server, you might be able to plug the drive into another computer, and move it from there before plugging it back in.
To enable the php accelerator, simply copy this into the terminal
sudo apt-get install php-apc
To enable external storage, simply go to the apps pane, this is under the dropdown menu at the top left. And go to "Not Enabled" Find External Storage Support and enable it. Now under the admin tab you can add external storage mounts. For me, my files are located in the same data directory my uploaded files would be, so I would add a local storage mount, with the location /mnt/clouddrive/name/files
If you also have preexisting files, do this, and replace name with your admin username. Once the files show up, you can even delete the mount point, and it will still recognize them!
To setup hdparm or any other spin down service, all you have to do is follow this tutorial, it's easy, it makes sense, and I don't think I can explain it any better, if you want it, it's here.
http://www.htpcguides.com/spin-down-and-manage-hard-drive-power-on-raspberry-pi/
One side note on that, I set my drive to turn off after two minutes, which works pretty well, I've had no problems with it, and see no reason for it to wait 10 minutes to turn off. That is a value of 24 in the spindown_time variable, if you wanted to know, if you have problems, let me know, I am tweaking my settings now, but if you have trouble I'd be happy to help.
One more thing, the app seems to automatically load when I get home, a little hard to explain, but on iOS, the device picks up that I am home, and almost queues the app in the background, which causes the drive to spin up as long as I am connected to the internet, I'm trying to get to the bottom of it now.
Finally, expanding the upload limit can be done from the admin page, I have found that setting it at 1.95 GB makes it default to 2GB, the highest, but when the input is 2GB it doesn't work.
Step 10: Tips for Sucess

So, now that you have finished your server, I will leave you with some tips, with the advent of Mirai, you may want to consider adding a firewall to your Pi, I do not use one, but it would be a great security measure if you don't mind the slower speeds. A good one can be installed by typing
sudo apt-get install ufw
and then
sudo ufw enable
be warned, it will disrupt all SSH connections, so make sure to run
sudo ufw allow ssh
Additionally, don't be afraid to try things, you just built a home based cloud server, and if it breaks because you are trying to make it better, so what? You can make a backup disc image just in case you break anything, or even start over. It's always repairable. Leave comments below on what you thought of this project, things that you did to make it better, as well as overall feedback, it would be greatly appreciated.
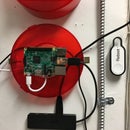
Lastly, make it look good! If you are using this as a real life solution, make sure that it has a permanent place, somewhere you won't accidentally step on it. I've mounted mine to the wall of a closet, and that's where it lives, in fact, I'll even include a picture of what it looks like, so anyone who wants an example can see one.
If you noticed, I have some extra lights on my Pi, these are USB flash drives that I stripped down, when plugged, in they have some lights that adds a little bit to the whole look, there are so many ways to make it look good, let me know what you did!
Congratulations on completing this project, it is definitely not easy, and for Linux beginners, this is something to be proud of. I made this Instructable because when I started on my journey to build a cloud server, there were no good, reliable tutorials, they all had very little to them, and were not helpful. Overall, it took me a year to finally finish, and to have a product that I am satisfied with. I felt like it was my duty to help people in the same place that I was. Let me know if you have ANY questions!
P.S. I would HIGHLY recommend the iOS app to complement the server, it is well worth the $0.99 because it automatically uploads pictures that you take to the server. I cannot speak for the android version, but from what I have heard, it is much better than the iOS version.

Participated in the
IoT Builders Contest

Participated in the
First Time Authors Contest 2016


