

Introduction: PART 1 - Send Arduino Data to the Web ( PHP/ MySQL/ D3.js )

The objective of this project was to use and Arduino to read a sensor and send the values to the internet, to be stored in a Web Server and displayed.
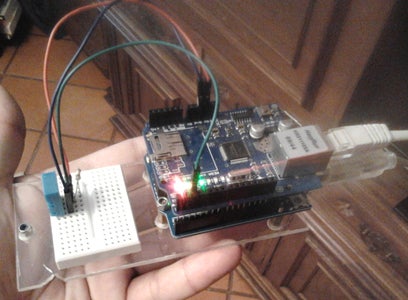
It consists in an Arduino Uno with an Ethernet Shield and a DHT 11 temperature / moisture sensor, acting as a Web Client. It sends POST requests with the readings to a web server running a custom Database and PHP application.
The PHP app stores the values when new POST requests are received and also serves the pages that display the information. In Part 2, i will explain the use of D3.js to dynamically show the data stored in the Database.
The Arduino it's configured to use a Dynamic IP Address, in order to solve any conflicting IP issues, and also to work easily with most home networks/routers.
This project is divided in 2 main parts:
PART 1- Arduino Web client Application: reads the sensor values and sends them to the webserver.
- PHP/MySQL Application: handles the POST requests that are sent to the server and serves the pages to clients who connectPART 2
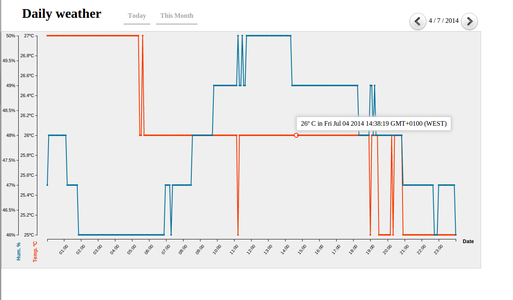
- Data Visualization: The PHP application will use the Javascript Framework D3.js to display the values stored in the DB with graphics. It will allow to navigate to the past days to observe the readingsREQUIREMENTS
HARDWARE
- Arduino Uno
- Ethernet Shield (eBay clone)
- DHT 11 sensor
- breadboard
- 10k Ohm resistor
- USB cable
- Ethernet cable
- wires
- piece of acrylic
- PCB spacers
Software
- You need access to a web server ( can be from a free hosting company ) with capability to run PHP applications and also to create databases. ( possibly cPanel with phpMyAdmin)
RESOURCES
Request Maker: This online tool is very useful to test the PHP application. You can simulate the POST requests that will be made by the Arduino and check if everything is working well.
Step 1: Arduino Web Client + DHT11 Sensor
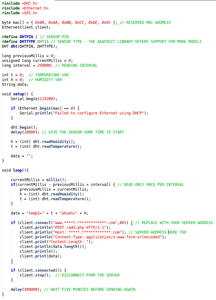


The code is very simple, all the important section are commented. If you have any doubt feel free to ask.

Step 2: PHP / MySQL Application

In this second part i will explain briefly the PHP application and the database. The database is used obviously to store the sensor readings, so that they can be accessed later. It's a very simple DB, with just one table with 3 columns. It stores the time stamp and the corresponding temperature and humidity values.
	CREATE TABLE tempLog (
		timeStamp TIMESTAMP NOT NULL PRIMARY KEY,
		temperature int(11) NOT NULL,
		humidity int(11) NOT NULL,
	);
The PHP application consists of 3 files:
- connect.php: this file is loaded every time we need to access to the database. It's loaded in the beginning of the almost each file. It contains a function that returns a new connection to be used by the PHP to execute query's to the DB. You need to store the DB configs (hostname, database, user, password) in this file.
- add.php: when the Arduino sends POST requests to the server, is to to this page. The PHP receives the values sent in the request and executes an insertion query with those values.
Sometimes you need to change the permissions of this file (should be 644), because it might be protected to allow only executions from the localhost.
- index.php: this is the website landing page. It displays the values that are stored in the database. Right now, it will display all the values in a single HTML table, just to show that works.
So, this concludes the first part of this Instructable. Feel free to ask questions about anything related, i'm glad to help.


