

Introduction: PVC Chicken Waterer
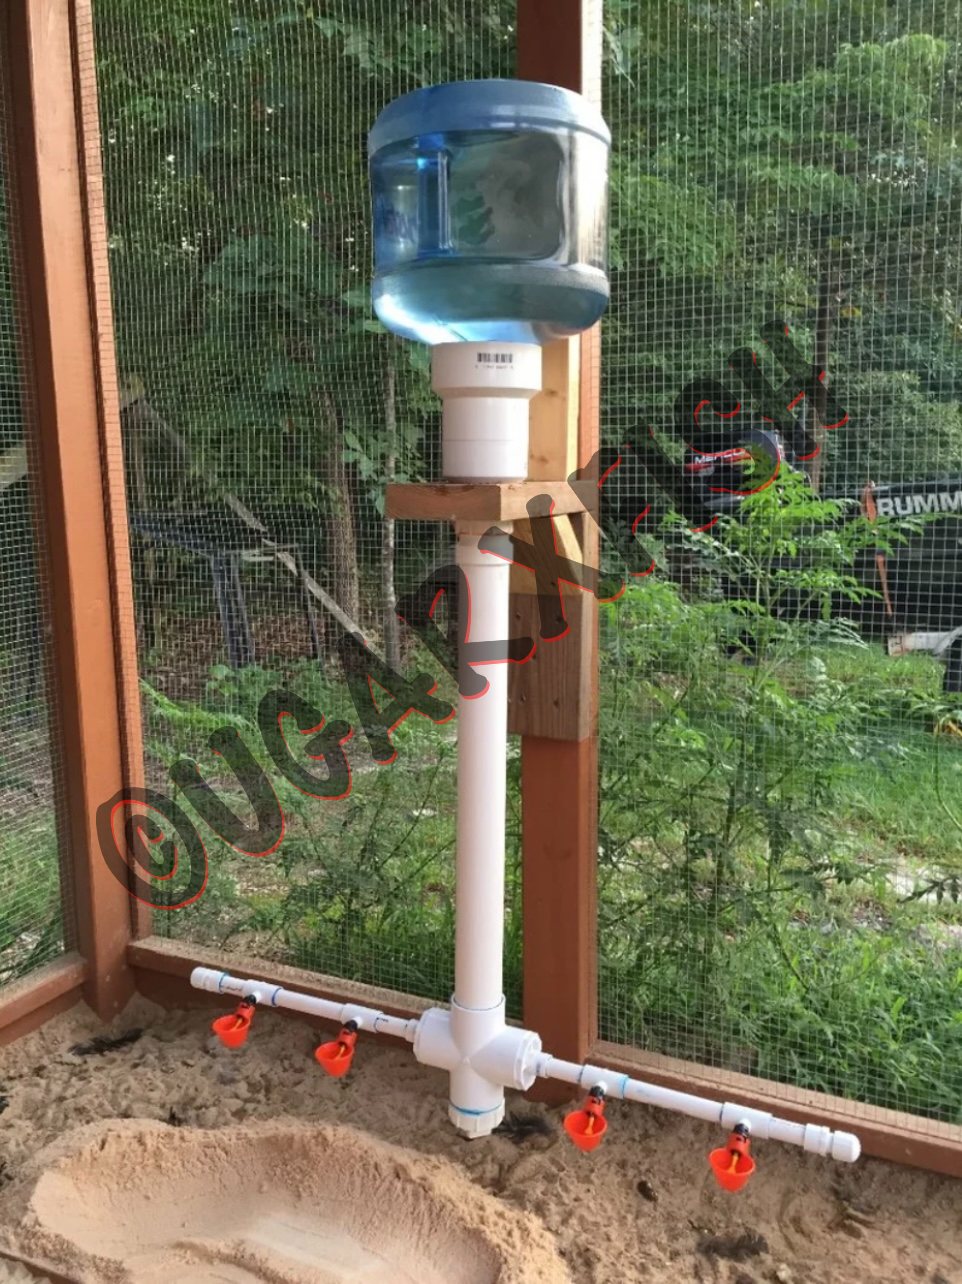


An easy way to keep your flock watered and not have a mess with overturned water containers!
Step 1: Supplies Needed


Here is a list of supplies that you will need for this project. I did add a few pieces to the pipes to make it easy to take apart and clean, but they could be left off to save money and to simplify the project. I will explain each addition throughout the project.
4 BeakTime Watering Cups (purchased through BeakTime.com)
2 foot piece of 1/2 inch PVC pipe
2 foot piece of 2 inch PVC pipe
3 inch piece of 3 inch PVC pipe (I had extra in my scrap pieces from previous projects)
4" X 3" PVC coupling
3" X 2" PVC coupling
4 - 1/2" adapters (male end threaded)
2 - 1/2" threaded caps
2 - 2" cleanout drain plug adapter
2" cleanout drain plug (threaded)
2" trap adapter fitting
2" 90 degree Cross Tee
2 - 2" X 1/2" Bushing
Pipe Joint Compound
PVC Cement
3 gallon or 5 gallon water jug (I chose a 3 gallon)
3 foot 2x6 lumber (I just used some scrap pieces I had)
Total cost of project is around $55.
Step 2: Cut PVC Needed


I used my compound miter saw to cut the PVC used in this project. It give nice, clean edges and is a whole lot easier on the arms. Just remember to keep steady pressure on the pipe and the saw blade and move slowly. WEAR GOGGLES!!! :)
Cut the following pieces
1. 1/2 inch pipe - cut 2 pieces 6" long and 4 pieces 3" long
2. 3 inch pipe - cut a 3 inch section
While you have your saw out, cut the wood needed for the bracket. I cut 2 pieces of 12" long. Also, you need a 6 inch piece, with 45 degree angles on each end to make the support beam. The 6 inch length will be the long length of the board.
The girls are always curious when the tools come out!
Step 3: Put the Tee Together With the Vertical Shaft


First, assemble the tee that will be at the base. Use the PVC cement to put the 2"x1/2" bushings in the left and right side of the tee. Then, cement one of the cleanout adapters to the bottom opening. Use joint compound on the cleanout plug and screw it into the cleanout adapter. Next, connect the 2" pipe to the top opening (using cement). At the top of the 2" pipe, glue the 2" trap adapter fitting on. Set this aside to cure while you work on the horizontal beams.
Step 4: Horizontal Beam Construction

Well, in the hurry of trying to get this together before the kids needed to be run here and there for sports practices, I forgot to take the detailed pictures of the construction of the horizontal beams that I had planned. UGH! We will try to make it with this one picture and a bunch of verbiage.
Start with a 3" piece of 1/2" pipe and glue one of the Beaktime cup couplers. I chose to order the ones with the 1/2" PVC couplers, but they have other ways to add them to your system. This is just the best way for ours.
Next, add the 6 inch piece to the other end of the cup coupler. The next piece will be another cup coupler, followed by another 3" piece of pipe. Make sure to line up the cups so they are straight.
Repeat these steps to construct the other side of the beam. On the outside end of each beam, install the 1/2" adapters and screw on the plug using the joint compound.
Add the other two 1/2" adapters to the bushings on the left and right side of the tee using joint compound. Once those two are in place, cement the left and right side horizontal beam making sure that the cups are lined up and that the cups sit flat so that water doesn't spill out easily.
Step 5: Top Half Construction
Another picture opportunity missed! Sorry! :)
To connect the 4"x3" coupler and the 3"x2" coupler, use the 3" piece of 3" PVC pipe and secure them together with cement. You can use a longer piece to give the top more height, but I think the closer the jug is to the wooden bracket, the less likely you will be to have the jug fall off or be wobbly.
Add a cleanout adapter to the 2" opening of the couplers with glue and allow all the pieces to cure for 2 hours or whatever the recommendations of the pipe cement is that you are using.
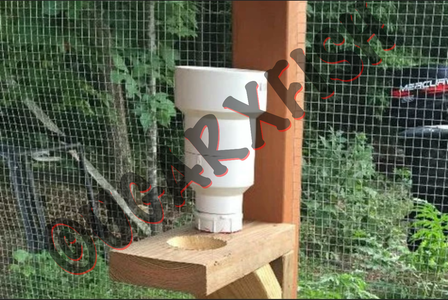
Step 6: Bracket for Mounting


You will need to determine where the neck of the water bottle will be on the platform of the bracket. Drill a 3 inch hole at that spot so that the cleanout adapter on the top piece sits easily inside the opening. It will need some room to be able to screw the cleanout adapter onto the trap adapter that sits atop the bottom shaft. I used a jigsaw to cut the opening, however, I would recommend a hole saw if one is available.
Disregard the first hole drawn that has the X in the middle. I chose not to use that one. I decided to push it a little further out so that I had enough room to have the angle support a long as possible. I wanted to make sure that the bracket was strong enough to withstand the weight of the water bottle when it is full.
Screw the top piece to the vertical piece that will attach to the stud or other area that you plan to install the waterer. Next, add the support piece to the bracket with screws. Start your screws in the vertical board so that it is easier to attach once the height is determined for the bracket.
Step 7: Hang the Bracket

To determine the height of the bracket, drop the top section into the hole of the bracket and screw the bottom portion to the top. When the height of the watering cups is determined, mark where the top of the bracket needs to be. Disconnect the top and bottom portions of the waterer and set aside. Mount the bracket securely to the site. I mounted mine to a stud in the run area of our coop. I centered the 2x6 board on the 2x4 and it worked great. I also am installing a 2x4 piece to run behind the water jug to take up the space between the 2x4 stud and the jug. This will also give me a extra place to put eye bolts and use bungee cords to hold the water jug to the stud. (This is not in the picture as of now, but will update the post when I get it done).
Step 8: Finish It Up!

Using joint compound, connect the top and bottom portion snuggly. Check all joints to make sure that are tight and ready for water. Open the top of the jug and insert the neck into the top. Watch for drips and tighten where necessary.
Note: I have found that my chicks like to walk behind the cup beam, sometimes causing the waterer to twist. I will be adding a new bracket with attachment points to keep this from happening. I hasn't caused any problems, other that me having to go out and twist it back into place. Just want to make sure it is safe as can be. I will add this step and pictures once I finish it.
Hope you find this helpful for your flock!
~Julie

Participated in the
Outside Contest


