

Introduction: PVC Training Spear


As every average numbskull knows, to become a truly mighty warrior, one must hone one's skills not only in combat; but also off of the battlefield. In other words: they must train with their weapons. (duh)
And train often. (so far rather obvious)
Unfortunately for the aspiring knight however, there are some difficulties. (as usual) (are there ever not any difficulties?) To train effectively with ones weapon, it follows (logically) that one must, well, train with one's weapon. (who'da guessed?) Bladed weapons in particular (swords, spears, halberds, axes, and the like), are actually much more fragile than most people (average numbskulls) believe. Edges dull. Blades chip. Swords break. Axe shafts split. Tips snap.
Random sidetrack containing a mini-rant and some tidbits of historical jargon that no one cares about:Contrary to popular culture, swords CAN'T cut through armor. When armor and sword smash into each other, the armor doesn't give way. The sword does. Which btw, is why maces, warhammers, and giant pole axes were quite popular. (You should know all this, you average numbskull.)
Point is; even perfectly made weapons will not stand up long under heavy use. Which makes quite clear (crystal. clear.) the fact that you don't want to be training with your weapons often, as it will cause them to break. Fail. Get damaged. Etc. You need a training weapon. A weapon similar enough to the real thing to hone your skills effectively, yet cheap enough (or just tough enough), that you don't have to worry about damaging it.
Here's how to make a super cheap (and pretty dang easy) PVC training spear.
Coincidentally, it makes a very nice throwing spear. (for those of you to whom plain knife and tomahawk throwing has become old hat)
Step 1: Video
Watch me vid for de full experience.
Step 2: Stuff U Gonna Need
Materials:
-About 6 feet of 3/4" (or 1") PVC pipe
-10" of 1" diameter PVC
-Approximately 10" of metal pipe, with a small enough diameter to fit inside the PVC shaft (when stretched)
- A bolt.
- Spray paint
Tools:
- Angle Grinder
- Drill
- Heat gun (could also plausibly use a stovetop if u r nuts)
Step 3: Cut Metal Pipe to Length


I believe my section was somewhere around 10 inches long. I honestly don't know exactly, it isn't super important.
Whatever length spear head floats your boat.
Step 4: Flatten Pipe


Logically, the pipe doesn't look much like a spear head. It is rather un-spearlike, with no sharp edges or any other dangerous-ness. It would make any Mother proud, really.
Better fix that.
Not that this is going to be a very edgy spear, it is only for training, after all. But it does need something like a point on it, otherwise it won't do any sticking. And I love me a sticky spear.
So pick you up a big hoss of a hamma and start pounding. Nothing scientific about it, just make one end flat.
Step 5: Come Up With a Scary Shape. to Frighten De Liberals.


Any shape will do.......
Really. As long as it comes to a point, it will do. Not looking for a REAL weapon here. It just has to be able to kill cardboard.
Step 6: Cut Out Scary Shape. (to Frighten De Liberals)


Not much to explain here.........
Well, besides me FANCY SHMANCY super slick GIF!!! (Cause all the cool authors are apparently using gifs in their ibles now.)
(annoying really. More work for me.)
Step 7: Shinify

I used a wire wheel in the drill to put a BEUTIMUS shiny on the head.
Step 8: Spififying


You could leave this part out and the spear would function fine, but it is the details that truly separate the sheep from the goats.
(i'm a goat btw. sheep are dumb) (for real. i hear sheep are less intelligent even than chickens)
Hey, i'm just sayin, if it can run around with its head cut clean off........
#chickens r dumb
I got sidetracked again. Here's the real step:
The REAL step:
(4 real)
Take that roughly 10 inch section of 1" PVC and heat it up till is soft. Then slide it over the end of your 3/4" spear shaft, and down several inches to get it out of the way. We'll heat and slide it back up into the correct position after the head is in place.
Step 9: Some Assembly Required.


Heat up the end of the shaft until is soft and pliable being careful not to go too far, you don't want to burn the PVC. Depending on the size of metal pipe you are using, this step can be tricky. My fit was very tight, and I could barely get the pipe to go in. Take your time.
After sliding the pipe into the pipe (hehe) a few inches, use a wet rag to cool the PVC down.
Step 10: Spififying Pt 2


Now that we have the head in place, we can go ahead and heat up that 1" PVC, and push it up into place just below the head. Cool it down with a wet rag and it won't be going nowhere.
Step 11: Makin It Secure As Heck.


Now it isn't totally necessary, but just to be extra sure that the head won't come flying off before sun starts to die and expands and obliterates all life on our planet (before completely destroying it) and then shrinking down into an extremely dense metal ball called a neutron star i'll go ahead and bolt the head to the PVC shaft.
(can't be too safe)
In all seriousness, just the friction fit between the PVC and the head is more than enough to keep it in place. It isn't going anywhere. Bolting it is really overkill.
Step 12: Dandifying


Just dandy, it will be. After a slick paint job of course.
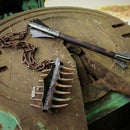
Step 13: Training Spear!!


Ooh!! Another GIF! (how shmancy)
Now you have a sweet medieval-ish training spear with which to practice long forgotten fighting techniques that no one cares about anymore. Enjoy.
Also, you can follow me N Brokk'sMake It Medieval-ish Instructable series here in this collection: https://www.instructables.com/id/Make-It-Medieval-Ish/
Follow us as well, that would help a bit. I build lots more than random medieval weapons. Check out all my builds on YouTube: https://www.youtube.com/channel/UCszMFa_qz5weFBoQ7olwlGw/videos?view_as=subscriber
Anywho, thanks for reading this instructable, and I hope to catch you next time. See ya.
Jake.


