

Introduction: Pallet Desk With Drawers


A little bit before Christmas my girlfriend asked me to make a desk for her. She came up with the dimensions and it was my job to get it done. Unknowing to her, she did not realize I was making it. When making it I didn’t want the top to just be a few boards so I decided to make the top out of a whole bunch of slats that I glued together. After making the top with the slats I decided I wanted to make as much as I could out of the slats. It seems like a good Christmas gift because she loves it.
Step 1: Gathering the Tools and Materials


For this project you will need the following tools and materials:
Tools
- Table Saw
- Miter Saw
- Planer
- Clamps
- Chisel
- Orbital Sander
- Sand Paper
Materials
- Pallet wood
- Wood Glue
- Wax paper
- Para-cord
Step 2: Cutting the Slats


When I was thinking of how to build this desk I first thought about making a bunch of slats for the whole desk and gluing them all together. I first began by choosing all the lumbar that I was going to use. I chose the boards that were thicker and wider so I could get more slats out of them. To make the slats I had to square up one side of the boards on the table saw. To do this I moved the blade close to the fence and ran all the boards through. I should have used a sacrificial fence for this step, but when I tried it wouldn’t cooperate. After one edge of the boards were strait I moved the fence to the one inch mark and made a bunch of slats that were one inch wide with varying thicknesses.
To get them all to the same thickness I used a planer. I ran the slats through until both the sides had nice finishes to them, and until all the slats were the same thickness. This planning made a lot of sawdust so try to do this outside or make sure you have a good dust collection system. The final dimensions came out to be half an inch wide and a little over half an inch thick. With a lot of these slats made I could move on to making the actual desk.
Step 3: Making the Top


The top was simple to make but took a long time. I started making the top by cutting the slats
to varying the lengths. I then combined these cut up slats so the total length was a little over 40 inches. When combining the slats I tried to intermingle the different types of wood so the colors would contrast. It took a while to design and cut the whole top of the table. After top was cut it was time to glue.
I laid down a few layers of wax paper so the glue wouldn’t stick to the surface and began applying the glue with a brush. Once all the slats were glued they were clamped until the glue dried. I glued the top in two different sections so it would still fit in the planer. Once the two sections were dried I removed the clamps and used a chisel and sand paper to remove the worst of the glue. I used the planer again to remove saw burn marks, excess glue, and to level slats that were sticking out. After the sections had the same thickness I glued and clamped them together forming the top. After it dried I again used a chisel and sandpaper to remove the excess glue. Finally I used the table saw to square the ends and to cut the top to length. With the top now complete I could begin making the rest of the desk.
Step 4: Making the Legs


I wanted the legs to be made up of four slats glued together. I began making the legs by gluing and clamping two slats together. I made twelve of these double slates. After the glue had dried I used the chisel and sand paper to remove the excess glue. I then glued two double slats together to form one lag. In total I had six legs. I removed the excess glue and cut them all to the same length that the table would be at.
Step 5: Making the Skirt


To connect the table top to the legs I designed a skirt. The legs hold the skirt up and the skirt holds the table top. To make the skirt I took a board that had rounded over edges and removed one edge using the table saw. The edge that was flat will be flush with the table top. Next I cut the board into more manageable lengths and set the table saw blade to 45 degrees. I then cut the boards to the correct length to go around the table top. I placed wax paper over the table top so the skirt and table top would not glue together. Next I glued the edges of the skirt together and taped them until they were dry.
I needed to add lip on the inner edge of the skirt to hold the top up. To do this, I cut a few slats so they were shorter than the width and length of the table. I then laid wax paper around the edges of the top. I then glued the slats onto the skirt and clamped them together till they were dry.
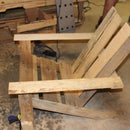
Step 6: Connecting the Legs to the Skirt


Next I needed to create an area where the legs would connect with the skirt. 4 of the legs would connect at the corners and the other two would be a little off center. To connect the legs at the edges I first cut a board to the thickness of the leg. Next I cut another board to the thickness of the leg and the thickness of the other board. If this doesn’t make sense refer to the images. I put the leg where it would go, in the corners, and glued the boards to the skirt. Making sure not to glue the leg to the board. After the boards were clamped I removed the leg. I did this so the leg would not accidentally glue to the boards. I repeated this step 3 more times at the other corners.
Next I had to make an area for the middle two legs. To make this slot I cut to boards the width of the leg, I than had to notch them so they would mate nicely with the skirt. I had to cut another board that was as long as the thickness of the leg and the thickness of the other two boards. I then measured where the leg should go and glued the boards around the leg, and clamped them in place. I then removed the leg and let it dry
Step 7: Making the Frame


Making the frame consisted mainly of making dado cuts until the slats fit in them properly. To make the frame, I wanted to space the slats 10 inches from each other. I set the saw blade to the thickness of the slats and began cutting the dados in the legs. I used a regular saw blade and after each cut moved the fence over a little bit till the slat fit securely in the cut. After I cut all of the legs I made sure it would go together. I than cut the second dado 10 inches higher and then made sure that all the cuts lined up again. Make sure that that you cut the dados in the correct spot, there were a few times when I caught myself about to cut in the wrong area.
After this it was all guess work as to how big I wanted the drawers to be. I had some ideas as to how large I wanted the drawers to be so I began cutting dados that far apart. Once the dados were cut I made sure everything lined up. Next I cut the slats to the correct lengths and began clamping and gluing the frame together.
Step 8: Drawer Slides and Stops


To make the slides I began by cutting some boards to the depth of the desk. Next I cut the boards in half and sanded them smooth. Finally I glued the drawer slides to the slats and clamped them in place.
To make the drawer stops I cut a few slats to the depth of the desk. When they were the corret length I glued them above the sliders. It’s kind of hard to explain where it goes so if you are confused look at the photo.
Step 9: Making the Drawers.


To make the drawers I measured the openings, and the depth of the desk. With the dimension known I started cutting the sides to the correct length and height. On the sides I cut a dado. This dado is to hold the bottom of the drawer in place. Next I cut the back, and bottom of the drawers to size. With the back, bottom, and sides cut to the correct dimension I glued them in place. While that was drying I clamped two boards together to make the front. When both pieces where dry I glued them together forming the whole drawer. I made the other two drawers in a similar manner.
To make the drawer pull I drilled a hole in each side towards the front. I also drilled two holes in the front of the drawer. I took some para-cord and wove it through one side then through the front and finally to the opposite side. I burnt the end so it wouldn’t fray and tied it in a knot. I then cut the other side to length and again burned the end. Next I tied a para-cord in a knot and the drawer pull was finished.
Step 10: Finishing the Desk


All that was left to do was sand and stain the desk. I started at lower grit sandpaper and worked my way up. This took forever! Once I was satisfied with the surface condition I broke out the wood stains and did some test spots comparing Danish oil to golden oak. I like golden oak better so I got staining. I waited the recommended time and once it was dry I gave it a coat of polyurethane. Once it dried I sanded it lightly with 220 grit sandpaper and used some steel wool on it also. I gave it another coat and once it was dry sanded it again with 220 grit. Finally It was finished.
Step 11: Looking Back


Looking back I underestimated how long this project would take and should have started earlier. I also realized just how long it truly takes to sand, which I should have spent more time doing. My dad also told me a better way to make the drawers which would have been better. Other than that I really like the desk and think it looks great. If you have any questions feel free to leave them and I will try to get back to you as soon as possible.

Participated in the
Homemade Gifts Contest 2016

Participated in the
Tables and Desks Contest 2016

Participated in the
Epilog Contest 8


