

Introduction: Pan / Tilt Face Tracking With the Raspberry Pi


With some effort I have found that controlling two servo motors to allow a webcam to pan/tilt while tracking a face in real time using the raspberry pi not as impossible as it may at first seem. With some careful tweaking and code optimization I was able to allow the pi to keep up with two servos while running OpenCV face detection at 320x240 looking for a right profile,left profile, and frontal face and adjusting the servos faster than once per second.
Step 1: Acquire the Hardware.

Things needed:
A raspberry pi -- Model A will work fine, I have the original Model B which has the same specs as the new Model A (minus network).
A pan/tilt bracket
Two Servos
A GPIO Ribbin Cable
A Pi-Supported Webcam -- I used a Logitech C210
Assuming you already have a raspberry pi and a webcam the additional hardware will run you about $25
Step 2: Get Your Raspberry Pi Ready.

Make sure you are using the Official RaspbianOS (the hard-float version) and that it is up to date.
You may want to overclock your raspberry pi. I did to 800mhz. The higher you go the faster the facial recognition will be, but the less stable your pi may be.
Install OpenCV for python: sudo apt-get install python-opencv
Get the wonderful servoblaster servo driver for the raspberry pi by Richard Hirst: here
You can download all the files as a zip archive and extract them to a folder somewhere on the pi.
To install the servo blaster driver open a terminal and CD into the directory where you extracted the servoblaster files
run the command: sudo make install_autostart
EDIT: The command for recent versions of ServoBlaster is just: sudo make install
You may want to make servoblaster time-out and stop sending signals to the servo after a second if it's not being moved.
to do this add the following line to /etc/modules: servoblaster idle_timeout=1000
start servoblaster with the following command: sudo modprobe servoblaster
The next task is to get the camera functioning as expected:
First of all, thanks a lot to Gmoto for finding this and pointing it out, it was the last piece of the "pi" to get everything running smoothly; you have to adjust some parameters in the uvcvideo module to get everything running well.
Namely, run these commands:
rmmod uvcvideo
modprobe uvcvideo nodrop=1 timeout=5000 quirks=0x80
You will need to run that every time you reboot if you plan to run the face tracking program, or alternatively add the parameters to /etc/modules like you did with the servoblaster time-out tweak.
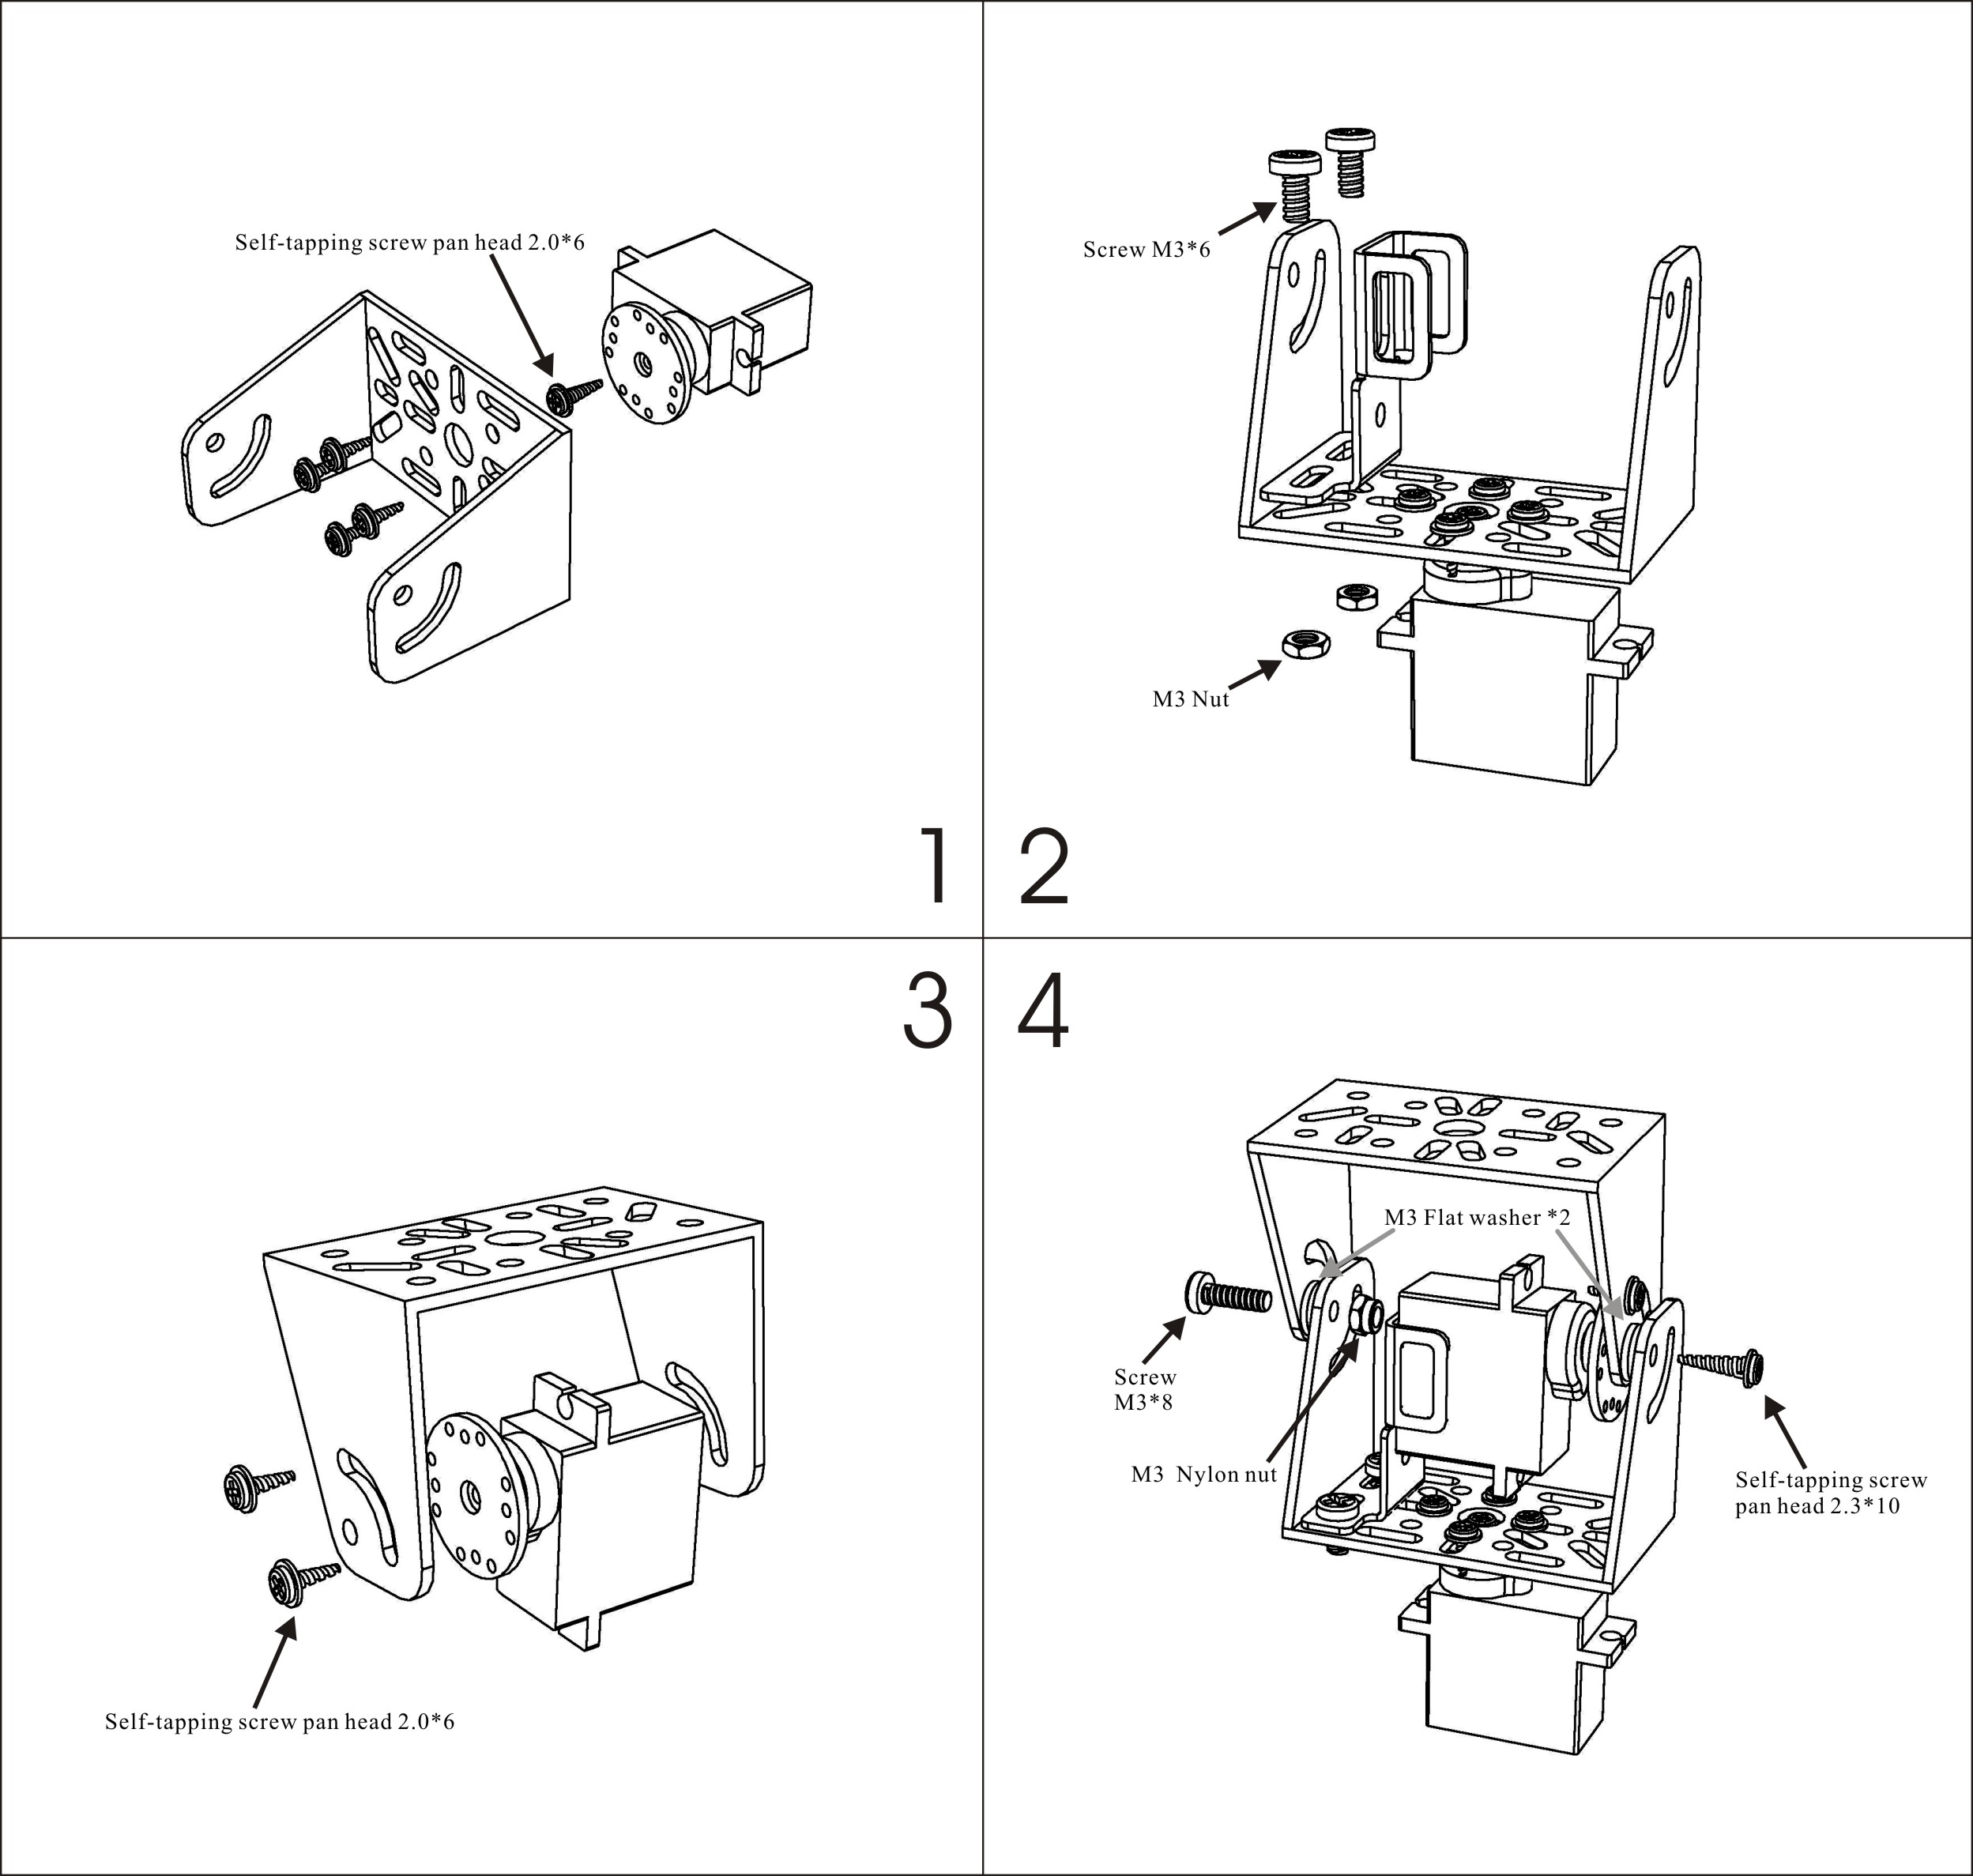
Step 3: Put Together Your Rig

Build the pan/tilt brackets as per the instructions and attach the servos.
Attach your camera to the top of the bracket (i just used tape) and plug it into your raspberry pi usb port.
I was able to power it without a usb hub, but you may want to get a powered usb hub and go through that.
Step 4: Connecting the Servos

Servoblaster considers servo-0 to be whatever is connected to GPIO 4 and servo-1 is whatever is connected to GPIO-17.
Servos have three wires, one is red which is Vin/positive, one is brown or black which is ground/negative and the other is control.
using the ribbon cable (and in my case some connector wire jammed into the holes) connect the control wire for each servo to the correct pin. The code assumes that servo-0 will control the left-right movement and servo-1 will control the up-down movement of the camera; so connect them this way.
Now it would seem to be common sense that the Vin for the servos would come from the 5v pins from the GPIO and the ground for the servos would come from the ground pins of GPIO, but this did not work in my case because I used a larger servo for the base. The large servo pulled more power than the pi was willing so supply. I was, however, able to power my smaller tilt servo with no issue. Also, Richard Hirst who made servoblaster seems to imply that he can drive multiple small servos with the GPIO 5v. I have also learned that there are some fuses in my version of the pi that were later removed related to those power pins. My instinct tells me that you could power two smaller servos from those pins on a newer pi. If you cannot, this is what you will have to do:
You will need some kind of external power source which is able to handle a heavy 5v-6v load: I used the one built into an arduino, but any 5ish volt power source should do; the servos are rated for up to 6v. The 5v pin on a computer power supply, a 5v-6v wall charger, some batteries in parallel; whatever floats your boat. Once you have your external source just connect the positive and negative lines from the servos to the positive and negative side of your power source, then connect the ground (negative) from your external power source to a ground pin on the raspberry pi GPIO.
Step 5: Run the Program
Here are some videos of mine in action.
Attachments

Step 6: Reflect and Learn

Yes, how fast, it creates two subprocesses one for each servo, when a servo is told to move, a speed is provided. The subprocess loops and increments the servo position by one with each pass- until it reaches the desired position. How fast it loops is based on the provided speed parameter. This allows you to move the servo motors at various speeds even though the motor speed is not adjustable. I originally implemented this with threads, but python proved to have very poor handling of threads at high CPU loads.
Just like pretty much any open source facial recognition application, we are using OpenCV's haar-classifier cascade to search for patterns matching those found in the included FrontalFace.xml. But there there seem to be some poorly understood and documented aspects of the parameters of the cvHaarDetectObjects function which have a major impact on the performance of the program.
The first parameter is of course the image. You pass the function the image you want to search for faces within, there seems to be some confusion even at this step - people seem to think that by first converting the image to grey-scale, the processing will be faster. A simple benchmark will show that this is untrue - in fact it will make the process slower because you are performing an extra step. People also seem to think that first scaling the image down will make things faster - this makes intuitive sense, because now there is a smaller image to search for a face within, but this is not the most efficient method, which brings me to the next parameter,
Scalefactor -- the forum dwellers seem to give suggestions about what this should be set to without giving much explanation about what it is. To fully understand, you need to know how OpenCV detects faces:
Watch that video and pay special attention toward the end. Notice that a square moves from top left to bottom right. Each time it moves, it looks for a pattern within it -- in this case a face, but with OpenCV that pattern could be anything. See how it makes one pass and gets bigger, then goes at it again? The amount that it increases in size with each pass is the scalefactor. If you set it to 1.1 it will get 1.1 times bigger (10%) with each pass. 1.3 would make it get 1.3 times bigger with each pass -- 30%. Obviously the quicker it is growing in size, the faster it will complete, but at the expense of possibly missing a face that was there.
The next parameter has no impact on performance so far as I can tell. MinNeighbors tells the program how picky to be about what it considers a match. The function is looking for patterns and checks if those patterns match its pattern database - an xml file. I think the default it 3 -- which means that if there are 3 patterns inside it's square where it is looking, which match patterns found in the xml file, then consider it a match. I set mine to 4. The higher you set it, the more sure you can be that when it says it found a match it's right. However, set it too low and it thinks everything it sees is a face. Set it too high and it will have trouble catching actual faces.
The next parameter Flags; these are boolean values that you can enable to tweak things:
one is CV_HAAR_DO_CANNY_PRUNING. This flag was designed just for faces; it tells the function to skip searching over areas with sharp edges... because faces generally do not have any sharp edges. (See attached image, sometimes they might...) This speeds things up depending on the backdrop.
another is HAAR_FIND_BIGGEST_OBJECT this tells the function to only return the largest object it found.
another is CV_HAAR_DO_ROUGH_SEARCH which tells the function to stop looking once it finds something, it's meant to be used with HAAR_FIND_BIGGEST_OBJECT and greatly improves performance when you are only trying to find one face.
The last two parameters are important, or at least one of them is - they are MinSize and MaxSize. A common method for speeding up the search seems to be to scale down images, if you want to double the speed of the detection of a face in an 800x600 image, scale it to 400x300. The problem with that logic is that you are shrinking potential faces, and haar can't reliably find faces smaller than 20x20 pixels. Not only that, now you are using computer resources to shrink that image. You can get the same speed boost by specifying a MinSize for the face. 20x20 is the default, but 40x40 will go crazy fast in comparison. The higher you go, the faster the search will be, but you may start missing smaller faces.
Just wanted to clear that up...
I hope this helps, and I hope everyone enjoys working with the Raspberry Pi and OpenCV as much as I did.
This is my first instructable. I would love to see your comments.
Thanks,
Chris


