

Introduction: Pandora's Ultimate Boombox


This is a portable music player that can play most if not all internet radio available including your own music collection. No need to connect to an amplifier & additional speakers, so you can take this away from home as long as you have access to broadband.
The design ideal was to produce a sleek, minimal, stylish device that is a 'no compromise' internet music player. For the player there seemed no other choice than Slimdevices Squeezebox 3 (http://www.slimdevices.com). This is a 'thin client device' that streams music from a server (on your pc or from the internet) The list of available music sources is right up to date & impressive (eg lastFM, Pandora, BBC listen again, shoutcast, RadioIO, Live365) It will play you music collection in any flavour you choose. My favourite is flac but mp3, ogg & most others are supported.
The case, after much research, I chose as genus pr1i. It fits my design criteria perfectly and looks cool into the bargain. The amp I chose as sonic audio's tamp. Low power, efficient, compact and sounds great. To power it all up I chose a mini ITX supply, which powers all devices simultaneously.
To summarise, it may seem onerous to collect all the components, ebay is an excellent source, however the results, if you are a music addict like me, will never leave you wanting.
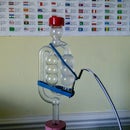
Update, cleaned up front fascia with a dremel drill & added a theatrical lighting gel filter with some acetate behind for rigidity.
Step 1: Gathering Materials


- Slimdevices Squeezebox 3 site (£200 new, £70-£150 recent ebay winning prices)
- Sonic T-AMP new model tamp (ã30 on ebay)
- Genus Pr1i DAB radio case (appears on ebay occasionally) (recently ã10 + ã8 p&p on ebay)
- mini ITX power supply (serach ebay for mini ITX EPIA) + 12v switched mode supply (ã30-ã40 new)
- audio & power cables(rs componets, farnell etc)
- mounting posts (rs componets, farnell etc) maplin
- display perspex (this is to filter squeezebox display, I've not sourced a suitable filter yet)
- mains power connector & lead rs componets, farnell etc maplin
Step 2: Gather Tools

- hot glue gun
- dremel type drill & attachments (grinding & cutting disc)
- soldering iron & solder
- crosspoint screwdriver
- wire cutter & stripper
- multimeter
Step 3: Dismantle

Carefully dismantle the squeezebox using the torx tool supplied. Careful with the ariel's & connectors. You won't need the case or the provided power supply (ebay them!) . careful with the squeezebox innards, specially the glass. put it away safe for now.
Unsrew the genus case removing all components except the speakers which you will use. For the mini ITX supply, take the switched power pack & remove the plastic case.
Step 4: Modify Power Supply


Remove all wires that are not required. You'll need 3 black, one grey, one red and one yellow on the bottom row, one green one black on the top row. Refer to the picture & snip the unwanted leads (or more safely, wait till it all works, mark unused ones, then snip these.
You'll need to solder the grey cable to the underside of the board as shown.
Step 5: Modify Genus Case


Open out genus display. The silver fascia front comes away. Unscrew the 4 screws supporting it from behind. I used a dremel drill with the flexible extender and cutting disc to cut the aperture between the circles on the main case body & the silver front separately. Grind the aperture with a fine grinding stone.
Grind inside display fasia on the main case so that the squeezebox sits flat.
Glue binding posts to support the squeezebox, tamp & itx power supply board. It may be easier to attach the binding posts to the respective boards, check position, then add a dab of hot glue to the ends & seat firmly & wait to cool (few seconds). Then unscrew & remove board & add more glue to surround the post, making it a permanent stable fixture.
Replace the silver fasia, button assembly (you may wish to add dabs of hot glue if you are not making add ons. see final step.
Fix display filter*
not yet sourced the material for this.
Step 6: Assembly


Place power pack in rear battery compartment, removing battery terminals. Feed both input & output cables through gaps to main case cavity. Note, you may wish the shorten the output cable by de soldering off board, cutting to length the re soldering, at this point.
Cut an aperture for the mains cable connector of choice in the back panel. I used an IEC type 7 'cassette' cable & connector). Position connector & screw to secure. Cut mains input cable to size & solder the two wires.
Take the squeezebox from its safe place, position and screw on its binding posts. Position the ITX power board & screw firmly. Locate the position of the tamp, the cut the existing genus speaker wires to length. solder as shown in diagram. If you are adding the line in addon, solder the coax cable now. Position the tamp & screw firmly. Hot glue the volume pot. board adjacent to the tamp directly onto the inside of the case. make sure the volume pot. is accessible. Turn volume shaft about half way through its travel. You can adjust to your liking later.
Next, hot glue the wireless antennas as far apart as possible.
Step 7: Connectors


Install ATX connector into ITX power board. Locate power pairs for: squeezebox (5V), tamp (12V)
Cut cables to length & solder power connectors to ends. Check with multimeter that polarity is correct (Very important check, don't skip this). If all's well, position power connectors in squeezebox & tamp.
Position audio cable from tamp to squeezebox. If this was solderd in an earlier step to the squeezebox, just plug 3.5mm stereo jack into tamp.
Plug in two pin cable from power pack to itx power board.
As a general tip, keep cables (except antenna cables) as short as possible, keeping power & audio cables apart as far as possible.
Step 8: Add Ons

Here are some suggestions for add ons you may wish to implement to extend functionality. these are optional:
-Aux in for ipod or mp3 player. I've implemented this. Simply bring a 3.5mm stereo panel mount socket to the fasia & solder this to the line in of the tamp (see earlier step)
-Headphone socket. Bring a 3.5mm stereo panel mount socket to the fasia, connected to twin coax & a 3.5mm stereo jack plug. Connect this to the headphone socket of the squeezebox.
-Wired ethernet connector. A little tricky. Connect a short utp cable to ethernet connector of the squeezebox. Mount or hot glue a female-female utp socket to rear panel & pllug utp cable into this. If you wish to use your squeezebox as a wireless bridge, the cable will need to be a crossover
-Digital out connector. To make digital recordings with this device, bring the digital coax or optical connector to the back panel.
ipod dock?? No, only joking :) I've got an ipod & sometimes want to continue listening to a podcast when I get in from work. well, that's what I use the aux in connector for
Step 9: Plug In, Power Up & Enjoy

Step 10: Comments

I have still to source a suitable filter for the squeezebox display. The aperture of the genus case looks a bit shabby. however the aperture is in two layers the silver fascia aperture & the aperture of the white case behind. I'm waiting to tidy the case fascia when I get the filter. Any idea's for filter suppliers, perspex, plastic etc?
The tamp audio section is superb. However, one characteristic of it is a pop at startup. If anyone has any ideas of a solution, could you post them please.
I wouldn't suggest attempting this project without an understanding of electrical safety/ electronics, or indeed if your likely to blame me for anything! I suggest installing & using squeezecentre streaming software first, you can download a virtual squeezebox to try it with. ok, mail me if you have questions or suggestions, ok fill your boots & have fun.
addition: found a solution to the display filter (actually google did) Theatrical lighting gel. There's a fella on ebay that sells them (MJL Lighting). Someone on squeezebox forum has suggested this filter
Should be easy to install. Cut oversize, remove silver fascia, glue or attach onto white case, replace silver fascia & hey presto. Apparently blue works best. I've ordered some colours & will post some pics when they arrive.
update: added filter with an acetate behind, see title picture.
Step 11: Links


Here's some web links to help you along the way, for reference:
-Slimdevices website (now owned by Logitech) slimdevices
-tamp people sonic impact and the one I bought now discontinued
-Advice on lighting gel to filter & protect display lighting gel
-the fella I bought the lighting gel from. lighting gel (I bought 4 colours & will have some left probably so ask if you need some)
-miniITX power supply. looky here My supplier has disappeared & I seem to recall I chose a 120W supply . Let me know if you want me to measure actual power usage.
- Genus Pr1i case, not made any more, so wait till one appears on ebay. This is what it looks like genus
You should be able to source all these items second hand from ebay ebay, given patience & time. Good luck & do mail me if you require help or advice.


