

Introduction: Paper "Cube" Made of Hyperbolic Paraboloids - Modular Math Origami


Whether you known multivariable calculus or not, you have to admit this math filled paper sculpture looks pretty cool. One of my favorite parts is how it is made up of modular units, which makes the actual origami involved simple (although rather repetitive.)
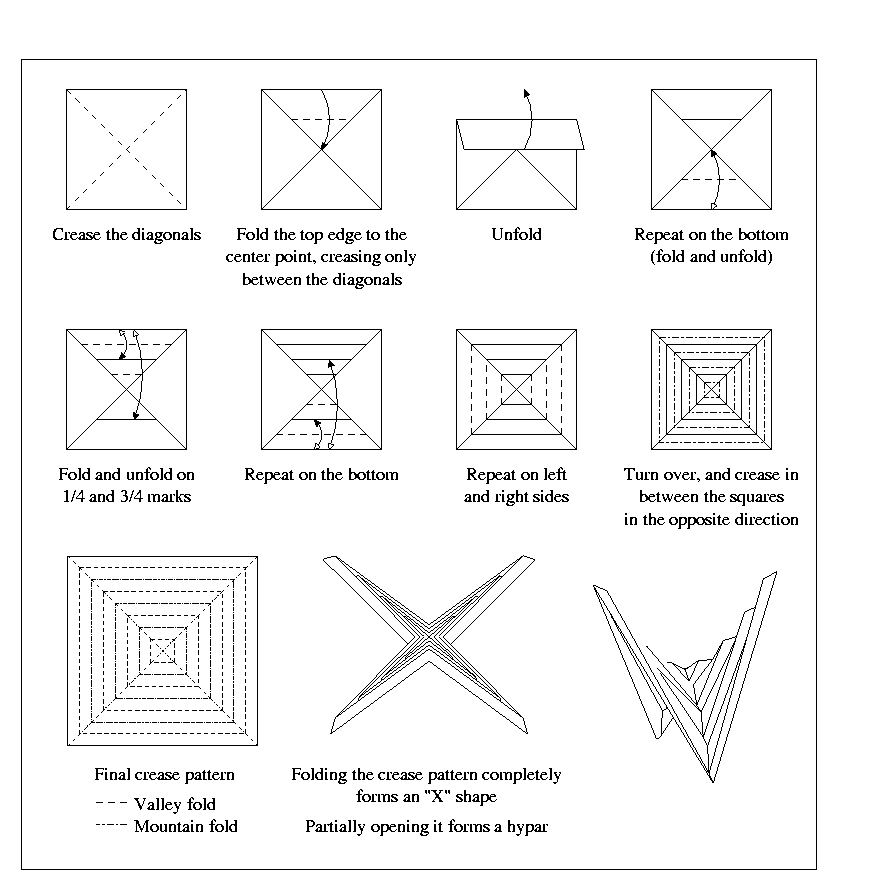
The base unit you are working with is a hyperbolic paraboloid, which is a surface talked about in multivariable calculus and other fields of math. Don't let its mathematical underpinnings scary you, it is a simple shape to fold.
This instructable is inspired by the work of Professor Erik Demaine. I HIGHLY recommend going to his website to see how he folds a hyperbolic paraboloid. The instructions here for folding a hyperbolic paraboloid are more of a supplement to Demaine's instructions. The main focus of this instructable is making a hyperbolic paraboloid cube using 24 hyperbolic paraboloid units.
Step 1: Gathering Knowledge and Supplies

Before gathering the physical supplies, you first need to gather the knowledge. Go here to learn how to fold a hyperbolic paraboloid. The link is from Erik Demaine's website. If you would like to learn more about the math behind this structure, check out this page.
Things you will need for this instructable:
24 sheets of square paper - The color does not matter. I color coded the sides for this instructable to make it easier to see the different sides of the finished "cube". Also, if you can, use good paper. It's completely possible to use cheap paper for this, as I did, but it will be much sturdier if you use good quality paper.
Double-sided tape - This is the best method I could think of for attaching the hyperbolic paraboloid units together. You could use glue or some other tape, but I highly recommend double-sided tape.
Thread, a needle, and masking tape - This is optional and only needed if you plan on hanging your finished sculpture.
Step 2: Folding a Hyperbolic Paraboloid


As mentioned, I highly suggest going here to learn how to make a hyperbolic paraboloid. I have included some pictures of certain steps to help show how to fold it. See the annotations for further insight.
In total, you need 24 of these, 4 per side. Color-cordinate as you wish.
Step 3: Making a Side of the Cube


Now that you have four hyperbolic paraboloids, it's time to join them together to form one of the six faces of the cube.
The way in which you join the edges of these 4 hyperbolic paraboloids is the same method used to join hyperbolic paraboloids for the rest of this project. The key to joining the hyperbolic paraboloids is making sure you are joining the CORRECT sides, hence this instructable and many pictures.
Once you have one side, make 20 more hyperbolic paraboloids units for the 5 other sides.
Step 4: Attaching the First Five Sides


Like the rest of this project, attaching the sides is more repetitive than difficult. It is a process, and you need to be somewhat delicate as the structure will be pretty floppy until the final side is taped on. Tape the edges of the sides together the same way you taped the edges of the single hyperbolic paraboloids.
Step 5: Attaching String for Hanging (optional)


NOTE: After the fact, I realized attaching the thread to the last side to be taped would make it much easy to sow the thread through the paper. However, I wanted the white-side to be on top of my cube, so I carefully sowed through the all ready attached white-side.
Ideally, you would sow through the side that is to be attached last (which is the red side on this cube.)
There is no need for attaching thread if you plan on not hanging your cube.
Step 6: The Last Side!


After you have learned from my mistake and attached the thread to the LAST side, it is time to, well, attach the last side to the rest of the cube. This is just like attaching all the other sides together except with a little more tape. All 8 edges of the red-side will be attached.
Step 7: It's Done!


Congratulations, after hours of repetitive folding and a bit of tape, you have done it, you have folded a hyperbolic parabaloid cube. Looks pretty sweet, huh?
I recommend hanging your master piece in a place of honor. Alternatively, if you used a sturdy enough paper, you can just let the sculpture sit around for people to look at and hold.
You could also make into hat or the worst fish bowl ever.
Have fun!


