

Introduction: Paracord Hammock


I love SCUBA diving! So much that in February of 2014 I spent a month on the island of Roatan, Honduras getting my Divemaster Certification. While there, I spent my days studying, diving, and relaxing in my hammock. Of course after I left, I missed diving everyday the most. However, after the diving, the thing that I missed was relaxing in my hammock on a daily basis. Upon arriving home, I made it a goal to somehow recreate my hammock that I'd left behind but not forgotten. Once I figured out the general idea, I decided to improve upon it by making my hammock with paracord.
This instructable is split up into five main parts:
Step 1: Tools and Materiel for Hammock Loom


Tools:
- Jigsaw
- Drill
- Drill bit
- Driver bit
- Hex Wrench (for Threaded Insert)
- Router
- Various Roundover Bits
- Planer
Material:
- 2x4's
- 2 1/2" Grabber Screws
Step 2: Design and Plan


After a few different design ideas, I settled on this final design using 2x4's and wedges to secure the cross members.
Measurements:
- Uprights 2 - 2x4x6'
- Cross members 2 - 2x4x105"
- Legs 4 - 2x4x15 1/2"
- Legs 4 - 2x4x14 1/2"
Step 3: Cut Crossmember Slots in Uprights


Cut the slots for the 2x4' crossmembers using scroll saw. Center the cuts so there is just a little more than 1 1/2" on the face of the 2x4. Cut these slots 2 inches from the top and 5 1/2 inches from the bottom.
Step 4: Cut Profile in Uprights


8 inches from the top, cut a round profile with a 1 inch radius. Continue cutting perpendicular to the face till the middle portion of the upright is a square 1 1/2" by 1 1/2" cross sectional profile.
Step 5: Cut Legs

Cut 4 legs 15 1/2 inches and 4 legs 14 1/2 inches.
Step 6: Smooth Out Uprights


Make the uprights round. You can do this by a sander (that would take forever), hand planer (this would also take a while), or a power planer. I used a weird obscure planer attachment that came with my Dremel. Break down the corners till you have a 1 1/2 inch diameter pole.
Step 7: Router Uprights

Using a 1/4 inch roundover bit, soften all the corners of your uprights.
Step 8: Router Everything Else


Use a 1/4 inch roundover bit to router the legs and a 3/8 inch roundover bit to router the crossmembers.
Step 9: Cut Off the Top


Mark and cut 10 inches below the top. This is so you will be able to remove the hammock bed from the loom once the hammock is finished.
Step 10: Install Threaded Inserts


These threaded inserts are so the hammock loom can be disassembled and reassembled. Follow the directions on the packaging of the threaded inserts for what drill bit size to use for installation.
Mark the center of the upright. Drill a hole for the threaded insert. Using a hex key, install the female portion of the insert into the base of the upright and install the male portion into the top. Tighten to top piece until the grain lines up.
Step 11: Attach Legs


Using a square, countersink and attach the legs. In all reality, the four 15 1/2 inch legs attached are the only necessary legs, however the four additional legs assist when assembling the loom.
Step 12: Make Wedges


Make wedges to secure the crossmembers in the uprights. These can be any size that will hold the crossmembers securely. Mine turned out being 7x1 1/2 inches.
Step 13: Mark Crossmembers


Using a tape measure, square, and a sharpie - mark the center of the crossmembers in one foot increments. This will assist with aligning the uprights with the crossmembers.
Step 14: Loom Finished

Now assemble and pat yourself on the back. You just finished the first part of your hammock!
Step 15: Tools and Materials for Netting Needle


Tools:
- Spray Adhesive or Glue Stick (to glue pattern to wood)
- Jigsaw
- Drill Bit
- Router
- 1/8" Roundover Bit
Materials:
- Oak (planed down to 3/8 of an inch)
- Pattern
Attachments

Step 16: Attach Pattern


Print and cut out pattern. Using spray adhesive or a glue stick, attach the pattern to your piece of oak. (edit the length of the needle to hold more strands. I made my needle 8 inches longer than the pattern for a total length of 16 inches)
Step 17: Cut Out the Netting Needle


Using a jigsaw, cut the outside off and the inside out of your netting needle. On the inside of the needle drill a hole to facilitate the jigsaw blade.
Step 18: Finish Netting Needle

Finish the netting needle by using a 1/8 inch roundover bit and some final sanding. I didn't use any sort of finish on my needle but you can if you wish. If you choose to use a finish make sure you select something that won't rub off onto your hammock during the weaving process.
Step 19: How to Load the Netting Needle


To load the netting needle, take whatever length of paracord you wish. I found that a length of 48 feet of paracord was enough to complete 4 passes of the foreground strands (half of a color section shown - See Step 24)
- Loop the end around the tongue of the netting needle and secure in place using the pressure of the paracord
- Flip over netting needle and loop slack end over tongue
- Repeat until you are out of paracord
Step 20: Materials and Planning for Hammock


Paracord does stretch, but if you make this hammock out of paracord you will not notice hardly any stretching. That being said, you need to plan on how large of a hammock you want so you know how much paracord you will need to order. Throughout the rest of this instructable, I will refer to a strand of paracord in two separate ways. The background strands (are wrapped around the loom - See Step 22) and the foreground strands (are anything brought into the hammock with the netting needle - See Step 24).
I ordered 5000 feet of paracord because I didn't want to run out of any particular color and was alright with having leftovers.
***All of the following information are stats based on an 8 foot hammock bed***
***Use this info when planning the size and look of your hammock***
- This hammock has 11 sections in the bed and is 35 inches wide
- Each of the 11 sections contains about 300 feet of paracord
- Each of the sections of this hammock is a little over 3 inches wide
- There are 188 strands of paracord running the length of the bed (100 background and 88 foreground)
- Each foreground strand will have 46 stitches resulting in a total of 4048 stitches through the whole bed
- In total, the hammock weighs nearly 10 pounds which means it contains nearly 2500 feet of paracord
For this hammock you will need:
- 3000 feet of paracord (I used about 2750 including scraps, so this will give you that much more wiggle room)
- Scissors
- Lighter
Step 21: Things to Remember

- Whenever you cut paracord always melt the end to prevent fraying
- When you introduce a strand into the hammock (background or foreground) tie the end of the paracord to one of the uprights with a bowline knot
- When working with a foreground strand, you will always be working in between two background strands
Step 22: Start the Background


To start your hammock, set up the loom for the desired length of bed (this was set up for an 8 foot bed measured using the marks on the crossmembers).
To start the background, tie a bowline and wrap the paracord around a good amount. The third picture shows I wrapped around the whole thing 11 times. After realizing this was a lot of paracord to manage, in the future I only wrapped the background strands around the loom 4 to 8 times. Tie the other end to the loom using a clove hitch.
Step 23: Tie Boarder


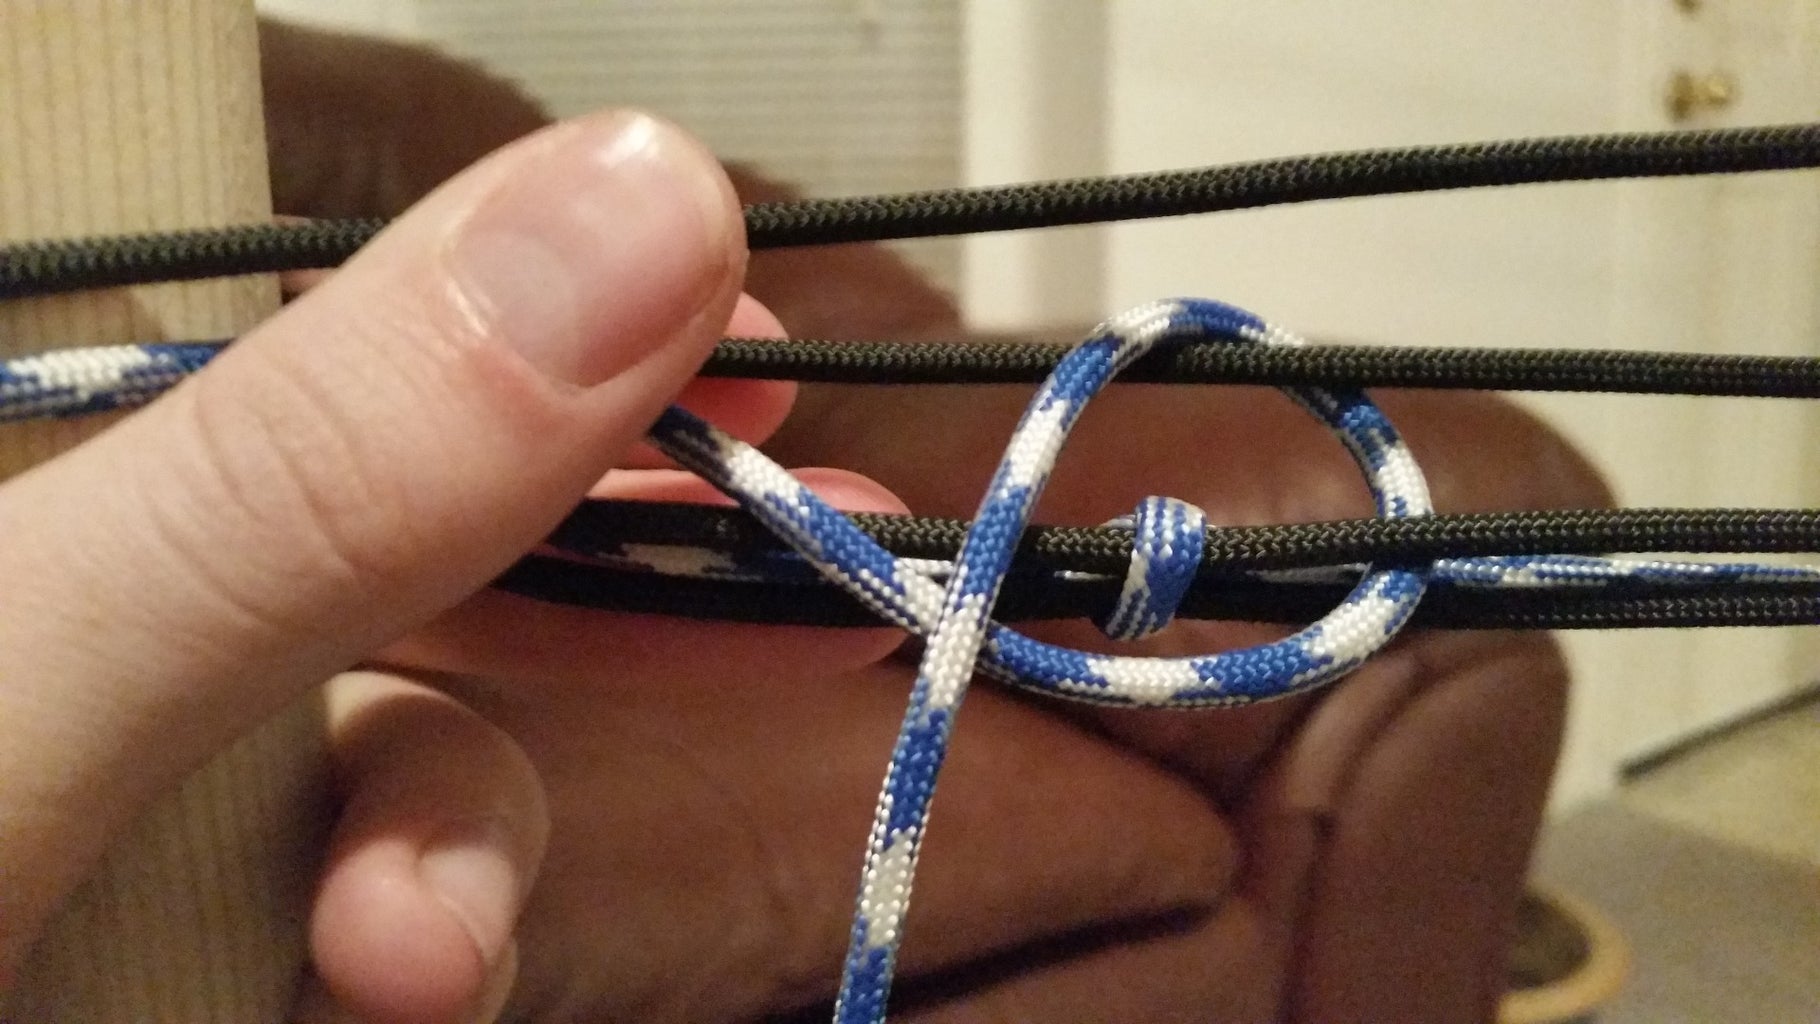


The boarder consists of three passes of foreground strands. To create the first pass, tie a bowline between the two bottom most background strands. Using an overhand knot, tie those two background strands together. The foreground strand will always stay between the two background strands. Making these knots uniform is the most important part of the hammock! These knots create the spacing that the rest of the hammock will take. If they are not evenly spaced, the whole hammock will be uneven. To aid in the placement of these knots, I made marks 4 inches apart on the side of my netting needle with a sharpie. Take the time to make the first pass of knots as perfect as possible.
For the second pass, loop around the hammock loom upright and perform the same overhand knot bringing in the next background strand into the boarder.
For the third and final pass, perform the same series of over hand knots. Make sure that every knot as you go is tight before going on to the next knot.
Step 24: Triple Weave


The hammock is woven together by the triple weave pattern. If you remember "Under Two, Over One" you have everything you need to know to weave the rest of the hammock.
Tie the loose end of the foreground strand (from netting needle) to the hammock loom upright using a bowline (sorry that this is not shown here). Insert the netting needle under the two background strands located under the bottom most loose background strand and above that bottom most loose background strand. Push the netting needle all the way through these three strands. Bring the netting needle back under the top strand that was just introduced into the weave. Perform this action twice between each set of knots.
Continue this pattern till your hammock is the size you prefer. Work around the hammock in a clock wise motion or a counter clockwise motion. What ever direction you decide on, stick with that direction through the rest of the weave. As you can see in this video, I worked in a counter-clockwise direction.
Step 25: What Mistakes Look Like


More than likely you will make mistakes through the process of working on your hammock. It's important to be able to recognize them early so that you don't need to backtrack very far.
The first image shows the mistake of forgetting to go back under the background thread that you introduced into the weave.
The second image is the result of staying on the same side of the loom when finishing a pass and not going around the back to perform the next pass.
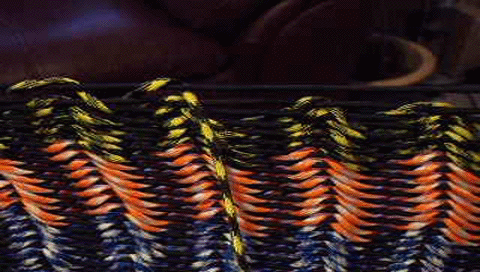
Step 26: Progress


These are a series of pictures showing the progress of the hammock bed through the weaving process.
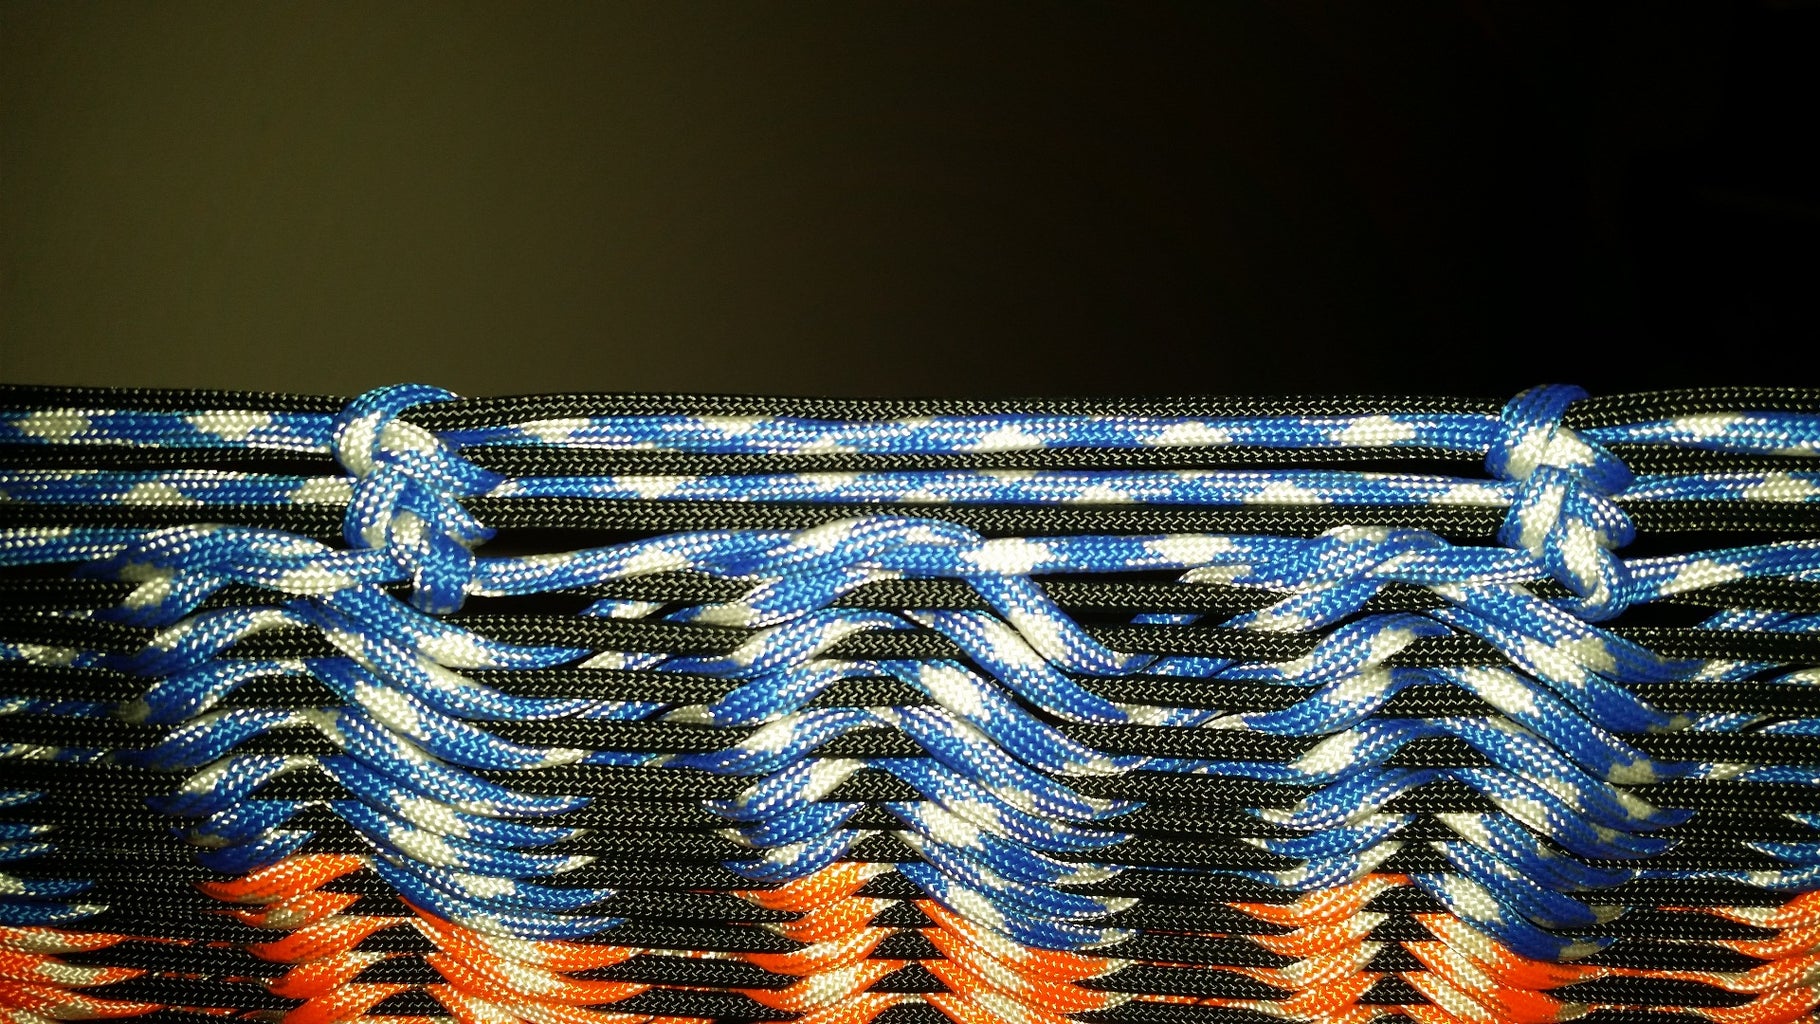
Step 27: Other Boarder - Part 1


The best part about this boarder, is you already have an example right in front of you! Take a look at the other side of the hammock for reference.
- Before you finish the last pass of the triple weave, tie in enough paracord to add 3 lengths of background strand (40 feet should be enough to compensate for the knots that it's going to be tying - mine is blue) with a bowline
- Finish last pass of the triple weave
- Untie and remove the last background strand (blue in my case - see last picture)
Step 28: Other Boarder - Part 2


Remember to reference the other side of the hammock for correct placement of knots.
- Load the 40 foot blue background strand from previous step onto netting needle
- Retie bowline
- Make sure that the pattern as you weave the paracord back through the loops is correct (I completed a whole pass with knots before I realized that I was weaving them backwards - see next step)
- Tie overhand knots following the same pattern that was used on the first boarder
Step 29: Other Boarder - Mistake

Don't be like me and complete a whole pass before realizing that it was done wrong. Pay attention to what direction your netting needle is passing through the loops of the hammock.
Step 30: Potential Problems

One thing to remember is paracord is strong. With this design, there is a potential it could break the loom. Remember to pay attention to this because it could potentially cause one boarder to be shorter of the other. If you decide on a different loom design because of this issue please share it in the comments!
Step 31: Removal From the Loom


When removing the hammock from the loom, it's best and easiest to plan out how the clew (made in step 33) will attach. I originally decided on 8 strands per end, but quickly decided that 12 would be more aesthetically pleasing.
Locate and mark the middle of the hammock (blue double zip-tie). You want the hammock to be balanced above all else. Count the top or bottom half of the loops going around the end of the hammock loom upright, and divide that number equally by 6. Make it as even as possible because because more than likely it will not turn out to be an equal number. Separate the loops, I used zip ties because I had a bunch just lying around.
Do this for the other half on the same hammock loom upright and the other end of the loom.
Remove the top crossmember.
Unscrew the top of the hammock loom uprights.
Slide the hammock bed off of the loom and marvel at your handiwork!
Step 32: Rope Making Jig


In order to twist together paracord to make the rope for the clew, you will need to make a rope making jig.
I made mine using 2x2's and some scrap bicycle spokes I had lying around, but any sort of stiff wire will work.
This jig is designed to make up to a 3 strand rope even though we will only be making one 2 strand rope at a time (See Step 31)
- Using pliers, make loops at the end of the rods
- Drill holes 4 inches apart in stationary piece of the jig slightly bigger than the rods
- Drill matching holes in the rotary board
- Feed the rods through the stationary board
- Make a 90 degree bend in the rods
- Make another 90 degree bend an inch down the rod
- Insert the rotary board over the rods
- Bend and cut the remaining rod so that it doesn't catch and cut your hand when rotating the jig (it hurts if you don't do this)
Step 33: Two Strand Rope


You need to make a lot of rope! I used 480 total feet of paracord to make both clews for this hammock. I originally tried to make a rope with 40 foot strands. This was a bad idea and really difficult to handle. After that I realized it would be easiest to make rope with shorter strands.
You can make the clews as long as you'd like. Traditionally one clew will be half the length of the bed thus doubling the length of the total hammock.
When making rope, cut 48 strands 10 feet in length (cut these longer if you want longer clews). This will result in 12 ropes with 4 strands each (6 ropes per clew).
To make rope:
- Attach two strands using slip knots to the rope making jig (pictures 2-3)
- Tie an over hand knot at the end of those two ropes (picture 4)
- Rotate the rope making jig clockwise till the entire two-strand rope is twisted (picture 8)
- Repeat with a secondary two strand rope (pictures 9-11)
There is another great instructable on how to make rope written by Mrballeng and can be found here.
Step 34: Four Strand Rope


To make the complete 4 strand rope, use the same process as before with one important change.
Instead of rotating the jig clockwise, rotate counter-clockwise.
Step 35: Weave the Clew


This is the most confusing step, but once you understand the idea behind it, it makes a lot of sense.
Mark the middle of your rope with a sharpie and make the loop in your clew 4 inches long. Following the diagram in the fourth picture, open the twists in the rope to allow the corresponding rope to be fed through the "eye" of the rope.
The numbers on the 4th picture correspond to the ropes in the clew.
Step 36: Make the Clew Even


Lay the clew on the ground. By untying the knots on the ends, shorten the length of the strands of the clew making them uniform. I decided that I liked the short tassels on the ends of the ropes so I left them there. You can just as easily cut them off at the knot if you wish.
Step 37: Wrap Clew


The clew needs to be wrapped. This will keep the ropes from separating and reduce potential wear on the load bearing strands.
To wrap the clew:
- Secure edges of clew with zip-ties to reduce movement of rope
- Using 14 feet of paracord, tie an overhand knot
- Secure the short tail of the overhand knot by tying a series of overhand knots from one zip-tie to the other
- Once the wrap is complete crate a "needle" of sorts out of the tail of a zip-tie (cut of the block on the end)
- Attach the paracord to the zip-tie (I used a hot wire to melt through and connect the paracord to the zip-tie)
- Feed the tail through about half of the wrap
- Pull tight, cut and melt
Step 38: Attach Clew to Hammock Bed


Using a sheet bend, attach the ends of the clew to the hammock bed. To make the hammock more comfortable, shorten the lengths of rope on the edges. This will form more of a cup to keep you from falling out.
Step 39: Final Thoughts

This has been one of the most time consuming and rewarding projects I've ever done. I started designing and making the loom almost a year ago. If you ever decide to take the time to make a hammock yourself, please let me know and share your results in the comments!

Participated in the
Summer Fun Contest

Participated in the
Outside Contest


