

Introduction: Party Lights

This project is dedicated to creating a music visualizer that picks up sound using a microphone and converts it into the blinking of an individually addressable LED strip. The LED strip is controlled by Arduino Uno (or pro mini) that is controlled via Bluetooth from an Android app (doesn't work for iPhones), which also allows you to set the color of the LEDs or launch a color animation.
Step 1: Components
- LED Strip WS2812B. There are a variety of places that sell these strips, I’d recommend Ebay (here) as it will save you money, but if you want a higher quality product, you can check out adafruit.com of sparkfun.com. There is a variety of length and densities available, you can choose anything that suits you, but more LEDs need more memory to control them and at some point Arduino will run out of it. 128 LEDs is a safe bet, but you can go a little higher if you wish to do so.
- Arduino Uno. You can buy one from the official vendor or from Ebay (here) for much-much cheaper. I bought mine for ~$5.
- Electret microphone combined with an amplifier MAX4466. Again, they sell those on Ebay (here) as well.
- Bluetooth adapter HC-06. I bought mine on Ebay (here).
- 5V power adapter for Adruino (optional as you can use USB) and the LED strip (required, unless your strip is very short and can be powered directly from Uno). Make sure your power supply can provide enough power at 5V for the whole LED strip. My 5m strip consumes ~45 W (e.g. I ~ 9 A) at maximum brightness. Ebay has those as well.
- A bunch of wires to connect things.
- Breadboard to connect everything through (choose your favorite size and color). This is optional as you can connect things directly to Arduino, but it will look messy, so I’d recommend doing it only after you’ve made everything work using the breadboard.
- Soldering iron and solder. Some vendors send components detached from their connecting pins, in which case you’ll have to solder them yourself.
Step 2: Configuring Bluetooth Adapter

Before you start building the music visualizer, you’ll need to configure the Bluetooth module so it uses the same baud rate as the final Arduino program. To do it, you will need to:
1. Download the archive and open test.ino in Arduino IDE. Upload the code to Arduino (there are plenty of tutorials that will show you how). It will allow you to communicate with the Bluetooth module and see its responses in the serial monitor.
2. Connect HC-06 to Arduino according to this diagram.
3. Open Serial monitor in your Arduino IDE (Tools -> Serial Monitor)
4. Make sure the baud rate is set to 9600. To enter a command, just type it in the monitor input and press enter.
5. You can find the list of possible commands to send in the attached pdf.
6. I’d recommend changing the name of the device to something that makes more sense (like “LED strip”) and you can also change the password if you want to protect your lights from any local LED pirates.
7. Once you’ve finished, there is one final setting you need to change. Type in “BAUD8” (no quotation marks) and make sure you receive “OK115200” from the module. Once it’s done, you won’t be able to send any more commands unless you change the baud rate to 115200 in the Arduino code.
8. You’re done! Disconnect HC-06 from Arduino.


Step 3: Assembling Everything Together
Once the Bluetooth module is configured, you can start assembling the final setup.
1. Make sure nothing is connected to the serial ports (digital pins 1 and 2) of your Arduino. Upload the attached code:
- the folder LED_control contains the .ino file that you should open in Arduino IDE
- the folder "FHT" inside "ArduinoFHT2" is the library you should attach to your Arduino project before compiling the code. This is a great library for doing the FHT transform (which is FFT for real numbers) I took from here, so you can also download it from their website. To install the library, go to Sketch -> Include Library -> Add .ZIP library, then navigate to the folder "FHT" and click open. This is counter-intuitive since you are adding a folder, not a .zip, but that's the right way to do it.
- once the library is connected, you can upload the code.
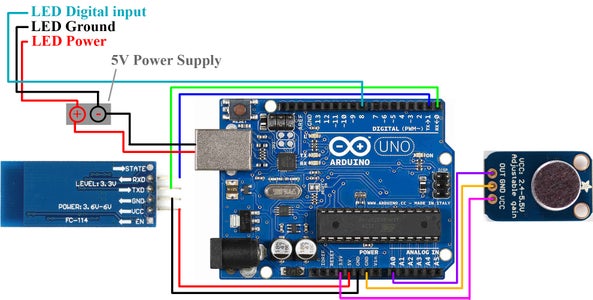
2. Connect all the elements according to the schematic. The schematic uses one power supply for both arduino and the LED strip, but you can power them separately (for example, arduino can be powered via USB and the strip – through a power adapter). If you decide to do so, make sure to CONNECT ARDUINO GROUND AND THE LED GROUND. If you don’t do so, your strip won’t work.
3. Install this android app (the .apk file) on your phone.
4. Launch the app and connect to your Bluetooth module.
5. Set the number of LEDs you have connected to Arduino and press “SEND”.
5. Try to send some colors to the LED strip. If it works, you’re done!
6. P.S.: before you launch music visualization, it’s useful to record the noise level (there is a corresponding button in the app). If your lights blink when there is no sound, you can re-record the noise for a longer duration (for me 3 s works fine, but it really depends on your power supply quality and the surrounding electromagnetic noise)
Step 4: P.S.


If you made everything work, it might be a good time to put everything in a nice box. It was easy for as I have access to a laser cutter so I just made one out of acrylic sheet.
Additionally, if you want to make this device much smaller, good news, you can! To do so, you should use Arduino pro mini (the 5V, 16MHz version), which you can buy on Ebay for ~$3. Assembling everything would require some soldering, as there are no pin connectors on the mini. Additionaly, you’ll need a serial-to-USB converter. Be careful when you buy those as not all of them have all the required channels to work with Arduino. The easiest way to make sure it will work is to buy both Arduino and the converter in a pack on Ebay. Or you can buy the official converter from the Arduino website if you’d like to spend more money. Finally, you will need a voltage regulator that can convert 5V to 3.3V as Arduino pro mini doesn’t have a 3.3V power supply you need for the microphone.
The assembly procedure is very similar. The only difference is that you’ll need to make a switch that allows you to disconnect the Bluetooth module from ports 1-2 and connect them to the ports 10-11 for programming. If you don’t do it, you won’t be able to upload any code to arduino or reprogram the Bluetooth adapter in the future.

Participated in the
Make it Glow Contest 2016


