

Introduction: Personal Toolkit

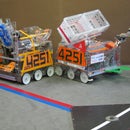


We are Cougar Robotics team 4251. Based on our experiences during FTC we think it is important for every team member to carry their own personal took kit. In this Instructable we will walk through an example kit and some ideas for other tools you might want to add.
If you don’t want to go through the whole walkthrough, the complete list is below.
• Carrying case
• Allen key set
• 1/4 and 5/16 combo wrench
• Diagonal cutters
• Needle-nose pliers
• Tape measure
• Loctite
• #0 Phillips head
Step 1: Tool Container

The most important step is finding a suitable container. People on our team use Rhinoskin™ cases. Whatever you use, it is important that the case is sturdy enough to not be torn up by your tools, and has enough pouches and dividers to keep your stuff organized.
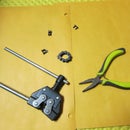
Step 2: Allen Keys

Next you will want to find yourself a set of allen keys. These are one the most commonly used tools in FTC, and will be useful whether you are designing a new robot or performing maintenance at a competition. We usually carry 4 different keys: 5/64, 7/64, 1/16, 3/32 These are the most commonly used sizes in the Tetrix build system. We also color code our allen keys so we can quickly find the one we need.
Optional: Adding T-Handled allen keys. These are especially useful when you need more leverage or length to rotate bolts on your robot.
Step 3: Combo Wrench

Along with your keys you will want to make sure you include a wrench. We use a 1/4 and 5/16 combo wrench. These are the two main sizes used by Tetrix, and this combo wrench should all you will need during the average build day or competition.
Option: Adding a ratcheting wrench. This can be especially useful when you are finding it difficult to rotate your allen key or rotating a nut is the easiest option.
Step 4: Diagonal Cutters

Diagonal cutters are another important item. During a competition or practice, we most commonly use them to remove zip ties. We use zip ties to attach our shields and other implements such as Lego motors on our robot, making them one of our most commonly used tools.
Step 5: Needle-Nose Pliers

Needle-nose pliers are a universal tool that we often find ourselves using. In addition to grasping the occasional hard to reach nut or bending warped pieces of metal, we also use needle-nose pliers to remove chain master links on our drive train.
Step 6: Tape Measure

Tape measures are most commonly used for determining critical dimensions when fabricating parts, such as cutting Tetrix channel or shearing plastic. Make sure that your tape measure is small enough to foot in your chosen tool kit container.
Option: Find a tape measure with a carabineer. Keeping your tape measure easily accessible with this addition will make sure you can quickly find your correct measurements with minimal hassle.
Step 7: #0 Phillips Head

We use this specific size of screwdriver for opening the battery box on a Sensor Multiplexer, or SMUX. This batteries have to be regularly changed for the most accurate readings, making this screwdriver size a valuable asset to have on hand at all times.
Step 8: Loctite Threadlocker

Loctite is a bonding adhesive used to prevent set screws from shaking loose. We have discovered that vibrations caused by competitive play slowly cause set screws to vibrate loose, possibly resulting in a major breakdown. We try to carry Loctite with us at all times to touch up on any screws we find during routine maintenance that are falling out. Make sure that you use non-permanent Loctite so that you don’t ruin any of your screws.


