

Introduction: Pi Power (Remote Power Management With Pi)


"Pi Power"!!! Remote Power Management with a Raspberry Pi......
.
“Not so long ago in a galaxy far, far away... our hero needed access to data near a distant star in the far off reaches of space" ....no need for "FTL" travel as I was actually in my living room on my laptop and was too lazy to go back and turn on my PC to get the files I wanted..... I was thinking, "wish I had some kind of remote power management on my PC like those State of The Art servers in the Data Center I maintain"...... Plus, those "Legacy" servers in the Data Center without power management are a pain and could use an upgrade.... Let's see if we can do something about that?
.
As you soon will see, with a Pi and a few tweaks we shall have what we seek... Yes, kiddies this could be the "Wuxi Finger Hold" of all Pi2PC modifications so, follow along closely. (It's an ingenious PC hack that anyone can do)
.
NOTE: Follow another post I made to build a Pi worthy of this challenge... after that you will need two things, "literally": (2) F/F Jumper Wires......
https://www.instructables.com/id/PiWork-Serial-Console-Server/
.
NOTE: Faster-than-light (also superluminal or FTL)
Step 1: PARTS:
F/F Jumper Wires
http://www.amazon.com/s/ref=nb_sb_noss?url=search-alias%3Daps&field-keywords=F%2FF%20jumper%20wires
.
(Optional)
STICKERS: Angry Birds StarWars
As you know "It's dangerous to go Solo so, take a Wookiee with you"... you'd think one of the kids put their sticker on my Pi (but nah, it was me).
.
(Alternatives)
Header to USB
http://www.amazon.com/s/ref=nb_sb_noss_1?url=search-alias%3Daps&field-keywords=header%20to%20USB
.
USB Battery Pack
http://www.amazon.com/s/ref=nb_sb_noss_1?url=search-alias%3Daps&field-keywords=USB+Battery+Pack
.
USB Power Adapter
Step 2: DISCLAIMER: (Be Safe Working With Electricity and Static Sensitive Components)
[Only tested on] An ATX compatible PC/ITX Motherboard and (ATX)POWER supply..... "your mileage may vary"!
http://en.wikipedia.org/wiki/ATX
http://lifehacker.com/5828747/how-to-build-a-computer-from-scratch-the-complete-guide
Again, be safe as "Electricity" can KILL or at the least ruin your day. (This is just a neat trick done with some spare parts. It's likely not the best way to do this as there is no electrical isolation, etc....)
Step 3: STEP #1


Take apart your Pi and add the wires.....
(MY SETUP)
#MAIN BOARD
POWER BUTTON@Gray/White
Pi @Blue(Pin24)/RED(Pin23)
#Pi Pinout
http://elinux.org/File:GPIOs.png
Step 4: STEP #2


Take apart your PC and add the wires from the PI....
Step 5: STEP #3


NOTICE: We are replacing the wires for the the ATX power buttons located some where on the outside of the case.
.
That's it! Now let's do the software setup.......
.
(MY SETUP)
#MAIN BOARD
POWER BUTTON@Gray/White
Pi @Blue(Pin24)/RED(Pin23)
#Pi Pinout
Step 6: THE EASY WAY: Get "GPIO"
(ACCESS YOUR PI REMOTELY)
#GET GPIO
echo y | pacman -Sy python #Thinking about doing a python script but as it turns out we do not need it
pkgfile -s gpio
echo y | pacman -Sy alarm/wiringpi
#TEST IT
gpio
gpio readall
NOTE: I am using "ARCHLinux" on my Pi; again, see my post about the setup.....
https://www.instructables.com/id/PiWork-Serial-Console-Server/
Step 7: THE HARD WAY :(
[[ TOGGLE PIN 23 ]]
echo 23 > /sys/class/gpio/export #Create a GPIO file access
echo out > /sys/class/gpio/gpio23/direction #Configure the Pin Direction (In/Out)
echo 1 > /sys/class/gpio/gpio23/value #Write a value
echo 0 > /sys/class/gpio/gpio23/value #Write a value
echo 23 > /sys/class/gpio/unexport #Delete the created GPIO (11)
Step 8: Almost Done: a Little Scripting Could Not Hurt......
NOTE: (Cut-n-Paste) TYPE THIS IN TO THE COMMAND LINE
.
cat <<EOF> /bin/ON
echo "POWER ON SYSTEM"
gpio mode 4 in
gpio mode 5 in
sleep 1
gpio mode 4 out
gpio mode 5 out
sleep 1
gpio mode 4 in
gpio mode 5 in
EOF
#
cat <<EOF> /bin/PO
echo "POWER OFF SYSTEM"
gpio mode 4 in
gpio mode 5 out
EOF
#
cat <<EOF> /bin/OFF
echo "SOFT OFF"
gpio mode 4 in
gpio mode 5 out
sleep 1
gpio mode 4 in
gpio mode 5 in
EOF
#
chmod 755 /bin/ON
chmod 755 /bin/PO
chmod 755 /bin/OFF
Step 9: DONE!


Now you can power on and off your PC remotely...... Enjoy!
(ACCESS YOUR PI REMOTELY)
#POWER ON
ON
#SOFT POWER OFF
OFF
#POWER OFF
PO
Step 10: SOFT OFF?

NOTE: "SOFT POWER OFF" will gracefully "shutdown" my LINUX PC seen here but only if I am logged in.......
**I have also confirmed that everything works with my Windows PC (power ON/SoftOFF/power OFF)**
Step 11: An Alternative: Pi in the (PC)BOX.....


Now we are trying to have it all one way to make this cooler and more like a "high-tech" server system with a networked management card.......is to put it all inside.
.
Yes, it is possible as some boards have internal USB and Serial headers so we can actually do everything inside the BOX and make it a full PC mod project.......
Step 12: Supplement Pi Power
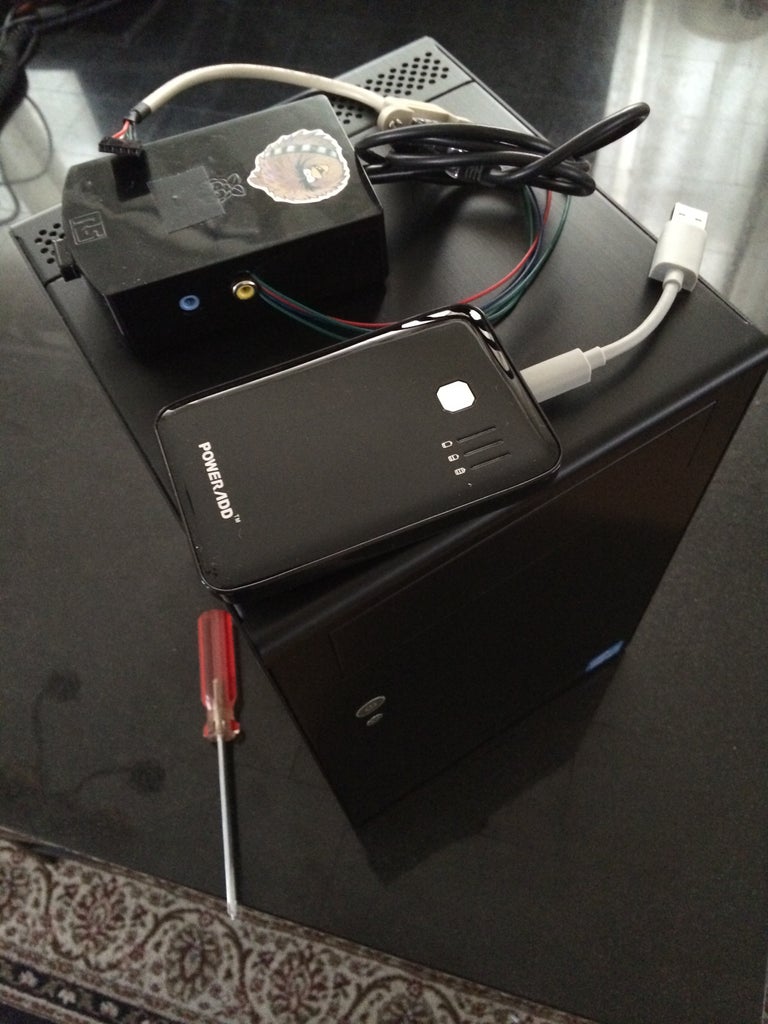
NOTE: Adding a battery to the MIX so we can keep the Pi online when we need to do remote reboots......
Step 13: DETAILS / DISCLAIMER


IT WORKS: The battery in this setup indeed charged from the Main Board and powered the Pi normally while at the time of reboot the Pi stayed online with battery power.
.
DISCLAIMER
Not all batteries will both charge and supply power; besides this, they are not designed to be used inside your PC it could void any warranty and may explode due to the heat inside your PC...... this was only a test.... I DO NOT otherwise run this setup and instead use the Pi outside and power it from the USB on my other PC or a USB power brick/block/adapter.
.
I am sure we can also use Solar/External battery pack to be safe...... future projects?
Step 14: STUFF IT


Enjoy!


