

Introduction: Pipe Wrench Table


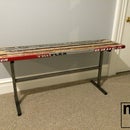
A friend gave me the idea for this table that has plumber pipe wrenches for legs. As a maker, I was so excited to build this table for my home office. My table sports a custom wood top and plumbing pipe wrenches for legs. The table top is made from a rough sawn piece of walnut wood that a neighbor gave me years prior.
Step 1: Gather Materials and Tools


Although I used many tools for this project, if necessary, you can greatly simplify the number of tools you require and I will provide those simplifying tips throughout this ible.
Supplies you will need:
- 3/4" or 1" thick wood slab for your top (I used rough sawn lumber, but you could use something precut for free by Home Depot or your favorite home improvement box store). My wood top is approximately 11" deep and 21" wide.
- 4 plumbing pipe wrenches 24" long. I used wrenches from Harbor Freight and paid approximately $13 each on sale. (TIP: look online for Harbor Freight coupons). http://www.harborfreight.com/24-in-steel-pipe-wren...
- Wood glue (only required if you are gluing your top together as I did)
- 4 3" long pieces of flat bar (something close to 2" wide by 1/8" thick) to make brackets for wrenches/legs
- 8 3/4" wood screws
- 120 and 220 grit sandpaper
- Brown spray paint
- Stain (optional)
- Polyurethane or wood sealer of your choice
- Acetone
- (Optional) Drink coaster and can of beer (could be substituted, see last step)
And you will need the following tools:
- Table saw (unless you can get your wood top already cut for free by Home Depot or your favorite home improvement box store)
- Kreg pocket hole jig, clamp and 6 screws (unless you can get your wood top already cut for free by Home Depot or your favorite home improvement box store)
- Surface planer (unless you can get your wood top already cut for free by Home Depot or your favorite home improvement box store)
- Welder to attach metal flat bar to pipe wrenches (or epoxy as possible substitute)
- Electric random orbital sander (or sanding block)
- Paint brush
- Hammer
- Nail punch
- Drill
- 3/16" drill bit
- 1/8" drill bit
- Screw driver or screw gun
Step 2: Cut and Prepare Wood Top


TIP: If you prefer, you can simply go to your favorite home improvement store and have them cut a piece of wood that is approximately 1" thick. Maple, oak, birch and pine would all be easy to find and make a great tabletop. You can use hardwood plywood, but you'd have to apply iron on edging to make the edge of the plywood look finished. My table top is approximately 11" deep and 21" wide.
I chose a more involved approach to create my top. I wanted to use a piece of walnut that a friend and neighbor gave me years prior. I wanted to have rough edges with some bark showing and make the top as deep as possible. In order to make my top, I performed the following steps:
- Attach a scrap piece of wood along the side of the wood to be cut on the fence side. This is only necessary if your wood for your top is uneven and you need the scrap wood to create a clean edge to ride against your table saw fence.
- Mark a line to indicate where to cut down length of wood. You want to have the cut piece of wood to have a consistent width across its length.
- Cut the wood down its length.
- Surface plane both sides of the wood until the surface is clean and the wood is about 3/4" to 1" thick.
- Cut the wood top in half widthwise.
- Position wood halves and determine how you'd like them to line up to ensure the wood grain looks good from the two halves being joined. Mark the wood so you will remember how the two pieces will be positioned when they are fastened together.
- Select one piece of wood (it does not matter which piece you select) and using the Kreg pocket hole jig and accompanying Kreg drill bit, drill a hole at each end of your piece and approximately every 6 inches along the joint where the wood will be joined. Here is a good video describing how to use this jig:
- Apply wood glue to both sides of your pieces where they will be joined.
- Clamp the tabletop pieces to a workbench to ensure they are both flat against your work surface. Then screw the two pieces together using Kreg screws.
- Wipe off any glue the squeezes from the joint. It is critical that you get it all off the top as this will be finished and excess glue can negatively effect your finish.
- Once the top is dry, cut the sides of the top to make sure the sides are perfectly even and smooth front to back.
That's it. Now you have a top that is cut to size. We will do our finishing in the next step.
Step 3: Finish Wood Top


In this step we will finish the top so it is ready to be assembled into our table. Do the following:
- Sand any rough areas of your top using 120 grit sandpaper. TIP: I prefer a random orbital sander, but you can definitely use a sanding block if you don't have an electric sander.
- Finally, sand your entire top using 220 grit sandpaper. Avoid any areas that are rough and contain bark to retain their natural beauty.
- Wipe off your top with a clean cloth rag.
- (Optional) Stain your tabletop if desired, I did not as I wanted the natural golden color of my wood.
- Wait for your stain to dry and then seal your tabletop using a sealer of your choice. I used water-based polyurethane.
Now, let your tabletop dry. Apply at least 3 coats of sealer to make sure your tabletop is durable. Seal all edges including sides and bottom as well was the top of the tabletop.
Step 4: Modify Pipe Wrenches to Add Brackets


Initially, I thought it might be possible to tighten the pipe wrench against the tabletop in order to attach the wrenches (legs) to the tabletop. Unfortunately, the pipe wrench, by design, doesn't really get that tight against an object. Instead, it is the pressure of the wrench as you twist it that cause the wrench to grab onto a nut.
So, we need to create a bracket that will allow us to get a secure connection between the legs and the tabletop. My approach to creating the bracket was to cut and weld flat bar to the bottom piece of the wrench mouth.
TIP: Rather than welding, you can try using epoxy to glue the brackets to the pipe wrench. I did not try this, but if you clean the metal well (using acetone) to remove any oil residue it should work. But take care to not allow epoxy to prevent the reassembly of the wrench or build up on the mouth of the wrench.
Perform the following steps to add brackets to your legs (wrenches):
- Using a hammer and nail set, tap out the pin that holds the bottom mouth of the pipe wrench.
- Use pliers to pull the pin completely out of the wrench. NOTE: do not discard any pieces as the wrench will be reassembled and all parts are required.
- Completely remove the bottom of the mouth of the wrench. You are removing this piece to make sure your welds do not blacken the paint on the wrench! You want the wrench to look nice!
- Use magnets to hold bracket pieces in place.
- Tack the brackets and double check that you are welding it properly PRIOR to finishing weld. A tack weld can be "undone" by hitting the piece with a hammer or using a grinder to remove the weld.
- Weld a bracket on each of the bottoms of the mouths of the wrenches. See photos for details on how I offset the brackets (this offsetting allowed me to get the legs really close to the edge of the table).
- Let the welds cool!
- Once cool, use acetone to clean the brackets of any oily residue.
- Spray paint the brackets taking care to cover all sides with paint to ensure they do not rust over time.
- Reassemble the bottom wrench bracket by putting bottom of mouth in position and tapping in pin using a hammer.
Now your legs are assembled. Set them aside and continue to the next step.
Step 5: Attach Wrenches (legs) to Tabletop


In this step, you need to double check (dry fit) your legs on your tabletop. Take care to not scratch your tabletop! I found that I needed my brackets to be bent a bit to have the legs sit at the right angle once attached. Tapping the bracket with a hammer easily adjusted each bracket as required.
With a helper, position your first leg on the tabletop taking care to adjust the distance from the edge as you find aesthetically pleasing. Tighten the wrench in the location where it will be attached. Note that you cannot get it very tight, but tighten as much as you can anyway. Be careful to not allow the wrench to wiggle around too much as it can damage the finish on your tabletop.
From the bottom, using a screw gun, insert two wood screws to attach your leg to your tabletop. If you are using pine or a soft wood, a pilot hole is not necessary. For any hardwood (which was the case for me), I predrilled a 1/8" hole for each screw.
Carefully repeat for remaining 3 legs. Check after attaching each leg to make sure they are being attached in a consistent manner with matching spacing from all edges of your tabletop.
Step 6: Admire Your Unique Table


Get a cold beer, take a sip and put can on coaster and take a step back and admire your unique table.
Install the table in a location where you can see it frequently (for inspiration) and where it will be a great conversation piece.
Good luck and let me know if you find ways to improve the design or built for this ible.


