

Introduction: Custom Platinum Engagement Ring- From CAD to Finish


Here's how to create a classic Diamond engagement ring from start to finish. This custom ring is made in Platinum and has one hundred small Diamonds set in the mounting. This particular style mounting uses a method known as bead setting- there are four tiny metal beads that hold each small stone in place. I'll show you how the design begins with a CAD model and walk you through the entire creation process step by step. If you ever wondered how jewelry like this is made or you're an aspiring jeweler looking to expand your stone setting skills then this is for you!
Step 1: Tools


A lot of tools were used in the creation of this ring. I'll give a general overview and then explain how all the tools are used in greater detail in the relevant sections. This isn't meant to be a complete list of all the tools used in jewelry making but it does represent all of the tools used in the creation of this particular ring.
1.) You need a solid workbench. This is where the magic happens! The vast majority of work is done at the jewelers bench. Every jeweler has their own preferences in regards to how their bench is set up and in the 15 years I've been working as a jeweler I've certainly developed my own sense of what works and what doesn't. That doesn't mean there isn't a different/better way of doing things- this is just my own personal preference. A jeweler's bench should have a thick sturdy top (it'll get hammered on a lot) and it should have a large metal lined pan to catch metal filings/scrap. I keep most of my larger tools like large hammers, files, ring mandrel, sanding sticks and my saw in this pan so I can quickly grab them.
2.) Good lighting is a must. Making jewelry is hard on your eyes so make sure you have lots of light at your work space. I use a magnifying ring light and I've found it to have nice even light. The magnification isn't very strong but it's nice to be able to drop it down in front of you to get a better view of what you're working on.
3.) When doing exacting detail work good magnification is really important. I wore magnifiers for years before getting a bench mounted stereo zoom microscope and I can tell you there is no comparison. The microscope offers much better magnification and field of view as well as a greater working distance, which is necessary when doing detailed engraving and stone setting. The microscope is mounted on a stand that allows it to be positioned wherever I want. The other scope I'd recommend is AmScope. My co worker has an Omano scope and while the optics are decent the stand isn't the greatest quality. Whatever scope you get be sure to get a LED ring lamp for it and make sure it has a .5X Barlow lens. The Barlow lens will increase the focal distance so you have room to move your hands under the scope while engraving and stone setting.
Meiji scope w/ Acrobat stand- I've been using this scope for several years and it's outstanding.
AmScope w/ stand, barlow lens and ring light- an excellent buy if you're on a budget.
4.) Rotary tools. I probably use these more than any other bench tool. Rotary tools are used for drilling, grinding and sanding. I have two Foredom flexshaft motors- one with a quick change handpiece and another with a #30 handpiece. The quick change handpieces are really nice for stone setting since you can change burs really fast. The #30 handpiece is great for using drill bits, large sanding rolls and large rotary burs. The Foredom flex shaft motors last forever- mine are over 15 years old. The #30 handpiece will also last forever. I manage to wear out the quick change handpieces every 1 1/2 to 2 years. I've been using a NSK Evolution EMax micromotor rotary tool for some time now and it's the cat's pajamas. It is simply the finest rotary tool I've ever used and they're known for being extremely robust. The big benefit of micromotor rotary tools is the motor is in the handpiece so you're not fighting the tension of a flex shaft drive cable- it's a pretty big deal when you're doing delicate work and stone setting. Unfortunately the NSK EMax is also very expensive! Foredom does make a less expensive alternative- while it's not as nice as the NSK it's less than half the cost and if I were on a budget I'd definitely go for it- I liked it a lot when I got to try it out.
Foredom flex shaft kit w/ #30 handpiece and accessories
Faro #10D quich change handpiece- if you want a quick change handpice for your flex shaft this is the one to get as it's the most durable one out there and it has a duplex spring for greater mobility. Trust me on this one- I've used pretty much every quick change handpiece made.
Foredom micromotor rotary tool
5.) GRS Benchmate with drop plate. This wonderful tool is designed to hold rings by either the inside of the ring (using an expanding mandrel) or by the outside (using a clamp.) There is also a bracket that holds a standard wood bench pin. The drop plate allows it to sit low enough so you can use it with a stereo microscope- this enables you to do very intricate engraving and stone setting work.
Drop plate
6.) Gravers. These are cutting tools that are designed to remove metal for engraving and stone setting. They come in all different shapes and sizes. The gravers I used for this ring are a knife edge, onglette and flat gravers. GRS makes a power hone with a dual angle fixture for sharpening gravers- this allows you to set up a specific angle for sharpening the tip of the graver. It's a super easy and quick way to sharpen gravers to exact angles. I've been using one for around 15 years and it's the best. Gravers can also be sharpened with a Diamond lap or sharpening stone.
If you want to grind your own gravers use these- http://www.ottofrei.com/Grobet-High-Speed-Steel-Gravers/
This is a set of stone setter's gravers already cut and ready to go- 12 different gravers are included in the set.
I use this quick change graver handle- you attach the gravers to the individual inserts.
GRS Power Hone with sharpening fixture and sharpening wheels
7.) Files, inside ring bur and sanding rolls. I use a large coarse flat file for removing casting sprues and flattening sides of rings and a fine half round file for shaping the inside edge of rings. I use a small barrette needle file for shaping prongs after stones are set. I use a large carbide bur for cleaning up the inside of ring castings and sanding rolls for finishing/smoothing the insides of rings.
Flat coarse file- http://www.ottofrei.com/Grobet-Swiss-Vallorbe-Valtitan-Files-Flat-Hand-8.html
Half round fine file- http://www.ottofrei.com/Files-Half-Round-8-Inch.html
Barrette fine needle file- http://www.ottofrei.com/Files-Needle-5-1/2-Inch-Barrette.html
Inside ring bur (part #120.292)- http://www.ottofrei.com/Carbide-Inside-Ring-Bur-with-1-8-Shank.html
Sanding rolls (120 grit)- http://www.ottofrei.com/3M-Cartridge-Roll-1-2-x-1-Pack-of-25.html
8.) Burs, polishing wheels and drill bits. For this ring I used several different shape burs. Straight stone setting burs, 90 degree Hart burs, ball burs and Krause burs are used for stone setting and cleaning up raw castings. Rubber wheels are used for smoothing and polishing. I use a dressing stone for shaping the rubber polishing wheels. Small drills are used for drilling relief holes for stone setting. I use a mandrel that holds small polishing points for polishing small areas. I use beeswax as a lubricant when using burs- it prolongs bur life and allows for a cleaner cut. I also use beeswax for holding Diamonds during stone setting.
Burs- http://www.ottofrei.com/Tungsten-Vanadium-Six-Pack-Burs-Busch-Otto-Frei-Swiss-and-Otto-Frei-Fox/
Polishing wheels- http://www.ottofrei.com/Shofu-Polishing-Wheels/
Dressing stone- http://www.ottofrei.com/Silicon-Carb-Dressing-Stone.html
Drills- http://www.ottofrei.com/High-Speed-Steel-Twist-Drills-Number-80-30-.343mm-3.264mm-.0135-.1285-Inches.html
Polishing points- http://www.ottofrei.com/Ottotech-Flexacrylic-Rod-Polishing-Kit.html
Beeswax- http://www.riogrande.com/Product/100-Natural-Beeswax-Stick/110022?Pos=1
9.) Sanding wheels and sticks. Sanding wheels are used with a rotary tool to smooth castings and shape metal, especially in small areas. Sanding sticks are used on larger surfaces (like the sides of rings) to smooth and shape metal. I use a split mandrel to hold a strip of sandpaper for final finishing of inside of rings.
7/8" coarse sanding wheels (part #111.911)- http://www.ottofrei.com/Moore-s-Discs-Adalox-Pack-of-50-Discs.html
7/8" fine plastic backed sanding discs (part# 111.976)- http://www.ottofrei.com/Moore-s-Plastic-Discs-Sand-Pack-of-50-Discs.html
Split mandrel- http://www.ottofrei.com/Split-Mandrel-Straight-Type-3-32-Shank.html
Sandpaper (I use the 80 micron and 15 micron)- http://www.riogrande.com/Product/3M-Imperial-Micro-Finishing-Films/337311?Pos=5
10.) Burnishing tool. This is used with a rotary tool to smooth metal where there is microporosity in a casting. Porosity is often found where a sprue is removed- there may be tiny little pits left in the metal (due to how the metal cools during the lost wax casting process) so they need to be burnished down and smoothed in order to get a nice surface for polishing.
I use the 10mm recessed burnisher (part #118.084)- http://www.ottofrei.com/Burnishers.html
11.) Beading and millgrain tools. Beading tools are small round tools that have a cupped end- these are used to form small beads of metal for holding stones in place. Millgrain tools are small round cupped wheels that are used to form beaded decorative edges.
Beading tools- http://www.ottofrei.com/Beading-Tools-Swiss-Set-Of-24-Tools-0-22-Plus-One-and-Handle.html
Millgrain tools- http://www.ottofrei.com/Millgrain-Tool-Set-Of-6-With-Handle-On-Hardwood-Stand-4-6-8-10-12-and-14.html
12.) Pliers. I use flat nose pliers and chain nose nose pliers for stone setting. Gem set pliers are used when setting large prong set stones when smaller pliers cannot reach across the prongs. I've used many different brands of pliers over the years and I've found Lindstrom to be the best there is- they will last a lifetime.
Flat nose and chain nose pliers (Model #s 7940 and 7893)- http://www.ottofrei.com/Lindstrom--Supreme-Line-Pliers.html
Gem set pliers- http://www.ottofrei.com/Wes-Gem-Brand-Gem-Set-Pliers.html
13.) Dust blower and engraving tool. I use the dust blower for blowing out debris when using cutting burs. The engraving tool is something I made from an old bur (I shaped/sharpened the end with a Diamond lap but any sharpening stone will work just as well)- I use it for engraving markings on the inside of rings.
Dust blower- http://www.ofrei.com/page242.html
Diamond lap- http://eze-lap.com/products/diamond-hone-stone/
14.) Wire wheels, brushes and polishing compound. The wire wheels and brushes are used with a rotary tool- the wire wheel is used for deburring and the brushes are used with a polishing compound for polishing hard to reach areas. For polishing Platinum I use three grades of Japanese Platinum polishing compound.
Wire wheels- http://www.ottofrei.com/Steel-Brush-3-4-.003-Crimped-Wire-Unmounted-3-32-Hole.html
Bristle brushes- http://www.ottofrei.com/Mounted-Natural-Bristle-Brushes/
Polishing compounds (800, 1500 and 8000)- http://www.ottofrei.com/Japanese-NW-Platinum-Polishing-Compounds.html
15.) Polishing motor/dust collector. Jewelers do a lot of polishing and this polishing station allows all of the dust generated during the polishing process to be collected in a filtration system. There are a lot of dust collection systems out there with a huge price range. The important thing is that you have some kind of collection system so you're not breathing in particles from polishing.
The polishing system at my work is pretty similar to this model except ours is a single hood setup that is a bit more powerful- http://www.ottofrei.com/Store/Handler-Full-Size-Dust-Collectors-Systems/Handler-600JP-Dust-Collector-System-Complete.html
A less expensive system would to use a Foredom BL motor kit with a separate filtered hood/dust collector.
16.) Ultrasonic cleaner and steamer. An ultrasonic cleaner is the best way to remove polishing compound. A steamer is used to quickly dry jewelry after it has been rinsed with water after the ultrasonic bath. Again a huge price range for this kind of equipment. A quick note about ultrasonic cleaners: certain fragile stones like Tanzanite, Emerald, Opal and Pearl should never be placed in an ultrasonic cleaner as they can be damaged by the ultrasonic.
We use a Crest ultrasonic cleaner- this is something that will get an awful lot of use so buy a good one, take care of it and it will last many, many years. I prefer digital controls vs knobs because it's easier to clean- also never had problem with durability. I've used cheap ultrasonic cleaners and they don't hold up to shop use- ditto for steamers.
Steamer- http://www.ottofrei.com/Steamaster-Steamer-2-Gallon-HPJ-2S.html
17.) Jeweler's saw. I use this for cutting out detail areas. I primarily use 4/0 and 8/0 saw blades. The 8/0 saw blades are great for cutting in very small areas while the 4/0 blades are used for cutting rings for sizing and for cutting thicker sheet material. Antilope blades are good quality at a reasonable price. Cheapo saw blades don't cut well (or straight) and break really easily.
Jeweler's saw
Antilope 4/0 saw blades- buy them by the gross pkg (144 blades)
Antilope 8/0 saw blades
18.) Ring mandrel. This is used for making sure the ring is round and that it is the proper size. 90% of the time I use a smooth taper ungrooved mandrel. Grooved mandrels are used when you have a stone that sticks through the bottom inside of the ring.
http://www.ottofrei.com/Steel-Ring-Mandrel-Graduated-USA-sizes-1-To-16-Made-in-the-USA.html
19.) Brass pusher. This is used to help position small Diamonds and push them into place while setting. The brass is soft enough not to damage the Diamonds. The tool is made by inserting a small length of 1/8" diameter brass rod into a wood graver handle. I like the graver handles that have a flat on them so they don't roll around on your bench.
http://www.ottofrei.com/Wood-Graver-Handle-1-2-Head-Short.html
20.) Rawhide mallet. A rawhide mallet is used to shape metal without marring it- great for hammering rings round.
http://www.ottofrei.com/Rawhide-Mallet-3-41mm-Head-Diameter-8-Oz.html
So that's a lot of tools and many of them are pretty darn expensive! One thing I tell people that are starting to get into jewelry work is check Craigslist ads for used tools or jewelry stores or schools that are selling off equipment. Most of the big ticket items like benches, ultrasonic cleaners, steamers, polishing motors, dust collectors, microscopes and flex shaft motors can be found second hand and most of these tools are really well built tools that were meant for production environments so as long as they are in decent working condition more than likely they will last you a long time.
Step 2: Tool Prep


In this section I'll cover a few specific things- making sanding sticks, prepping gravers, dressing polishing wheels and prepping files.
1.) Making sanding sticks.
A sanding stick is such a simple tool but having a really good sanding stick makes a big difference. Here's how I make mine. Get a plastics shop to cut some 1' wide by 1/4" thick by 12" long sticks for you. I think mine were cut from HDPE stock. Get some 3M Imperial micro finishing film- this is the best sandpaper I've used. I use 80 micron (180 grit) for my coarse stick and 15 micron (600 grit) for my fine stick. Cut the sandpaper into strips and glue the strips to the faces of the plastic sticks using 3M Super 77 spray glue. Trim the edges of the sandpaper to match the edge of the stick with a razor blade if necessary.
The beauty of this plastic backed sandpaper is that it always gives a really nice even finish and it lasts a really long time. When it wears out, simply peel it off the plastic stick and glue another strip on. You can also dunk the sanding stick in an ultrasonic cleaner to clean it- any metal particles will come right off the sandpaper.
2.) Prepping gravers.
Here's how I prep and sharpen my gravers. The care you take making sure your gravers are clean and sharp will make a big difference in your bright cutting and stone setting work. Gravers are typically sold in long, uncut form so the first thing you need to do is grind away the tang a bit so the graver can be fit to a handle. This is done using a standard bench grinder with a grinding wheel. Only grind away a small bit at a time. Keep a small cup of water next to your bench grinder and dunk the graver in so it doesn't get too hot- this will help it keep an edge after sharpening. Wood handles are the traditional standby but I really like the new style quick change handles as they allow you to fit multiple style gravers to a single handle.
Once you have a handle mounted the next step is to grind a relief on the back of the graver. This relief serves two purposes- first, it gives you greater clearance when working in a confined space and second, it makes sharpening much faster since you now are sharpening a much smaller area. After the relief area is removed grind a bevel on each side of the relief edge.
Now grind the cutting face of the graver. All graver sharpening angles are done relative to the bottom edge of the graver. The face of the graver is usually cut at a 55 degree angle using a 600 grit wheel followed by a ceramic wheel that polishes the cutting face. Flat gravers get an additional step: the flat bottom of the graver gets a 10 degree relief ground and polished- this will give a nicer finish when cutting flat areas. If you don't want to grind your own gravers there are gravers available that are already ground to shape and ready for insertion into the handle of your choice (see the Tools section.)
3.) Dressing polishing wheels.
This is really simple- use a dressing stone to shape polishing wheels as necessary. The important part is to keep flat surfaces on your polishing wheels- this will help avoid wavy surfaces when you're smoothing metal.
4.) File prep work.
One thing I do is polish the edges of my smooth edged small files, especially files that are used to shape prongs after stones are set. I use a small Diamond lap and run it over the edge of the file to remove any rough edges and then polish the edge of the file using a polishing buff with a stainless steel polishing compound. Doing this will help avoid the file putting any damaging marks on a stone (especially soft/fragile stones) when shaping prongs.
Step 3: Terminology


To make things a bit easier I've found it helpful to have a couple of simple diagrams that show the specific names used to describe a typical round brilliant cut Diamond and a ring design.
Diamond terminology-
Culet- this is the bottom point of the stone. You don't want this touching metal when setting a stone.
Table- this is the top flat portion of the stone. When setting a stone you want this to be as level as possible.
Girdle- this is the outermost edge of the stone and as such it is what a prong holds onto in a typical multi prong setting.
Ring terminology-
Center head- this is what holds the main stone in a typical engagement ring.
Prong- this is the part of the center head that comes into contact with the stone. Notches, called seats, are cut into the prongs and they hold the stone in place. Heads for round stones typically have four, six or eight prongs.
Shoulder- this is the uppermost portion of the ring that leads up to the center head.
Ring shank- this is the lower part of the ring.
Step 4: CAD Design


The ring was designed by my boss using the Matrix CAD program (see Resources section.) This is a CAD program that is based on Rhino and is tailored specifically for jewelry design.
One thing to consider when using CAD for designing rings for lost wax casting is that you need to overbuild the model somewhat to allow for shrinkage and finishing/cleanup work. As an example, if you wanted the finished width of the ring to be 2mm then the model you send out for casting would probably need to be between 2.1mm and 2.2mm width. The first image shows what the finished model looks like when it is sent out for casting.
You will notice that this model is different than the last model that is shown with all of the stones in place. The model that has all of the stones in place is a version that is used to show a client approximately what their finished ring will look like. It can be difficult for people to visualize what a ring will look like if they are only shown the model that is sent out for casting. The model that is sent out for casting only needs to have dimples that locate where the stones will be set due to the method of stone setting that will be used in the construction of the ring.
Picture #1- the center stone (1.95 carat Diamond) and the profile of the ring.
Picture #2- the beginning construction of the center head. This is done by creating the under bezels and then defining a prong shape.
Picture #3- the completed head with the rest of the prongs added.
Picture #4- the center head removed and the cross section areas along the profile. The cross section profiles determine the height and width of the ring shank.
Picture #5- what the ring looks like after the cross section profiles have been swept.
Picture #6- a cutter shape is made to alter the ring shape for the center head.
Picture #7- what the ring looks like after the cut section has been removed.
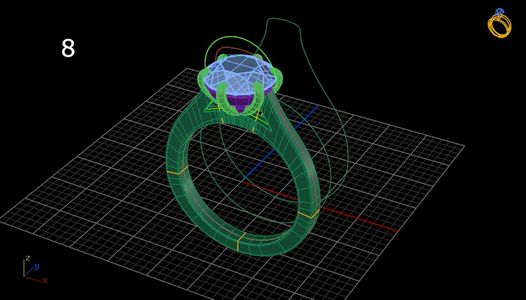
Picture #8- what the ring looks like after the center head has been added back in.
Picture #9- adding small stones on the sides of the ring.
Picture #10- placement of the small stones along the top of the ring shoulders.
Picture #11- the finished layout of all of the small stones.
Pictures #12 and #13- creation of cutters for all of the small stones.
Picture #14- stones placed in cut channels.
Picture #15- the addition of small beads that hold the stones in place. This is then rendered to show to the client to give them an approximate idea of what the ring will look like when completed. Note that the style of stone setting shown here is different of that of the finished ring. The CAD model shows what is called a shared bead setting, whereas the finished ring uses what is called an individual bead setting.
Picture #16- what the CAD model looks like after the stones have been removed and markers have been left as locators for the stones. Note also that the prong shape is different as this is what you want a setting to look like before the center stone is set. This is the model that is sent to the casting facility.
The ring was cast in 95/5 Platinum/Ruthenium alloy and turn around time is usually around one week after the CAD file is sent off.
Step 5: Cleaning Up the Casting


When the ring casting arrives from the caster I check it over for any defects. You want to make sure there aren't any major pits or areas where the casting is incomplete.
Next I take the ring and slide it on a ring mandrel to check the finger size. Usually there is some deformation during casting due to shrinkage so the ring needs to be rounded out. When the ring is on the mandrel I tap it with a rawhide mallet to make sure it's round. Next I clean up the inside of the ring with a large rotary bur followed by a sanding drum, checking the finger size as I go.
Once the inside of the ring is cleaned up I take a large flat file and remove the sprue on the bottom of the ring. Sometimes there can be small pits left in this area so they are smoothed using a burnishing tool. Now I take my large flat file and file the bottom and sides of the ring flat and follow this with a coarse and then fine sanding stick. I often use sanding discs to smooth detail areas such as around the shoulders of the ring. Next I take a fine half round file and put a slight radius on the inside edge of the ring. This removes the sharp corner on the inside ring edge and makes the ring more comfortable to wear.
Now I start the detail work. This involves using a jeweler's saw with a 8/0 blade to clean up the openings around the head and top of the ring. At this point in time it was decided to reshape the bridges on the sides of the center head so they were recut using the saw and burs to give more of an arc shape vs. the previous straight lines. Next I take a ball bur and clean up the inside of the top of the ring where the center stone is set. A Krause bur is used to clean up really small areas like corners.
Once I'm happy with the overall shape of the ring I use brownie polishing wheels to smooth the surface of the ring.
Step 6: Stone Setting Prep Work


Now the fun begins!
The first step in getting the ring ready for stone setting is drill small holes where the the stones will be placed. I start with the smallest stones first. The smallest stones are .8mm diameter so I used a #72 drill (.63mm diameter) to drill the shallow holes. The drill used just needs to be slightly smaller than the diameter of the stone to be set. The holes only need to be drilled just beyond the depth of the stone that will be set, so that the bottom of the stone will not hit the bottom of the hole when it is set.
Now I take a straight setting bur the same size as the stone and make the hole just large enough to hold the stone. The setting bur should be placed deep enough in the hole so that the very top of the stone (the table) should be just barely below the surface of the ring.
Next I hold the ring in a fixture (GRS Benchmate ring holder) and using a onglette graver I cut a line through the center of the holes I just drilled. Then I cut lines along the outside edges of the stones- these lines will create the borders of the stones.
Now I use a small flat graver and cut out the area between the center of the small holes and the borders. This creates small triangular sections between the holes. Now I very carefully use a knife edge graver and split the top of each triangular section. Having a stereo microscope really helps with this process. You have to be pretty careful when splitting the top of the tiny triangular sections as you can easily tear off a chunk of metal, especially when working with something this small.
This process is then repeated over the entire surface of the ring where stones will be set.
Step 7: Pre Polishing


Once all the stone setting prep work is done it's time to pre polish the ring before setting the stones. This will give a night bright finish under the stones and in all the small areas that will be hard to access after the stones are set.
First I use a small wire brush on all the areas where the stone setting prep work was done. This will remove any small loose bits of metal around the the stone setting areas.
Next I use brownie and greenie wheels to smooth and polish any areas that have small nicks or blemishes that occurred during the stone setting prep work.
Now it's time to do some polishing. When polishing Platinum I use three Japanese Platinum polishing comounds- these are available in 800, 1500 and 8000 compounds. 800 compound is the most aggressive compound so it is used first, followed by the 1500 and 8000. The 8000 compound will give a very high polish.You have to be a bit careful with the more aggressive compound around the areas where stones are to be set as the 800 compound can remove a lot of material pretty quickly, so I'm mostly concentrating on the large area around the bottom of the ring using large buffs with the big polishing motor. I use a separate buff for each compound.
The important thing to remember when polishing is don't stay on any one area for too long. You always want your rubber wheels, polishing buffs and brushes to be moving in different areas/directions so you can avoid putting polishing lines or grooves into the metal.
Once I'm happy with the large areas I repeat the polishing process around the detail areas using small brushes with my rotary tool. After using the brushes the ring is put into an ultrasonic cleaner to remove all of the polishing compound and then it is steamed dry. When finished you should have a nice even high polish all over the ring.
Step 8: Stone Setting


Now it's time to set the small stones.
The first thing I do is arrange all of my stones in order from biggest to smallest for each section where they will be set. The stones are placed in a small stainless steel tray so it's easy to keep track of them- these little guys can disappear really easily! One thing I do is always count the number of stones to be set and weigh them (in carats) before they are set. This makes it a lot easier later on when the client wants an appraisal done because you'll know the exact stone weight.
I begin by setting the smallest stones first. I pick up each stone with a bit of beeswax and check the fit in each opening. I prefer to use beeswax because when you pick up tiny stones with tweezers sometimes the stone will move a bit and the tweezers will snap shut and launch your stone across the room. Spending a lot of time searching the floor for lost stones is not fun!
Burs tend to run a bit undersize so sometimes your stone may measure 1.02mm and your bur may measure .98mm so you need to move the setting bur around a bit in the stone seat in order to get the stone to fit properly. The stone should be a snug, but not tight, fit. Sometimes you can use a brass pusher to push the stone into place but you should never have to force the stone to fit. Make sure to clean out any debris out of each stone seat using a dust blower before setting the stone.
After placing a stone I use a small beading tool to move the tiny bit of metal in each of the triangular sections over the stone- there are four beads of metal for each stone. The beading tool used should be slightly bigger than the bit of metal to be formed over the stone. You should have a nice round metal bead in four corners that hold each stone in place. You don't have to push the beading tool very hard to get the metal bead to form as Platinum moves very easily. When the beads are formed you will notice that there will be excess metal around each of the beads- this is perfectly normal.
After the all of the stones are set you can go back and cut away any excess metal that appears on the top of the stone using a small flat graver. Follow this by cutting away any excess metal that appears around the previously cut borders using an onglette or knife graver. You'll more than likely see marks left on the ring by the gravers, especially around the areas where it's hard to cut due to tight clearances so you have to go back and remove any marks with brownie and greenie wheels.
When setting stones it is important to try and make sure the stones don't overlap each other- the girdle of each stone should come very close to each other but not actually touch. What I do when setting small stones is set the smallest stones first, then the largest stones and then fill in the middle sizes, adjusting the fit of each stone as I go.
Once all of your side stones are set give it quick once over with the small wire brush, followed by a light polish using the Platinum polishing compounds and then clean it for five minutes in the ultrasonic cleaner.
If you did a good job none of the stones will be loose or will have come out during the ultrasonic bath. Be sure to check and make sure all of the stones are tight after cleaning- I check each stone under the microscope by pressing down on the stone with the tip of a graver or an old small bur to see if it moves. If any stones are loose use the beading tool to tighten them.
Step 9: Millgrain Work


Time to make the edges pretty!
For this step I use a millgrain tool. A millgrain tool is basically a small wheel that is rolled over the metal that forms the borders around the edges where the stones are set. The trick when using a millgrain tool is to roll it along the edge in as smooth a motion as possible. If you have to go back over any areas make sure to get the wheel lined up just right with the pattern or you'll get double lines, which won't look good. What you want is a nice decorative beaded edge around all of the stone setting work. There tends to be some areas that the millgrain tool can't reach (usually in corners) and for that I just use a beading tool that matches the size of the millgrain tool.
Step 10: Setting the Center Stone


Round brilliant cut Diamonds are probably the easiest of all stones to set in a prong setting. The first thing I do is check the fit of the stone. I hold the stone on top of the prongs with some beeswax to gauge how far into the prong I need to cut a seat for the stone. The seat for the stone is cut using a 45 degree Hart bur. I gauge the height of the seat by where I want the stone's girdle to sit- I usually like to have it sit around 1mm to 2mm above the bridge under the stone but every job is a bit different as some people want the stone to sit very low and other people want it to sit high.
Once I know where I want the stone to sit I cut the seat in each prong. The trick here is to get it the same height on each prong so the stone sits level. I also make sure to never cut the seat more than 1/2 the depth of the prong, otherwise the prong will be prone to breaking or cracking at the cut line.
Once my seats are cut I bend back the prong slightly using needle nose pliers and drop the stone into place. I like to set stones so that the top facets of the stone line up with the prongs on the top of the ring. Next I take my flat nose pliers and gently squeeze the prongs together so the top of the prong is just barely touching the top of the stone.
Now I do what is called vector tightening. Using my pliers I grab two prongs next to each other and squeeze them together, working my way around the stone by grabbing opposing sets of prongs and squeezing them together until the stone is tight. This is a very safe way to tighten stones as it puts very little downward pressure on the girdle of the stone. If the prongs are too far apart or too difficult to move with flat nose pliers I'll use parallel gem setting pliers as they can open quite a bit further to accommodate really large settings. I then check the stone to make sure it is secure by gently trying to move it with tweezers or with beeswax.
After I'm happy with how the center stone looks I file down the height of the prongs and then round them off using a small barrette file. Then I smooth the tops of the prongs with brownie and greenie wheels to make sure they don't have any rough edges and won't catch clothing fibers.
Step 11: Add the Hallmark

Almost done!
Now I inscribe a manufacturer's mark and a hallmark that shows the metal alloy used inside the ring. One way to do this is to use a manufactured stamp but on delicate rings I prefer to do this using a homemade scribing bit as striking a delicate ring with a large stamp can deform the ring.
I put my scribing bit in my rotary tool and engrave the proper markings on the inside of the ring. Since this ring is made from 95/5 Platinum/Ruthenium I inscribe "PLAT" inside the ring. In order for a ring to be marked "PLAT" or "Platinum" is has to be at least 95% pure Platinum alloy.
I then use my sanding sheet mandrel to lightly finish the inside of the ring, removing any small metal burrs that resulted from the engraving process.
Step 12: Finished!

Now give the ring one last final polish with the 8000 Platinum compound followed by a thorough cleaning in the ultrasonic. Check it over once more to make sure all stones are tight and secure. Now weigh the ring on a gram scale to get the finished weight- again this is for appraisal purposes.
Finished!
I hope you enjoyed following this instructable. If you're an aspiring jeweler or just want to learn more about the jewelry creation process I hope you found it informative. As always, if there are any questions or any step of this process is unclear just let me know!
Step 13: FAQs

Q: Why Platinum?
A: Platinum is the strongest of all precious metals- jewelry made with Platinum tends to be more durable than jewelry made using other precious metal alloys. Platinum does not tarnish like white Gold alloys so it does not require Rhodium plating to maintain a bright white finish. Platinum is also a very dense metal with very little memory so when you move prongs or form metal beads to tighten stones the metal tends to stay put, whereas white Gold has some springiness to it- it tends to relax a bit after stones are set so it can require more force to tighten stones. Some people also have an allergic reaction to Nickel in white Gold alloys that can cause a skin irritation- Platinum does not have this problem.
Q: Is there anything where Platinum isn't necessarily the best choice?
A: Friction earring backs and certain types of clasps. For these applications it's better to have a metal alloy that has some spring to it so white Gold is usually preferred in these applications. Since Platinum is so dense it also may not be the best choice for large, chunky jewelry designs- especially pendants and earrings since the weight of the finished piece can make it uncomfortable to wear. Palladium is often a good alternative in this instance.
Q: What Platinum alloys do you use?
A: For castings 95/5 Platinum/Ruthenium is the way to go. For designs that require a fair bit of hand fabrication 90/10 Platinum/Iridium is often used as it responds well to rolling, forming and hand forging processes.
Q: Regarding Diamonds, what matters most- carat, cut, color or clarity?
A: Everyone has their priorities but speaking as a stone setter, what matters to me most is the cut of the stone. A well cut stone is easier to set straight and level and will always show greater brilliance than a stone that has a poor cut but maybe higher color or clarity.
Q: Is setting faceted colored stones different from setting Diamonds?
A: Absolutely. Most faceted colored stones are more fragile than Diamonds so they require greater care when setting, especially stones such as Emerald or Tanzanite. Many colored stones are also cut very differently than Diamonds- typically they are more "bellied"- the underside of the stone (called the pavilion) is sometimes much deeper and the girdle of the stone can be much thicker so they can require prongs that are thicker or settings that can accommodate greater stone depth.
Q: How long does custom jewelry take to make?
A: Typical turnaround time is four to six weeks- usually a maximum of four weeks from the date of design approval. The actual manufacturing time can vary greatly depending on the complexity of the piece- it could be anywhere from several hours to several days of work.
Q: How long does it take to work up a jewelry design?
A: Usually around one week.
Q: Why would I want to be a jeweler?
A: Are you kidding? You get to beat metal with a hammer and play with fire and dangerous chemicals. It's the best job there is! :)
Step 14: Gallery


I wanted to show a couple of jewelry pieces I made that use the exact same stone setting method as shown in the instructable.
The first piece is a white Gold ring with a large orange Sapphire and 328 small Diamonds. Most of the Diamonds are about .8mm diameter.
The second piece is a rose Gold pendant with a large red Zircon surrounded by white and champagne Diamonds.
Both of these jewelry pieces were a lot of fun to make. :)
Step 15: Resources

Jewelry design software-
At my work we use Gemvision Matrix software. It's a 3D modeling package that is specifically designed for the jewelry industry. My boss loves it.
http://gemvision.com/matrix/
Casting facilities-
Techform casting
Techform is in my experience the best Platinum/Palladium casting facility there is. The quality of their work is fantastic and they're just a great company to deal with. They can also arrange to have your 3D casting model created at A3DM right next door to them so it's a one stop shopping for Platinum casting. Techform can also cast in Stainless Steel and Cobalt-Chrome alloys. They do not do any Gold or Silver casting at this time.
http://techformcasting.com/jewelry
Best Cast casting
Best Cast can create your 3D model in house and cast using Gold, Silver, Platinum and Palladium alloys. They have quick turnaround times and really good customer service.
http://www.best-cast.com
Metal suppliers-
United Precious Metals and Hoover & Strong are both good suppliers of sheet, wire, tubing and casting grain.
http://www.unitedpmr.com/
http://www.hooverandstrong.com
Tool suppliers-
Otto Frei
I've been buying tools from Otto Frei for many years. They stock most everything any jeweler could want and they have great customer service.
http://www.ottofrei.com
Rio Grande
Another good tool supplier. If Otto Frei doesn't have what you want then Rio will probably have it.
http://www.riogrande.com
Schools-
New Approach School
Blaine Lewis teaches all kinds of jewelry making classes. I took his stone setting class 14 years ago and it was one of the best classes ever. Highly recommended!
http://www.newapproachschool.com

First Prize in the
Jewelry Contest

Participated in the
Epilog Challenge V


