

Introduction: Plywood Shop Cart Made With CNC Router


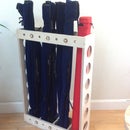


Here is a shop cart that is constructed from 3/4 and 1/2 inch plywood. The parts for this piece are cut on a CNC router.
I decided to build a set of shop carts from the scraps of various projects. The carts are very handy, as they can be easily pushed out of the way to make room to work on large pieces.
This is the first of two shop cart designs. The second can be found here:
https://www.instructables.com/id/Long-Tool-Organizer-Cart-made-with-CNC-plywood-Bro/
Step 1: Materials and Tools
Materials
(The exact amount of plywood will vary based on your cart size)
3/4 plywood - for the tray sides and legs I cut this from scrap, but you should be able to cut all from a 1/2 sheet.
1/2 plywood - two rectangular sheets for the cart trays-typical sizes are 18x24 and 24x36 -less than 1/2 sheet
1 inch coarse pocket screws - 12
3 inch fixed caster wheels - 2
3 inch swivel caster wheels -2
mounting screws and washers for the casters- 16
wood glue
Equipment
CNC router
Any plywood friendly 1/4 router bit- this is a shop cart - not worried about tearout on the cut..
Pocket screw jig and driver
brad nailer
clamps
Step 2: Design


The trick with a shop cart design, especially a smaller one is stability. Larger wheels are really nice for uneven surface but can contribute to a lack of stability.
I researched dimensions for shop carts on the web with 3 inch wheels and used this for my starting point. The typical tray sizes were 18x24 and 24x36 inch.
I wanted to make a very strong cart that was supported and locked in place by the plywood itself, and not reliant on fasteners that could loosen over time. This required a generous amount of large interlocking cutouts, tabs, and full mortise and tenon joints.
I did not want any handles on the carts, so that multiple carts could be packed tightly together is a small shop.
Step 3: Cut

This part was easy- just put a 1/4 bit on the router and ran the files for all the pieces.
Step 4: Assemble and Finish


This was a bit of a pain. Although all the parts were interlocking, the design did not lock into place until all the parts were assembled. Since it was impossible to assemble the entire piece at once, the sub assemblies had to be squared manually.
Instead of constructing some jigs for this, I eyeballed the fits. I glued and brad nailed the sub-assemblies together quickly, so I had a chance to adjust the fit when assembling the full piece.
- First assemble the trays by attaching the sides to the tray bottoms. I used pocket screws here, but this was overkill.
- Next assemble the legs.
- Now glue and clamp the whole piece together.
Once the glue has dried:
- turn the cart upside down and glue the plywood base for the wheels
- install the wheels with large wood screws.
I did not apply any finish, but it is probably a good idea to paint or varnish the piece to facilitate cleaning of spills when the cart is put into service.
That's it!
Step 5: Retrospective
Although the end product turned out to be strong, and functional, and reasonably cool looking, there are some things that I will address
- Too many parts: There are 22 plywood parts for this cart- too much cutting time.
- Assembling the piece is clumsy and time consuming - this led to some sloppy (but still tight joints): This can be addressed by designing some assembly jigs and/or modifying the design.


