

Introduction: Polishing Machined Aluminum to a Mirror Finish


This is one of many strategies to get aluminum to a mirror finish. If you have sandpaper, a buffing wheel, and some compounds, you can get pretty close to mirror. To get clearer and clearer finishes, you can chrome plate, electro-polish, or do it the way NASA recommends.
Step 1: Machine the Aluminum

I started with machined aluminum from a Haas Mill, which saves a lot of sanding time. I recommend using the facing tool on all the flat surfaces you need to make shiny. End-mills are okay, but not as good. For this (kinda) cube, I rotated the piece and faced (with a facing tool) every side that was going to be polished. The sides of end-mills were leaving machine marks that were too deep.
Step 2: Sand to the Highest Grit You Have

Because I had machined it with a very precise machine before all this, I could start with 1200 grit wet/dry sandpaper. After getting rid of all the machine marks, I sanded it with 1500, and then 2000, giving it enough time on each to make sure all of that surface gets to that grit-level.
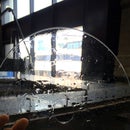
You can see from my set up that I clamped the sandpaper down using a random piece of metal, to a flat table that I've cleaned off before. (Any dirt underneath will only cause scratches in your finish). Wetting the paper makes it stick to the table as well, giving it you a flat surface to push against. Every once in a while, I would rinse off the grit in a bucket of water right next to my whole setup.
Step 3: Buffing Wheel + Rouge

The next and magical step is to hit the surfaces with a buffing wheel. At Pier 9, I used a cotton wheel on the Burr King and applied some brown rouge to to it, after knurling and cleaning the cotton a bit. Use the rouge sparingly, otherwise you'll end up with streaks of it on your metal. I placed a spongy mat underneath the wheel, just in case the Burr King caught an edge and flung it to the ground. Be sure to not even come close to the edge that will catch (like I did). Simply flip the piece around and buff from a different direction.
I sand and buff all in the same direction. This is not necessary, but it creates a uniform sheen on it at each stage which makes it easy to see what you have yet to sand/buff.
You should see it become reflective after just a light touch on the buffing wheel. Buffing it further will give it a little more clarity.
Step 4: Hand Buffer + Metal Polish

Apply some appropriate metal polish, and follow the directions on the back of the tube. At Pier 9, we have a buffing hand-tool with some nice cotton buffing heads. This saves some time and arm movements of rubbing the polish in. But after buffing it, you still need to rub the compound away with a clean microfiber cloth. If you watch the video, it's kinda magical to rub away this black tarnish to reveal a near-mirror finish.
And that's it! Be patient, and whatever strategy you use, try it on a test piece first. There are a lot of little nuances that only come with doing it a few times.
Step 5: Take Some Selfies


and don't touch it without gloves on. :)


