

Introduction: Pool Solar Heater or Optical Illusion for Entertainment


Commercial solar pool heaters are expensive, especially if you need multples. Here's how you can cobble together a solar collector/heater for your pool and create interesting 3-D optical illusions to entertain (or frighten) your neighbours and friends.
It's not as hard as it looks. If I can do it, anyone can do it.
Step 1: Why Another?

There are a lot of pool heater instructions on the internets; this one culls together the best parts of each (sort of) and provides more specific advice for the pumping situation.
Step 2: Components

- Pool water
- A pump
- Solar heater
- Water is pumped from the pool to the collector
- The collector transfers its heat to the water going through it
- The heated (sort of) water is returned to the pool
Step 3: Components, Cont.

For this 'able, we'll be using two collectors and two input/output streams.
Why?
I started out with just one collector and wanted to try more for more heat exchange.
Step 4: Tools and Materials

The hardest (uhm, next-to-the-hardest) part of the solar collector system is getting the right materials and getting them to all fit together without becoming a Rube Goldberg project.
As we go along the steps, I'll show you more details about what specific parts were used.
Step 5: Tools and Materials, Cont.

Materials
(1) Pool (this Instructable used a 16 foot Intex vinyl above-grounder) [$330]
(2) 100 feet roll of 1/2 inch poly tubing per collector (total 200 ft per collector) [$10 ea]
(1) 8 foot 2x3 stud per collector (or 2x4) [$2 ea]
(1) 4x4 foot (approx) plywood panel per collector [$9 ea]
(1) Straight internal 1/2 inch coupler per collector (for coupling together into one 200 ft tube) [$1 ea]
(30) 8 inch or longer tie wraps per collector [$3]
(1) 1/2 inch T-splitter [$1 ea]
(1) 850 gallon per hour, 12 ft head, submersible pump [$70 ea]
(1) Slightly larger than 1/2 inch portion of rubber or malleable tubing, about 2 inches long (bib) [$1 ea]
(1) small hose clamp [$2 ea]
(n) Bottles wine [$3 ea Europe, $9 ea North America]
Tools
Drill
5/8 inch or larger drill bit (for holes through which to pass cable ties)
Scissors (for lobbing off 5-inch splice to connect T coupler to pump output)
Duct tape (for patching holes in hose)
Slot screw driver (for hose clamps)
Wine glass
Step 6: COLLECTOR: Base

We'll start out with building the collector since that will give you an idea as to whether you want to continue with the rest of this nonsense.
Get a 4x4 sheet of plywood for each collector.
You can buy 4x8 sheets at the hardware store and have them cut them down to size for you. This is advised because it is easier to transport back to your house.
I got one large sheet of plywood at the local Habitat for Humanity ReStore, and the other already pre-cut as as an under layment board.
Paint the bases black and set a side.
UPDATE: using reflective material rather than black paint may be better for heat transfer.
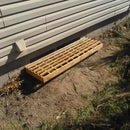
Step 7: COLLECTOR: Frame

FYI:
- 2x3 is a little lighter weight than a 2x4, but use whatever you want
- Two four-foot pieces for the frame is the right size for 200 feet of hose, or one collector
- This smaller, four-foot size frame is easier to carry and manage and thus put away at the end of the season (and move around)
- You can attach the two sections in several ways, none of which is any better than another (I tried several methods, the easiest was just to pound 'em into each other)
Step 8: COLLECTOR: Collector Piping/hose

The collector's guts consist of a lonnnnnnnnng black pipe through which the water will run and (hopefully) heat will transfer to the water.
This is the type of hose that I bought. It's cheap. It's black. Those are the only good qualities about it. Two hundred feet of 1/2 inch diameter piping will fit on the frame. This was found near the plumbing department in the irrigation and sprinkler aisle and was only sold in 100 and 500 foot rolls.
This stuff is about $11 for 100 foot, so buy two rolls for one collector, buy 4 rolls if you want to build two collectors.
FYI: why this stuff and not copper? I don't have any skill and putting copper pipes together sounded like a pretty big hassle. Plus I wanted to mimic the commercially available solar collectors as much as possible which for the most part are based on some type of black hosing.
Step 9: COLLECTOR: Piping Coupler

TIPS:
- There are different sizes and widths of these little gray plastic things so be sure to try it out on your hose while at the store to make sure it will fit.
- The guy at the hardware store told me to use a hair dryer to ensure a tight fit, but my hair wasn't even wet so I don't know what the hey he was talking about.
- He also said I needed a hose clamp but I didn't, so call the cops
Step 10: COLLECTOR: Piping Unwind

The hose is pretty kinky (but not in a good way).
So first unravel the hose as much as possible.
Step 11: COLLECTOR: Piping Winding

The idea here is that you will be winding the pipe on top of the frame around and around, similar to piping frosting onto the top of a cake.
But you'll want to leave about ten feet of hose dangling before piping. (So this is akin to piping frosting on your table first and then continue up and onto the top of the cake.)
WHY? You'll need the dangling 10 feet of frosting er I mean pipe to run the water to/from the pump and pool. You'll need to remember to do this for each end of the hose.
Step 12: COLLECTOR: Piping Winding, Cont.

You can start the piping at the outer edge of the frame and wind around, or at the center. I did both and neither was easier than the other.
In this photo I had started from the center and wound outward. Either way the hose will kink every 10 seconds.
Step 13: COLLECTOR: Piping Winding, Cont.

As you frost, you'll want to use plastic wrap ties to keep the hose in place. I used 8-inch ties (a total of 30 for one collector with 200 feet of pipe).
UPDATE:
There are several conflicting comments about the use of tie wraps; if possible you might want to get wraps that are specifically designed to handle sunlight.
Step 14: COLLECTOR: Piping Winding, Cont.

To wrap,
- Drill an initial 5/8 inch hole through the frame and right along the inside of the first loop of frosting,
- Then drill another hole on the outside of the second loop of frosting.
- Run your fingernail along the tie wrap to double-check where the teeth are, then feed it through the two holes. WHY? Tie wraps have only a one-way attachment and 99% of the time you'll get them backwards. By running your fingernail along the wrap you can reduce the percentage of frustration. Some times.
Since my tie wraps were pretty short, I actually had to use pliers to tighten the wraps.
Here is an mp4 showing (in olde thyme speed) tie wrapping a piece of the hose.
.
Step 15: TIP: Drilling Tie-wrap Hole

TIP 1
Don't get too close to the outer pipe when drilling the hole. Yep been there done that.
TIP 2
Try not to touch the drill bit too much. Yep been there burned that too.
Step 16: Alternate to Tie Wraps: Screw Heads

I saw a few collectors on the Internet where people used screw heads to act as clamps to hold the piping down. This didn't work too well for me because the screw heads just weren't large enough.
For me, the tie wraps just worked better. And they hold better when moving the thing around.
UPDATE:
Another idea for holding down the collector tubes would be to use long copper strands and/or string in a weaving-manner; i.e. poke the string/wire in and out through the holes. This would be nice because it would allow you to easily remove the string/wire at the end of the season and breaking everything down.
Step 17: COLLECTOR: Piping, Cont.

When you get to the end of the first reel of hose, use the gray coupler thing to couple to the next roll and repeat with the second hose.
Then I guess you're supposed to wash your hair and dry it with a hair dryer.
You can skip this step, of course, if you already had a 200 foot roll.
Step 18: COLLECTOR: Piping, Cont.

No matter what you do, you will end up eventually with an optical illusion.
You can stop here and put it on display or continue to unkink, unwravel, unwind.
TIP:
Unwind with a glass or two of wine at this point. This will actually make the hose look straight.
Step 19: COLLECTOR: Piping, Cont.


As you near the end of the roll of piping, be sure to leave about 10 feet or so unwrapped for water access to/from the pump/pool.
And watch out for kinks.
Being able to do yoga poses is also useful to hold down the hose between tie wraps.
Step 20: COLLECTOR: Repeat for Secondary Collector

Eventually, after enough bottles of wine, you'll have two collectors.
Place each on its plywood base.
This photo almost looks like I knew what I was doing.
Sort of.
Step 21: PUMP

This one is rated at 800 gallons per minute. Seems to work and it seems like I could add another collector and it might still chug along.
This pump was chosen because it had specs that were right on the package:
- Pumping height: 12 ft (means it can get the water up and out of the pool okay)
- Fits 1/2 inch tubing (means it should fit my hoses; more on that in a bit)
- For ponds up to 12 ft (my pool is a little larger than that, but eh not by much)
- Had a bunch of parts that looked like they could be useful (more on that in a bit, too)
- I wanted to experiment and the Intex pool pump was too much of a hassle to disconnect and reconnect
- The hoses coming to and from the Intex pool pump were huge and I knew that it would be another hassle to try to fit those hoses to the collector's tubing
- I wanted to experiment with a timer to turn the collector pumping action on and off every 30 minutes or so and I knew that the Intex pump would probably throw its circuit breaker and ruin my experiment
- I was not planning on introducing a thermo-syphoning technique
- If this whole collector thing did not work then I planned on using the pump for a fountain feature
Step 22: PUMP: Tip

Just in case you are unfamiliar with pumps, this one is submersible so you actually place it in the water. Some pumps are not submersible (i.e. outmersible).
The input of the pump usually looks like the intake of a B-52, with nasty looking propeller things. The output hole (hee hee) is usually just the other end.
Step 23: PUMP: Attach Collector Hose Ends to Output End of Pump

- Fit on the pump's output hole (hee hee)
- Fit the 1/2 input piping on the collectors
H A !
GOOD LUCK!
Step 24: PUMP, Cont.

There a few types of T splitters that are made for 1/2 inch tubing. Both, according to the guy at Home Depot, require you to wash your hair and then dry it, but I didn't. I opted for the little grey splitter since it was the easiest to use.
Step 25: PUMP, Cont.
While the little gray T splitter's output fit into the two inputs of the collectors' pipes okay, the input of the T would not attach to the pump's output hole (hee hee).
This is because the pump's output hole (hee hee) is hard plastic and the little gray T splitter could not get a grip.
Step 26: PUMP, Cont.

Therefore, the next contortion is to cobble together a piece of the 1/2 pipe, connect the 1/2 inch pipe to the little gray thing's T input, then cobble the 1/2 inch piece of pipe to the pump's output hole (hee hee).
HOWEVER!
Even though the pump's specs said that it "fits" 1/2 tubing, it doesn't say that it will fit as-is.
UPDATE:
So depending on whether the object in question is a hose, a tube, or a pipe, the "specs" will apply to either the inside diameter or the outside diameter. No word, however, on what the specification is for an output hole (hee hee).
UPDATE 2:
If you wash your hair at this stage and use a hair dryer you might be able to make the tubing pliable enough to squish on to the output hole (hee hee).
Step 27: PUMP, Cont.

So the next contortion is to cobble the 1/2 inch pipe through a bib and then to the output hole (hee hee) of the pump. A bib is an external coupler and I just made up that term.
The bib consists of a piece of tubing just slightly larger than the 1/2 pipes. Go to Ace hardware with your 1/2 inch tube and they'll be able to get you an inch or so length of bib.
Step 28: PUMP, Cont.

And add a hose clamp around the 1/2 inch pipe. You might not need the clamp, but you probably will so I recommend it. You don't need to dry your hair.
Step 29: PUMP, Cont.

- Coming out of the pump is a 1/2 inch piece of piping coupled to the pump's output hole (hee hee) with a bib and clamp
- The 1/2 inch piece of pipe is connected to the input of the T splitter
- The T splitter outputs will go to the inputs of each of the collectors' pipes
Step 30: COLLECTOR-TO-PUMP CONNECTION

From each collector, grab one end of its hose and attach to one end of the T output.
Step 31: IMMERSE PUMP

Almost done! Toss the pump into the pool and plug it in.
Step 32: COLLECTOR OUTPUT-TO-POOL

Grab the other end of the hose from each collector and place over the edge of the pool. This is where the heated (sort of) water will be pumped to after circulating through the collectors.
Step 33: (OPTIONAL) Add Thermometer

Add a thermometer to one of the collectors.
Step 34: COVER COLLECTOR WITH WINDOW OR PLEXIGLASS

I snagged a few huge windows at our local Habitat for Humanity ReStore for $10 each. I just laid them on top of each collector and shored up the sides with a few loose boards to keep the wind out.
I didn't build a complete window frame because I wanted to be able to disassemble, remove it, and store it over the winter easily. Plus I'm too lazy.
UPDATE:
The collector boxes really DO need to be insulated, so if you are planning on this type of collector, building up a frame would be worth it. You don't have to do it immediately if you are lazy like me, but try to get around to it before the season is over.
Step 35: (OPTIONAL) CHECK TEMP AFTER HOUR

On a pretty warm day (80ish) the collector (under glass) displayed about 120 degrees.
Step 36: ADD TIMER TO PUMP POWER (OPTIONAL)


As an experiment, I wanted the pump to circulate every 1/2 hour so purchased a timed socket. This allows the water to sit in the collectors for a while to warm up before getting pumped back into the pool. Or that was my theory, anyway after discussing the approaches with the experts at work. (snort!)
I went through two of the Brinks timers because the timers stopped working after 1 day.
I settled on the GE timer which actually allows you to set the time in 15-minute increments. Jury is still out on this one.
UPDATE:
THIS STEP SHOULD NOT BE NECESSARY. BUT THE TIMER IS USEFUL ANYWAY TO TURN THE PUMP ON DURING THE DAY AND OFF AT NIGHT.
Step 37: FINIS

So how's it working?
Well, as soon as it was up the clouds came rolling in.
And it's been almost raining every day since.
Step 38: FINAL NOTES

- The commercial solar pool heaters are expensive but convenient. They also require you to put them in line with the pool's filter and pump (they usually do not have their own pump).
- There are many on-line calculators out there (see this one for example) that will help you determine the number of collectors you should use. The number of collectors that you need will always be more than you are willing to build or buy, but it will usually come to about 5 collectors. With the commercial heater that I started out with initially (see photo) I have a total of 3.
- A good example of solar collector system: Filpumps
- Get and use a solar blanket as a cover. (See this instructable for easily putting on and taking off the cover.)
- Get a way to mix up the water (there is a gadget especially designed for this but I can't seem to find the link). Mixing up the warmer water on top of the pool with the cooler water at the bottom of the pool results in a better overall temperature.
- By the way, I am using this for my chlorine production: Intex Salt Water Pump
- A possible chlorine replacement (thanks to member ebb_au): Biguanide

Participated in the
I Could Make That Contest


