

Introduction: Portal Gun From 3D Printed Parts


It all started with the game. I'm not a massive fan of FPS, but my boyfriend convinced me to give Portal 2 a try. I think i'll trust his game recommendations a little more from now on, because I loved it!…which based on my 'logical' progression of thought then leads on to “I have to make it!”. And so it began.
The research began with the one and only Volpin. Harrison Krix is a real prop maker, and his ASHPD's are a treat for the eyes! Check him out at https://www.instructables.com/member/volpin/ and his blog at http://volpinprops.blogspot.com/
Needless to say, with neither the tools, nor the talent, I didn't expect to end up with a prop which could be put alongside his and look the part. So without the tools, how could we make a decent replica of everyone's favourite ASHPD?
3D PRINTING OF COURSE!!
I've uploaded this Instructable for theHurricane Lasers comp; think of all the awesome costume and prop parts that could be made with a laser cutter! Or maybe even the stand for this ASHPD which I have the acrylic for, but have neglected to complete due to being distracted by new projects. :)
This isn't a list of all the parts needed, rather a run through of the build.
Please feel free to ask any questions; i've gained so much from this community, now i'm just glad to be able to share something in return!
You can see the cosplay skit I used this prop in (which won best skit!) on YouTube here.
You can get the 3D printed parts from Jarly Props on Shapeways should you wish to use the same ones as me.
Step 1: Where Did the Model Come From?


I'm not a 3D modeler…but my boyfriend Justin is! ( @_R3D_M0NK3Y on Twitter!)
After having a poke around online, I found a few models which were okay…but none that screamed at me “I am the most accurate ASHPD model you'll ever see!”. (my last poll I asked 'What is the most important thing about a cosplay costume' – 80% said accuracy vs 20% who said being comfortable!) Since accuracy was the goal, it looked like this had to be done from scratch.
The starting point was a rip using 3D Ripper DX. The original plan was to look through a portal at the player, which resulted in the rip pulling what is being shown through the portal as it is actual 3D geometry, not just an image. (when you see yourself through a portal, you're seeing another incarnation of the Chell model, so with the portals in the right layout you could end up ripping 3 or more copies of Chell!) Unfortunately, while it was whole, the rip was so low poly it was next to useless.
The best is what you can see in the picture I've attached; it is incomplete because it is is actually what the player always sees in the bottom right of the screen, and therefore for efficiency, it didn't need to be whole! It was however the best base to work from.
Step 2: Print the Parts!


Using the materials guide on Shapeways, the walls were made thin where they could be for price, while still making sure parts which would benefit from thicker walls were given them.
We sent them off to Shapeways and a few weeks later, and in a few different boxes, all the parts arrived!
They were printed in white strong and flexible.
Step 3: Prepare the 3D Printed Parts for Construction


White strong and flexible is a porous material, so priming and sanding was in order. We used a grey body primer to see what we had covered, then sanded, then re-primed, then sanded. Well, Justin did. Again…lucky.
Because the walls were so thin, we decided slushing some resin around the inside would help to reinforce the casings. We used Barnes EasyCast which came from a local moulding and casting shop. It cures to an off white colour, so it wouldn't look out of place on the light casings.
Then came the painting, courtesy of Games Workshop paints. We went through quite a few Skull White and Chaos Black cans; the guys in the store seemed completely bemused that a girl was coming in so often for base coat paint. I'm clearly painting an army of pure win. :D
Again with the fine grit sand paper and a few more light coats of paint and the casings were ready for waterslide decals and a clear gloss finish.
(we did have troubles with the white paint and the gloss not dealing with each other; it had a reaction and crackled so we had to sand it back and start again! Advice is to do a test first!!!)
Step 4: Make Up Some of the Rest!


Under the rear casing you will find PVC storm water pipe…and a very bad builder's bog job by me!
After some hack saw cutting, then measuring, then some more cutting, the pipes got to the stage where they could be joined (with cloth tape of course!) and married with one of the tube ends with builder's bog. Now this stuff is great, but it stinks and makes a mess when you sand it!
After a quick test fit with the tray which sits under the glowing tubes, everything got bogged together!
Then the sanding began. There is an enormous amount of sanding to be done when making props i've discovered…
I didn't bother making it perfect though; it can't be seen and there are much more important things that need my time…like eating apples and drinking alcoholic beverages. (drink responsibly!)
The handle at the back is actually a kitchen drawer handle, and it's attached to a storm water cap that sits nice and snugly over the end of the storm water pipe. Perfect!
All black parts were painted several times in Chaos Black, then received a final few coatings of a clear satin to finish.
Step 5: Setting Up the Housings and for the LEDs


The perspex tubes for the lit 'bars' fit perfectly in to the 'tube end' printed parts; the outer tube has in outer diameter of 50mm, inner diameter of 46mm, and the smaller tube for the inside has an outer diameter of 19mm. I bought a cheap lightsaber ripoff, removed the diffusing film and used it in the inner tube. Originally we'd tried sanding the inner tube with a really fine grit wet rub, but you could still see the scratches. A little bit of hot glue on each end held the diffuser in place.
The barrel part and the top indicator (hole in the back casing, actually made with a berocca tin!) were diffused using 2mm acrylic which was wet rubbed (scratches didn't seem to be a problem with the sheet acrylic, just the perspex tubes…) then a water slide decal with a grill was transferred to the top. The adhesive on the decal didn't work so well, but once the parts were put together, there wasn't any room to move anyway!
Step 6: Wiring!


Now I am not an electronics engineer, but I got my grandpa to explain a few things to me. A few trips to Jaycar (electronics shop in Aus)later and I had this mess. Spaghetti! Yum!
That's right. Me make circuits.
You can hopefully see the circle plastic discs in the images; these had 5mm holes drilled out of them, and the LED's fit in snug. To make sure they weren't going anywhere (because I can't get them out so easy now!) they got a little aquadhere love.
I had ordered a soundboard from replicaprops.com, but alas my electronics skills had failed me and I didn't get it working for the convention. I have future proofed though, a speaker is at the ready at the front of the gun when electronics skills are up to the challenge.
Step 7: Putting the Parts Together


This is around the time where I started to realize just how good it was coming out and got teary. It may have been the lack of sleep and nervousness, but I didn't care!
The back casing needed to effectively 'hover'; so the larger acrylic tube made for a good support. It did a good job, but I didn't so much. Lots of Araldite and measuring incorrectly later, and the support was complete! (such a mess!)
A Berocca tin also featured as a support for the back indicator light.
Pretty much the whole thing is stuck together with Araldite. Yep.
The last thing to do was make the wires from the back casing to the claws. These are made from armature wire, with heat shrink around them. Easy, flexible, light, and lucky for me relatively cheap!
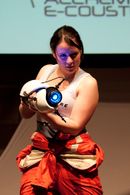
Step 8: Bask in It's Glory


The day I used this to perform was this surreal blur of nausea, shaking from sleep deprivation and shifting weight trying to tell my body I didn't need to go to the toilet. That was scary.
Many a thanks needs to go out to my boyfriend Justin. Without him, none of this have been able to come to fruition. I owe many an hour in return for time spent on my cosplay projects with me, and more again in sleep lost.
Now I just have to come up with something bigger and better.
Time to go see what Justin is playing….

Finalist in the
Hurricane Lasers Contest

Third Prize in the
Halloween Props Contest


