

Introduction: Prism Shoes - 3D Print Shoes


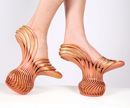
This is my first 3d print shoes and I want to share it with you...
In this instructable I will help you to understand the steps to design your 3d print shoes.
The Prism shoes were born in 2014. I studied fashion and jewellery in Bezalel academy , but I always had a crush on shoes.... ( I'm sure it's also hidden inside you )
My design emphasizes the meeting point between two different bodies and present the feet's presence even though it is absent.
For this instrutable you will need: plasticine, scan of a last, access to a 3d printer, knowledge in 3d software and to free you imagination....
Step 1: Find Your Inspiration


Inspiration is something that fascinates you, that you cannot stop thinking about it and you can spent hours reading and researching about it.
This shoes were inspired by the psychedelic art in the 20th century and the album Dark Side Of The Moon by Pink Floyd.
I like to do a deep research and to encircle the subject from different sides. I took a prism and a flashlight and started to play with it in the dark looking for a new shape and the rainbow. on the other hand I drew an abstract drawing and started to look at how it looked through a magnifying glass and how it changed the way my drawing looked.
Try whatever interests you, this is my favorite part of the design .
Step 2: Sketches


You need to sketch your vision. With all your details you could think about it....
Try to 3d modelit, then it could help you to feel the shoes before you print it and to measure the size. Then you could know what you want to change... because when you design shoes on the computer all you want to do is to try it on.
I used plasticine, it can be easily sculpted with great results. When starting to design by plasticine it's better to warm it ( you could use the microwave), when finished or want a break you can put it in the freezer and it will become stiff and then you can smooth the plasticine and do your finishing design.
But whatever feels comfortable to you is good for your design...
When you feel satisfied with your design you should do a technical sketch with all the details in different sizes, from all the different views (like my photo).
Step 3: 3D Software


Go to your computer and choose your favourite 3d software (solidworks/ rhino / 123D / tinkercad / onshape / meshmixer... ) and start designing your vision.
I chose solidworks in this case ...
my step:
1import the scanned last ->
2 make a surface from the scan last -> thicken the last by 5mm->
3sketch the prism -> boundary surface from the prism sketch that you can use for the solid of the prism ->
4 sketch to cut the thicken of the last->
5 cut extrude and surface cut to thicken of the last -> combine every solid part ->
6fillet is always good to make your design looking better :)
can't wait to see your design !!
Step 4: STL File

When you finish your design, you should prepare your file to be ready for printing .
-The thickness is adjusted for your printer
-The shape without support (if you use a FDM printer)
-The shape its like you wanted
-The shoes are on the work plane (if you use tinkercad / onshape / 123D ....)
- Everything is combined and solid, no hole or surface .
Then export the file to STL (file -> save as -> save as type: STL )
The triangle that you see is called a mesh, and this how the computer translates the shape to the software of the printer .
Step 5: Print


The fun and the satisfactory part ... choose the right printer for you work.
I wanted it to be transparent so I choose an Objet printer with the material: fullcure 720
Before printing you have to cnosider a few factors, what do you consider the most important detail in your shoe? do you want the shoe do be in high resolution? do you want to walk with it? for beauty? prototyping?
If you plan on walking with it you have to print with a strong material that can carry your body weight, when walking our feet exerts 10 times the weight of our body towards the floor!
*my advice for a strong print is printing nylon with an SLS printer.
There is alot of different printers and each one is good for a different purpose. Shoe are constructed usualy from material with varying degree of flexiblity for different parts of the shoe, hard for the heel, soft for the upper and anti skid for the sole. An ultimate print will be in several print with a printer that can control the hardness of the material (the scale of hardness is called shore hardness), for an example Startasys printers.
hope you enjoy ! wish you all the best ...
From more information and work : www.netasoreq.com


