

Introduction: Programmable LED Firefly Jar


This is a fun, beautiful and inexpensive project that makes a great gift! I first started making these over a year ago and my original prototype (and many others) are still running strong.
Building a firefly jar only requires an hour or two of your time, and ever the fan of creative re-use, many of the parts can be recycled from old electronics and things around the house.
To do this project it's helpful to have some Arduino and soldering experience.
Hardware:
* an ATTiny85 (ATTiny85-20PU, or tiny-based board, like Trinket)
* Some addressable LED pixels (I'm using these, but there are
)
* 1 .10uF capacitor
* low value resistor (100, 220, 470 Ohm worked fine)
* a piece of perf board or a PCB
* a 5V wall wart (old cell phone power supplies!)
* a mason jar (used pickle / spaghetti sauce / mason jars)
* diffusive material (Used shipping materials: bubble wrap, tissue paper. Paint, glass frosting, possibilities are endless)
* An AVR programmer (like the USP Tiny ISP)
* breadboard and soldering supplies are helpful!
Software:
* Arduino
* Tiny core
* Adafruit NeoPixel (or FastLED) library
This Instructable shares some things in common with my other one written about ATtiny -- if you want a more in-depth primer on using this small microcontroller with addressable LEDs read that one first!
If programming an ATtiny seems like too much you could make this project happen with something small like (ATtiny85-based) DigiSpark or Trinket.
Update: I created a repository for firefly jar code and schematics.
Step 1: Setup Your Software
1. Download and Install Arduino
2. Download and install the Tiny Core (instructions), you need ATTiny85 8Mhz or 16Mhz support!
3. Download and install the NeoPixel library (Copy it to your Arduino sketches folder /libraries/)
Step 2: Program and Test Your ATTiny

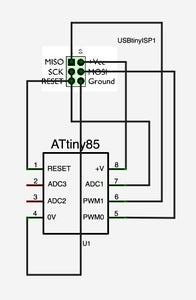


Setup your ATTiny on a breadboard.
Wire your ATTiny to the programmer as shown in the schematic. Note the dot on the IC, this is pin 1!
In Arduino choose the example sketch from the NeoPixel library > standtest.
Change the initialization
Determine the number of pixels you are using and change the data pin to 4
Adafruit_NeoPixel strip = Adafruit_NeoPixel(5, 4, NEO_GRB + NEO_KHZ800);
Upload and test
With ATTiny85 8Mhz or 16Mhz (Internal Osc) selected in Tools -> Board, test and upload your sketch! If it doesn't work immediately you most likely need to set the fuses on the ATtiny. You'll only have to do this once per microcontroler, with the 8 or 16MHz option set, choose 'Burn Bootloader' option in Tools, then try uploading your sketch again.
Create patterns
Create your own patterns to run on your firefly jar!
Schematic from Fritzing via harizanov
Step 3: Prepare the Jar & Adapter

Cut off the connector end of your old power adapter, separate and strip the red and black wires. Test the voltage and polarity with your multimeter.
Poke a hole in your jar lid with a nail or sharp object (careful!) and thread the cord through.
For strain-relief you can tie the cord in a knot.
Step 4: Solder Your ATTiny and Components


Solder your ATTiny to a piece of perfboard. Include a decoupling capacitor across the power supply and a small value resistor. If you want your install to be more flexible install a 8-pin DIP socket so you can remove and reprogram the microcontroller later.
Attach the your power and ground lines you threaded through the jar lid to this circuit.
Step 5: Assemble Your Jar


Assemble your jar and distribute your LED pixels evenly.
I've found filling it with packing peanuts, bubble wrap, tissue and scrap paper works very nicely and creates some interesting effects. Reflective plastics and broken glass can also be fun.
If you're feeling very ambitious you can glaze the jar or buy some paint and use that to give it a more translucent look.
Plug your jar in and enjoy the beautiful patterns!
Step 6: Bonus: Make It a Touch Lamp!

And that's not all... bonus round :)
Using the Capacitive Sensor library and two pins on your microcontroller you can make your jar a touch lamp.
There are a few extra requirements to do this, mainly your jar will need a metal lid (or a piece of metal underneath your lid), and you'll need to connect two wires to either side of that lid (screws work well as an attachment point).
Getting this to work may involve a little trial and error on your part, some lids are coated, so you may have to do some sanding to get a good electrical connection, but it's an awesome effect.
Hardware:
* two screws or something metal to attach wires to a jar lid
* two more pins on your ATtiny
* 1 high value resistor -- 1M Ohm or greater to place on the output pin
* 1 resistor with a value of 1000Ohm or so to help protect the input pin from static electricity.
Software:
* Capacitive Sensor Library (learn more about how it works)
* Adafruit Neopixel
Here is one example sketch for touch. Some tweaking of TOUCH_THRESH and TOUCH_DELAY may need to be done to work with the particulars of your jar.
Step 7: Bonus: Use a Printed PCB!


I wanted to make these as holiday gifts for friends and family and did not want to do all of that soldering to perf-board. So I made a simple PCB to ease my construction process.
I added a diode to prevent reverse power hookups and programming headers so you can change the ATtiny code right on the board.
I have a prototype using this PCB that has been running every day for nearly a year now and these jars have survived falls, kids, animals, burning man ---- and keep on running!
If you would like to use my PCB, you can order sets of 3 via OSH Park. I welcome collaborations and improvements to this board. If you're looking for a single board or kits, get in touch, if there's enough interest I'll do a run of them! If you hold a workshop to build these or make a cool variation on this design I'd love to hear about it.

Participated in the
Green Electronics Challenge

Participated in the
Lamps and Lighting

Participated in the
Sensors Contest


