

Introduction: Prop Base


I wanted to create a base for various items that I make. I was looking for something unusual and it had to have backlighting. I made this the base out of wood and once it was complete, I had it immersion printed using a Hydrographic system so it looked like it was made from black carbon fiber.
Step 1: Base Construction Detail

I first made some plans regarding dimensions and cutouts required for the base. The drawing shown illustrates dimensions for the base top and the 4 sides that were made. The wood is ¾ “poplar that was obtained from Home Depot. The circles were drilled using a 1.5” hole saw. To get the oval shape, two 1.5 “holes were drilled and a jig saw was used to remove the wood that remained between the two holes.
Step 2: After Drilling, Cutting, and Sanding


With the boards cut and the end pieces sanded down, the base front, sides, and back will look like the pictures. Both sides have the same pattern. As you can see, I went with one long oval instead of the two circles and oval shown in the layout drawing. The back is not seen and i just solid.
All boards are ¾” thick. The openings are for the back-lighting and have an opaque lens mounted to the back of each opening after the base gets hydro dipped.
Step 3: Underside Construction Detail

The base is screwed and glued so it will not will not come apart and is very sturdy. Notice that I used pocket holes for the screws. I accomplish pocket holes with a Kreg jig. I use the Kreg jig for all wood working projects. The Kreg jog is easy to use and makes a rock slid hidden connection that is much easier than biscuit joining. You can get the Kreg jig, screws, square head bits, and everything you need at Lowes or Woodcraft.
The picture illustrates the pocket holes made to join the base top and sides together. I also use a woodworking glue and then screw it all in place.
Now that the base was complete, I mailed it to Chrome Fish Customs in Florida to be Hydro Dipped. While I waited for the base to be finished, I got everything needed for the base backlighting.
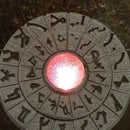
Step 4: Backlighting


The goal was to have light emitting from the cutout areas of the base. Once the base returned from Hydro Dipping, I affixed .020 “LED light panel flexible acrylic sheet material on the inside of the base to cover the cutout areas. I just drilled small holes in the acrylic sheet and attached the acrylic to teh base with small wood screws. The material provides a diffuse matte white area that the light can transmit through. The material shown can be cut with scissors.
I ordered this material from www.tapplastics.com, it is sold as a roll that is 25” x 50” and it is not expensive.
The only thing left was to add light to the inside of the base. I decided to use an LED string since it would not get hot and should last a life time with no re-lamping issues. I ended up using a SUPERNIGHT 16.4 foot 12 volt SMD 5050 300 LED yellow waterproof flexible lamp light strip shown in the picture.
Now that the LED light was decided upon, I need a way to power it. The Led light strip requires a 12 VDC source. I was not sure what else I might do so I decided to go with a very robust 12 VDC transformer. I could have used a smaller one but overkill is your friend. The item I used is shown in the picture. It is a LEDwholesalers waterproof LED driver transformer rated at 60 watts and 12 volts. I ordered both of these items from Amazon.
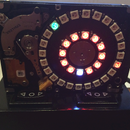
I added four small wood blocks to the inside of the base arranged in a rectangle pattern and attached the LED strip to the blocks by wrapping it around the rectangle pattern. The Led strip connects to the transformer. I added a junction box inside the base that connected the transformer to 120 VAC. The transformer needs 120 VAC power and I usually need to feed 120 VAC up the base to power whatever I have standing on the base. Therefore, I added a hole to the back of the base that was finished with a nice cord grip and the main power cord fed through this hole and was connected to the junction box inside the base. If you do not work with electricity, get someone to do this for you.

Participated in the
Wood Contest


