

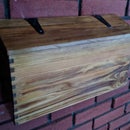
Introduction: Pyramid Wood Planter


Two of things I enjoy are wood working and gardening, and an opportunity to combine both just came up. I've always been on the lookout for herb or strawberry planters (you know, the big terracota pots with holes on the sides) so we could plant our own herbs, but never found something I actually liked.
Then my anniversary (and the need for a good gift) came around, I started thinking of making my own out of wood, and found a few interesting ideas on the net. Their designs were not available, and from what I could tell, the planters themselves weren't even available for sale any more.
So I set out to build my own, based partly on some of those designs. If you want to make a planter that is good for either flowers or herbs (since no toxic chemicals were used in building this, there should be no health issues related to their absorption into the plants that you later on eat), this might be for you.
The total cost (excluding any plants you may end up using) was around $60, and it only took a few hours (spread out over a few days) to build.
I hope you enjoy it.
Step 1: Materials


The structure is made out of red Cedar, since it is naturally rot and bug resistant. It's a bit more expensive that using treated lumber (the green stuff), but if you go with that option I would suggest using this structure only for flowers and not herbs. Some of the chemicals used to treat the wood may end up being absorbed by the herbs and could be harmful to your health.
Other than the wood, I used some wood glue, 100% silicone and screws. That's about it.
Here's what you'll need:
10 boards of 1"x6"x5' red Cedar (approximately $4 each)
.75" screws
4 rotating support wheels (if you'll be putting the planter on a deck)
wood glue
100% outdoors silicone
a miter saw
a circular saw
a coping saw
heavy duty garbage bag (for the liner)
clamps
some free time ...
Using the circular saw, you'll then need to saw four of the boards down the long center, such that you end up with eight 1"x3"x5' boards.
Step 2: Building the Platform


The planter's platform is a two foot wide square. I laid out 2' boards side by side until I reached a total width of 2 feet (the last board had to be cut to a width of about 3"). I then cut two more 2' boards and laid them across the base (on on top and one on the bottom) to keep them all together.
Plenty of glue was used in between the boards, and the first board I laid down was also screwed into the cross boards. Once all the boards were set in position, clamps were used to keep the whole thing straight and tight.
I also used an angle to check for square.
Once the glue has dried, remove all clamps. Using the circular saw, saw off the edges at a 20 degree angle. To do this, I marked a margin the width of a single board all around the platform, and then cut the margin off. This angled side will give us the slant needed for the first level's walls.
Step 3: First Level's Walls


This is where the miter saw comes in handy.
The walls of the first level just have to be fixed to the slanted edges of the platform, but are high enough to offer both a wall for the first level and a skirt to hide the wheels on which the whole thing will sit.
The boards at the corners will touch each other at a 45% angle, but before that's cut you need to adjust the sides of the walls. Since they will be slanted at a 20 degree angle, their edges won't be a simple 45 degree cut on a straight edge. Rather, the edges need to be adjusted first.
To adjust them, position one wall against the base with about half of it extending below the base, and the edge of the wall touching the platform's bottom corner. Use a pencil to trace a line where the two units meet each other. Take the wall off and continue tracing that line all along the wall. Cut the board along this line.
This was my first mistake, by the way. You'll notice in the photos that the 1st level walls begin flush with the platform and do not extend below it. This happened because when I measured them for width, I aligned the wall's bottom with the platform bottom and did not account for the extra space needed for the skirt.
Once all the walls are cut, use the miter saw to cut off the edges at an angle such that they are flush with each other when being positioned on the base. I found the angle needed for this was roughly 20 degrees.
The walls are glued to the base and to each other, and 1" screes are inserted at an angle from beneath the base in order to secure them. Finishing nails are then used at the corners to hold the walls together.
To hold the whole thing together while the glue dries, I found that bunjy cords worked just fine. Don't put them (or rope, or whatever you use) on to tight so as not to exert too much pull on the screws.
Step 4: Adding the Second and Third Level Walls


At this point, the hardest part is over. It's pretty simple and quick from here. The 2nd level walls just hook on to notches in two opposing 1st level walls.
The notches are all about 0.75 inches long and as wide as the walls themselves. There are matching notches on both the lower wall and upper wall, and they hook together.
Start by measuring the notch on the first level walls, about 2.5 inches away from the edge. Slant the slot parallel to the base's corner. Once all four slots are cut on the 1st level walls, I loosely inserted the 2nd level walls in order to mark the position of their slots. I used the coping saw throughout the whole thing because a lot of adjustments and little extra fine-tuning cuts were needed along the way.
Step 5: Drainage and Lining


Drainage holes are drilled about every three or four inches, and then silicone is applied to the inner walls and base in order to accommodate the lining.
For the lining, I took a heavy duty large garbage bag (a 40 gallon one I think) and sliced it open. Once the silicon was applied, I put the liner on top of the base and eased it in. The plastic is heavy duty, but be gentle when pushing it into the base as it can snag and tear.
Let the silicone dry for a few hours (I left it in over night just to be safe), and then slice off the excess a little below the edge so that it is not visible once the planter is filled with earth. Punch holes in the plastic where the drainage holes are located.
One issue I noted, however, is that the plastic does not adhere all that well to the silicone. If you tug on it a bit, it can come off. I'm not too worried about this since the pressure of the earth will be keeping the liner pressed against the silicone and walls, so the seal should remain more or less intact and not less much water get to the wood.
Step 6: Assembly
Now that everything is done, take it out and assemble the unit. If you've decided to built the skirt and use the wheels, add them on now. I would recommend screwing them on to the two bottom boards that support the base.
Add about an inch of drainage gravel (0.25 or 0.75"), fill the planter with earth, plant some flowers and herbs, and enjoy :)
I welcome any ideas you might have for improvements, so let me know.


