

Introduction: Quick Attach Shields


We are Cougar Robotics 4251 and this is for the Instructables Sponsorship Program.
Shields are a critical part for a competitive FTC robot. They keep outside things out of your bot and all of your stuff on the inside. They can also add a finished look to your robot. Having shields that both serve their function but also come off and on quickly is important. You might need to do maintanence on your robot at competition or show a judge the internal workings of your robot. Whatever the need, quick attaching shields are very useful.
The method we use for quick attachment and removal is zip ties. They are cheap, easy to use, and quite durable if thought about.
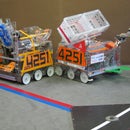
Here is the robot we wish to design a side shield for.
Attachments

Step 1: Design Shape


We always start with cardboard. It is cheap and easy to cut and bend. We will usually start by hand cutting a piece of cardboard, adding holes to attach it to the robot. We use a marker to draw the shape on while holding it against the robot. Once it is cut out, we add holes with a pencil or the tips of the scissors. This lets us actually test the design and mount it to the robot. With the cardboard shields in place, we will run a few practice rounds to see if anything is in the way. If there is, we will modify either leaving it on the robot or by removing them and then reattaching the shields after modification.
In this step, a good pair of scissors is a great tool. You can get relatively precise cuts easily.
Now that we have a rough cutout of our shields, we do a second version, still hand cut, out of cardboard. This one, we actually measure out distances, get holes in exactly the right places and design it off of the robot. Then, we attach it and see if it works. If it does, we can move on to a more final material.
For more specifics, look at the boxes on the pictures (in order)
Note: We try to use straight lines when designing our shields. This makes it easer to cut later.
Note: we have seen cardboard shields on robots before and it does work. It may not look pretty, but for low impact areas on an extremely tight budget, cardboard can do the job just fine.
Step 2: CAD

Note: this step can be skipped if you are not using CAD/CAM.
Once we have a pretty well laid out design, we will transfer our shields to a CAD drawing. Here, we make sure to get holes that will line up with our robot, fitting on the Tetrix pattern or create special shapes to be bent. It is good to remember that the Tetrix system is based off of 8mm, 16mm, and 32mm hole patterns. The more that you can make the machine do for you, the better. A laser or CNC will will cut shields more accurately, precisely, and repeatably than you will by hand.
Another benefit to having shields in CAD is that it is easy to come back later and make precise changes to your shields. You can also cut a few of a single one if you feel the need for spares (we don't because we have very rarely broken shields in competition).
Step 3: Cut Out of Plastic


We have a selection of 1/8" plastics that we use for shields. The main one we use is PET-G. It is the strongest we can cut on the laser cutter we use. It is also easy to bend with a heat gun. Finally, it doesn't shatter and can be easily cut on a sheet metal shear, giving us nice, straight, lines. The second plastic we like to use is polycarbonate. It is very strong but much harder to shape. It cannot be cut on our laser and doesn't bend without bubbling (if someone has a solution to this, I would greatly appreciate hearing it).
Now we will take our CAD file and use a laser cutter to cut out our design. If the shield is too big to be handled by the laser, we will cut it by hand with a jigsaw. We will use a fence on the saw whenever possible to get nice cuts (this is why I said it is good to design using straight lines).
Step 4: Bend (if Necessary)
PATIENCE!
Patience is the key to getting it right the first time.
To get the exact bends we want in a shield and to be able to do it more than once, we build jigs to bend shields. This gives us something to bend the plastic over. It might be a mockup of the part we are covering or just something to get the correct angle.
We have found that the best tool to bend PET-G is a heat gun. Run the gun up and down the spot you wish bend. When it is ready, the plastic will suddenly get very soft. When this happens, keep heating the plastic (though it is not a priority anymore) and use a block of wood to create a nice angle against your jig. Using a wood block insulates your hand from the heat, gives you a flat surface to press with, and doesn't immediately suck all of the heat out of your plastic.
Hold the wood there and take the gun off when you have the desired shape. Hold the plastic in place for 30+ seconds to make it hold its shape.
Step 5: Drill Holes
If you are doing your shields by hand or didn't know where exactly you wanted holes, now is the time to add them. Hold your shield up to your robot and mark the shields with a sharpie. Now that you have the holes marked, you can move away from the robot. We like to start with a center-punch to make sure the drill doesn't walk. Then, using a 9/64" bit, we drill the holes (on a drill press if we can).
Step 6: Attach!


Now, if you have thought about where you were accurate with your holes, you should be able to just zip tie your shields in place. The other method we have found for attaching shields is utilizing the Tetrix plastic rivits. We don't like these because we have found that they can come out in rough play. They also create a perfect spot for something to catch and rip off your shields. We don't recommend them but they do work.
Now, your shields should be able to go on and off very quickly! We have found it very valuable to be able to remove shields in a matter of seconds and have them go back on in a similar time frame.
Other Options for Quick Shield Attachment:
- Tetrix rivits (I explained above why we don't like them)
- Velcro - It is, in general, weaker than zip ties but it is more reusable. I have also seen teams break their plastic trying to remove velcro-ed shields because they pull at one corner, assuming that would just come off and the plastic flexes to the point of breaking.


