

Introduction: RTL-SDR FM Radio Receiver With GNU Radio Companion

RTL-SDR is currently very popular topic on the Net. There are also many guides on how to use it on Windows and Linux too. But starting to use it myself I haven't found any guide that explains whole process from installing necessary drivers and software to building first simple receiver using GNU Radio which is the most capable software which could be used with RTL28xxU chips and that's what this Instructable is about. It should be, for me I hope too, first step to learn how the thing works from scratch and to make projects capable of capturing signals that wasn't decoded using RTL-SDR yet i.e. 433 MHz band.
Step 1: What's RTL-SDR?
If you are interested only in how to make GRC project go to step 5.
RTL-SDR is the cheapest method to get into the world of SDR (Software Defined Radio) - method of receiving (RTL-SDR have no capability to transmit) and processing radio transmission using your PC. Using it you can receive everything that is transmitted between about 20~2000 MHz depending on second chip on the device.
In brief it can hear i.e.:
- ordinary FM radio stations
- police radio transmissions
- plane and ship tracking informations
- small radio devices like car keys
- probably GPS satellites (as of now there is no confirmed method to do this)
- International Space Station and other space equipment that transmits below 2 GHz
- every other device that you know transmits on these frequencies
Step 2: How to Get It?

The simplest method is to get one on eBay. There are many offers that have in their caption names of the chips that are on board. They costs about 10$. Here you need to be aware of few different chips that are currently on market. The difference between them are frequencies they are capable of receiving. Summary of the differences is on that site:
http://sdr.osmocom.org/trac/wiki/rtl-sdr
The most reasonable choice is R820T chip and that tutorial is based on its capabilities. The other good chip is Elonics E4000 but they are actually more expensive ones.
Step 3: What You Will Need?
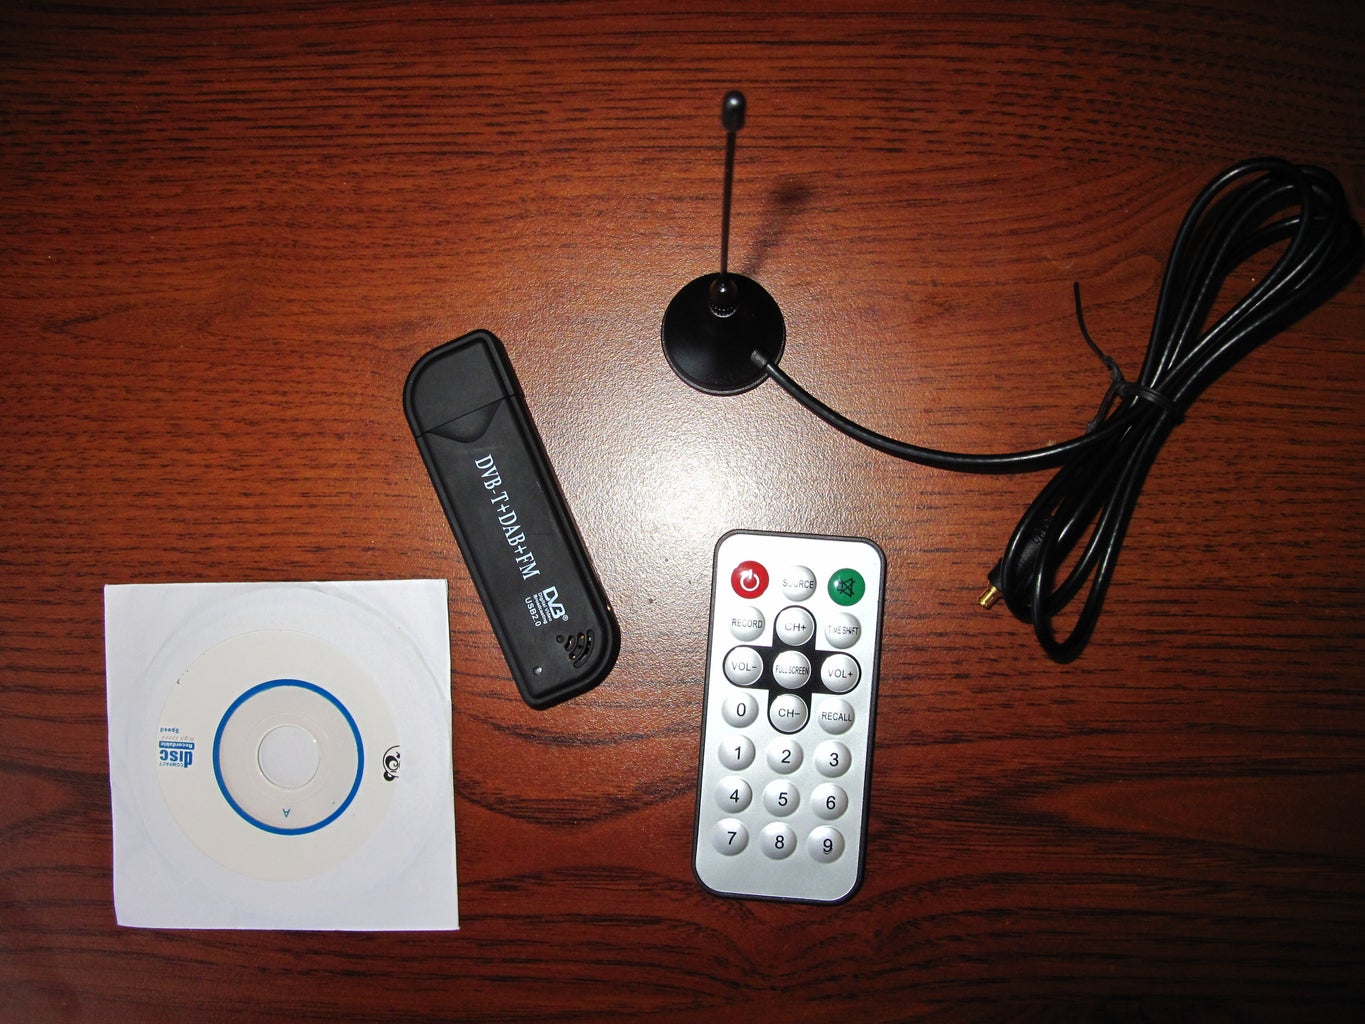
I'm using Arch Linux and receiver with RTL2838 and Rafael Micro R820T chips. It would be good if you had good antenna cause the one that is included to the package has really bad performance. Of course every Linux distro could be good.
Step 4: Connecting the Hardware and Installing Software
The first thing is to connect your dongle and check if it has appropriate chips using
$ dmesg | tail
or
$ journalctl
Here I had some troubles with default driver of the dongle that was hanging OS when I unplugged it so I had to disable that driver by creating new .conf file in /etc/modprobe.d that contains one line:
blacklist dvb_usb_rtl28xxu
add that file to initrd by inserting its path to FILES variable in /etc/mkinitcpio.conf:
FILES="/etc/modprobe.d/blacklist.conf"
and generate new image by mkinitcpio -p linux
Now after system restart the problem was solved.
(on other systems the procedure will probably be completely different)
After fixing driver problem you can install packages needed to use RTL-SDR.
Here we will install 'rtl-sdr', 'sdrsharp-svn', 'gnuradio' and 'gr-osmosdr-git'.
rtl-sdr is the main driver and can be installed on Arch from community repo:
# pacman -S rtl-sdr
or its git version available on AUR as rtl-sdr-git
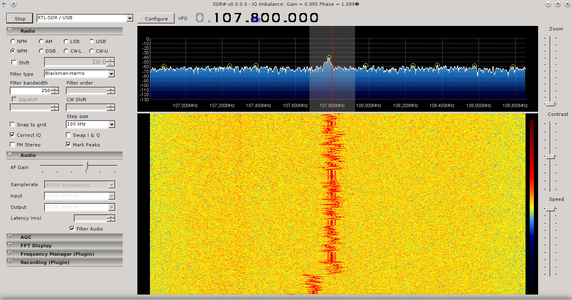
SDR# is the program that offers basic capability to decode FM and AM radio and have easy to learn GUI so using it is the best for beginners. It is available on AUR as sdrsharp-svn.
The most capable software for RTL-SDR is GNU Radio and its graphical tool: GNU Radio Companion. It is also available on AUR (name: gnuradio). It is also required to install package gr-osmosdr-git from AUR that is needed to use RTL-SDR dongle as source in GRC.
(and again on different operating system whole process is different, maybe simpler maybe harder, not tested myself but on Ubuntu rtl-sdr should be available from apt-get and on Fedora it should also be on default repositories, gnuradio has good installation instruction here: http://gnuradio.org/redmine/projects/gnuradio/wiki/InstallingGR)
SDR# could now be used also to find station which signal is strong enough to be received without any disruptions. If you found one after making the program you can check if it's working on that station as good as on SDR#.
Step 5: FM Radio - Theoretical Introduction

The simplest FM radio consists of few elements:
- signal source - in our case it would be RTL-SDR dongle
- low pass filter
- WBFM demodulator
- audio output - your PC's sound card
There can be few other elements depending on input and output sample rate, if it will be possible to match them using only above elements there won't be any other.
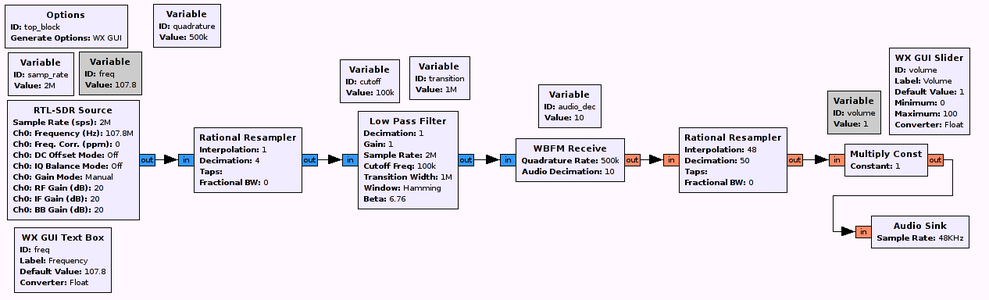
Step 6: RTL-SDR Source

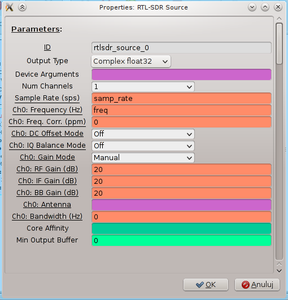
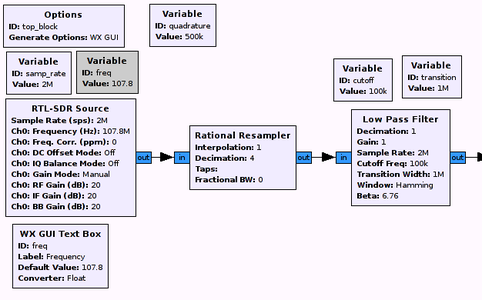
osmocom Source can also be used here. We can find both of them in Sources category on the right sidebar of GRC. Our signal input. We need to set its sample rate to 2M. It can be done by editing samp_rate variable and setting its value to 2e6. Here we will also set the frequency of the station we want to receive.
Step 7: Low Pass Filter


The next step is to filter out frequencies other than the one we centered in th previous step. In that task we will use a low pass filter block. It can be found on filters category. We here set cutoff frequency to 100e3. This is because that's standard band's width. I don't know what correct value for transition width should be, but trying to change that I found that the higher value the better so it's finally set to 1M. We also sets decimation to value "int(samp_rate/quadrature)" so it will be slowly matching to our sound card's sample rate.
Step 8: WBFM Receive

Now we could do the nearly final and the most important step: placing the FM demodulator. Its block can be found on modulators menu. In my case its quadrature rate equals 500k. I don't know if it could be changed to something else so if you are not sure just leave it as is. In that setting it should work.
Step 9: Matching to Audio Output and Volume Regulation
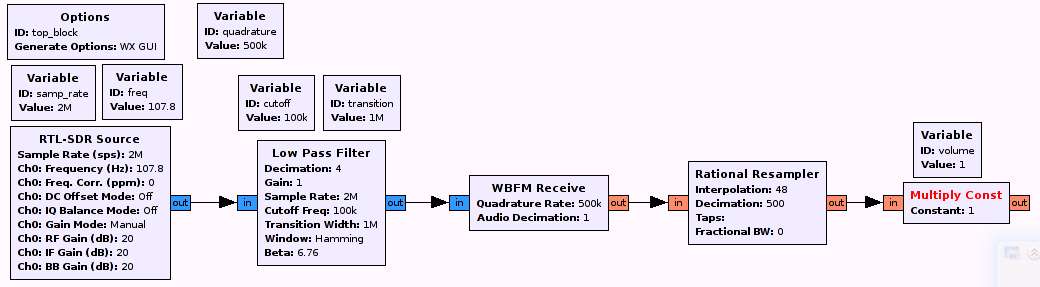
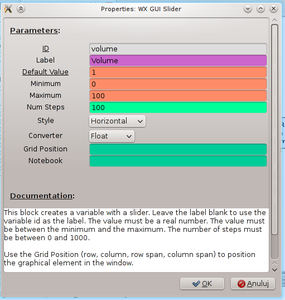
That two tasks can be done by using rational resampler and multiply const blocks. The first can be found in resamplers menu and the second is in math operators category. At first we need to convert rate from 500k to 48k so we need to decimate by 500 and then multiply by 48. In the second block we set const to 'volume'. Now we can create variable or place element named "WX GUI Slider". Placing the second one will let us regulating volume on GUI that will be shown after our program starts. This can be of course done with any other variable.
Step 10: Audio Sink

And finally we link Audio Sink block (found in Audio) with Multiply const. Now its only required to edit its rate and choose 48k from a drop down list and that's it! If you don't have that option just choose the biggest value and edit value in rational resampler and it should work.
Step 11: Final Remarks
If you don't know how some step has been done you can find finished project on my site. There is also another project that I created trying to figure out how it works so it has few additional features like FFT graphs. The links are in this post: http://v3l0c1r4pt0r.tk/newsy/czytaj/37 which is a bit modified version of this Instructable.
Finally one more note: during the tests of this schematic I realized that decimation to 500k should not been made on the filter block but before it so I modified it and now demodulated audio is much better than before.


