

Introduction: Raspberry Pi Based Wireless FM Microphone


A wireless microphone is a microphone without a physical cable connecting it directly to the sound recording or amplifying equipment with which it is associated. Also known as a radio microphone, it has a small, battery-powered radio transmitter in the microphone body, which transmits the audio signal from the microphone by radio waves to a nearby receiver unit, which recovers the audio. The other audio equipment is connected to the receiver unit by cable. Wireless microphones are widely used in the entertainment industry, television broadcasting, and public speaking to allow public speakers, interviewers, performers, and entertainers to move about freely while using a microphone to amplify their voices.
There are many different standards, frequencies and transmission technologies used to replace the microphone's cable connection and make it into a wireless microphone. They can transmit, for example, in radio waves using UHF or VHF frequencies, FM, AM, or various digital modulation schemes. Some low cost (or specialist) models use infrared light. Infrared microphones require a direct line of sight between the microphone and the receiver, while costlier radio frequency models do not. (-wikipedia)
Once you have the Pi all set up, you’ll be able to amplify your voice with any all-in-one radio or boombox. This could be useful for giving lectures or presentations where it might be hard to hear you and there isn’t a professional PA system. You could also use it in a van or other large vehicle to communicate over the car’s speakers.
Here is the step-by-step instructions how raspberry pi can be used as a very good quality wireless microphone and can be used in class room, seminar, so keep reading.
Step 1: What You Needs...


| Serial # | Component | Quantity |
|---|---|---|
| 1 | Raspberry Pi (Any model, I used B) | 1 |
| 2 | USB Microphone | 1 |
| 3 | FM Receiver | 1 |
| 4 | Speaker with Amplifier | 1 |
| 5 | 9 Volt Battery + 5 Volt regulator (LM7805) or Power Bank | 1 |
| 6 | Raspberry Pi Case | 1 |
| 7 | A SD card with Raspbian on it (minimum 2 GB) | 1 |
| 8 | FM Antenna (simple jumper wire works fine) | 1 |
Step 2: Required Tools and Supplies...


| Serial # | Tools | Quantity |
|---|---|---|
| 1 | SSH or Monitor | 1 |
| 2 | Wi-Fi dongle or Ethernet Connection | |
| 3 | Micro USB cable | 1 |
| 4 | Glue & Felt | |
| 5 | Wires | |
| 6 | Some Programming Experience | |
| 7 | Wire Cutter | 1 |
| 8 | Screw driver | 1 |
| 9 | Soldering Iron | 1 |
Step 3: Turn You Raspberry Pi Into FM Transmitter


We know wireless microphone is actually a wireless radio transmitter. Microphone convert our voice (audio signal) into electrical signal and the transmitter transmit the signal as radio wave. Pi is acting as a FM transmitter in this project. So lets make our Pi FM transmitter. For the thing I want to thank the people over at Imperial College Robotics Society have a new way to use it as FM Transmitter. They designed a program that turns the Pi into an FM radio transmitter.
Our first work is to download the program in our cool Raspberry Pi. For that you must connected to the Internet first. Don't afraid, you only need the internet to download the software, you can use this afterwards without internet. Connect you pi to a monitor or use SSH for accessing your pi remotely (for details of remote access click here). OK, we are connected to out Raspberry Pi, now lets start downloading...
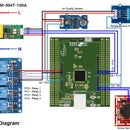
One important thing: Connect a 20-30 cm wire (jumper wire will work fine) to the GPIO PIN 4 (shown in figure above) of your Raspberry Pi to increase the range of your transmitter.
Procedure
1. Open your Pi terminal and type this into the terminal
wget http://www.omattos.com/pifm.tar.gz
This will download the python script that helps with the radio transmission.
2. Untar (unzip) the file you downloaded. Type this into the terminal
tar xvzf pifm.tar.gz
3. Open your Radio App on your phone or if you still have a functioning radio tune to 100Mhz and then in your terminal type sudo ./pifm sound.wav 100.0
sudo ./pifm sound.wav 100.0
If everything went well you should now be hearing Star Wars sound track in your radio tuning at 100 MHz. You can transmit any frequency within FM range just typing the frequency instead of 100.0.
Step 4: Connecting USB Microphone to Raspberry Pi


The Raspberry Pi comes with a 3.5mm analogue stereo audio output, but no input. As a radio amateur I am interested in using the Raspberry Pi as microphone to do this I need an audio input. This can be achieved by connecting a USB audio device to your Raspberry Pi.
Make sure your Raspberry Pi is turned off and insert the USB audio device into one of the USB sockets on the Raspberry Pi, and then power up your Raspberry Pi. The USB audio device should be automatically installed. Go in SSH or LXTerminal window and type the following and press Enter
sudo apt-get install alsa-utils
You may already have this package on your system, but entering this command won't do any harm even if you do. This will install a package of ALSA utilities if you don't already have them (ALSA stands for Advances Linux Sound Architecture). If you want to know more about ALSA then follow the link: http://www.alsa-project.org/main/index.php/Main_Page.
Now, You should make sure that the USB audio device is being detected by both the hardware and software. Enter the following command and press enter. (image 6)
lsusb
This will display information regarding attached USB devices. As you can see, the last device listed in the screenshot (image 6) above is the USB audio device labelled as C-Media Electronics, Inc. Audio Adapter. So far, so good.
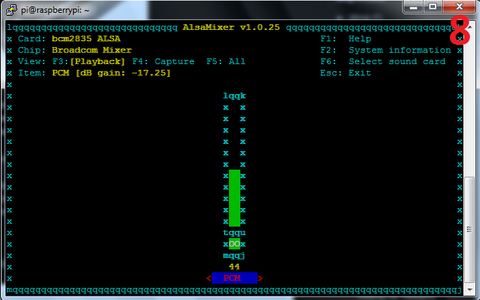
Adjusting Volume
You can adjust the volume of your microphone by by an utility called alsamixer.
To start it, simply enter the name in the command line, like so:
alsamixer
This presents a more graphical view (image 8,9,10) of the volume and information regarding the USB audio device. Using the arrow keys on your keyboard, select the volume column and adjust the volume higher or lower, dependent on your needs. Where possible, keep the volume level below 80–90% to avoid any distortion.
Step 5: Transmit Your Voice to FM Band

Our FM transmitter and Microphone setup is ready to transmit our voice. Here is the command you will use to start the broadcast. Each piece will be explained. Note that this command may need modified to work for your mic, just keep reading.
arecord -fS16_LE -r 22050 -Dplughw:1,0 - | sudo ./pifm - 100.1 22050
Let, break the code snippet
arecord
Program we are using to record audio.
-fS16_LE
Output 16-bit data. Needed this way for PiFM to read it.
-r 22050
This specifies sampling rate to output recording. 22,050 is a good balance for speed and quality.
-Dplughw:1,0
to see all of the audio devices connected.
sudo ./pifm - 100.1 22050
Here sudo for root access, ./pifm run the FM module at '100.1' Mhz to transmit and '22050' is the sampling rate of the input. If you did everything right, after you run the command you should be able to tune your radio to 100.1 Mhz and hear yourself talking through the mic!
Step 6: Make Our Program Autostart at Boot Time


There are loads of ways of running a command at start-up in Linux but my favoured approach is to create an initialisation script in /etc/init.d and register it using update-rc.d. This way the application is started and stopped automatically when the system boots / shutdowns.
Create a bash script in /etc/init.d
sudo nano /etc/init.d/autostartpifm.sh
and add the following lines
#!/bin/bash
cd /home/pi
arecord -fS16_LE -r 22050 -Dplughw:1,0 - | sudo ./pifm - 100.1 22050
press 'Ctrl+X' than 'y' and than enter
Make script executable
sudo chmod 755 /etc/init.d/autostartpifm.sh
Test by starting the program and saying something to microphone.
sudo /etc/init.d/autostartpifm.sh start
Press Ctrl+c to exit
Register script to be run at start-up
To register your script to be run at start-up and shutdown, run the following command:
sudo update-rc.d autostartpifm.sh defaults
Note - The header at the start is to make the script LSB compliant and provides details about the start up script and you should only need to change the name. If you want to know more about creating LSB scripts for managing services, see http://wiki.debian.org/LSBInitScripts
If you ever want to remove the script from start-up, run the following command:
sudo update-rc.d -f autostartpifm.sh remove
If everything goes fine then our program will start automatically every time Raspberry Pi gets power.
Step 7: Modify USB Microphone


We need to modify USB microphone slightly. I want to remove the stand form the microphone. For that, first open the screws from the bottom of the stand and bring out the controller circuit. Cut the connecting wires of switch & microphone to the controller circuit. Now separate the microphone from the stand and solder it to the controller.
Now, cover the controller & microphone with some felt, attached a clip with the cord. Your microphone is ready to use.
Step 8: All the Things Together


If you completed all the steps before now it is the time to test your invention. Attached the power bank with pi case using some glue. Connect your modified microphone to Raspberry Pi. Power up your pi with power bank. Tuned your FM receiver attached with the speaker to the frequency you set previously. Now you can say anything you like and transmit it to the speaker and broadcast it. You can attached your microphone to your shirt with a clip and raspberry pi in your pocket and moved anywhere in the room.

Participated in the
Raspberry Pi Contest


