

Introduction: Raspberry Pi Bicycle Speedometer


In this instructable I will explain to you how to build a bicycle speedometer using a Raspberry PI. To recreate this project you will have to possess some basic knowledge which I will list below. I will also give you a list of the required materials for this project. Furthermore I will explain how to set up the database, how to build the electric circuit and how to code the whole thing. On the bottom of this instructable you can find a little guide on how the project works.
This project is school related. Currently I'm a student NMCT at Howest.
Step 1: Basic Knowledge
Required knowledge for this project:
· Basic python knowledge (+ flask)
· Basic HTML, CSS and Javascript knowledge
· Basic knowledge of databases
· Basic knowledge of electrical circuits
· Knowledge on how to use python to interact with a Raspberry Pi
· Setting up flask on a Raspberry PI
· Setting up a database on your Raspberry Pi
. Autorunning scripts on your Raspberry Pi
· How to solder an electrical circuit
Step 2: Acquiring Necessary Materials
Required materials fort his project:
· 1 x Raspberry PI 3 Model B
· 1 x Micro USB Cable
· 1 x Battery Holder box with 6AA size cells (9V)
· 6 x AA battery 3001 – 3500mAh (1.2V)
· 1 x Universal Battery Elimination Circuit (input: 5.5-23V, output: 5V)
· 1 x LCD Display, 20 x 4 characters (i2c)
· 1 x Hall effect Sensor + magnet
· 3 x 10KΩ resistor
· 1 x 330Ω resistor
· 1 x Momentary push putton
· 1 x Capacitor 100nF
· 10 x Dupont cable male to female
The total cost of this project would be around 69 euros.
See attachement to find my bill of materials (excel version since saving it as pdf made a mess of it).
Attachments

Step 3: Setting Up Your Database


See Image1 for the database model.
· Table ‘Snelheidsmeter’ contains an entry with ID=1, Naam= “Speedometer”, Beschrijving= “Raspberry Pi 3 Model B”. See image2
· Table ‘Gebruiker’ contains a default entry with ID=1, Naam=”default”, Voornaam=”default”, Leeftijd=0, DiameterWiel = 0. See image3
· Table ‘SnelheidsmeterGebruiker’ contains an entry linking the entry of ‘Snelheidsmeter’ to the entry of ‘Gebruiker’ (ID=1, SnelheidsmeterID=1, GebruikerID=1) See image 4
· Table ‘Sessie’ is empty
· Table ‘Deelsessie’ is empty
This should not be changed, otherwise the application will crash when starting a session. This also means that at the moment, speed and distance are calculated using the value of ‘Gebruiker.DiameterWiel’ (0), which results in them both being zero all the time (further explanation: ‘How it works’).
Step 4: Drawing the Electric Circuit


I used the free software 'Fritzing' to draw these. It's quite a good tool!
See attachement 'Onderdelenlijst' for further explanation.
Attachments
Step 5: Soldering the Electric Circuit


Some notes:
- The supply voltage of the battery holder box is 9V, this outreaches the maximum supply voltage of the Pi (5V) by far. That's why I included an UBEC (Universal Battery Elimination Circuit), which supplies a steady 5V, into the electric circuit. Using a 9V battery holder box to supply a 5V system also means your batteries will be drained more slowly. Which means more cycling!
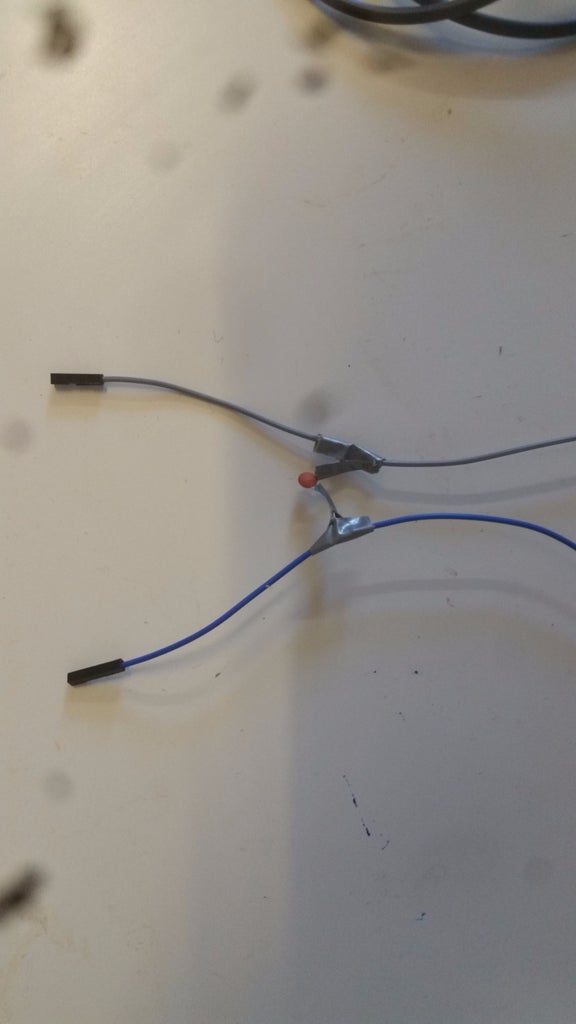
- Because the Hall Effect Sensor only works perfectly at a supply voltage of minimum 6V I supplied its power with the battery holder box (9V). This means however that the output voltage from the output cable is higher then the GPIO 3.3V maximum. This is why I build a resistor partion of 10KΩ- 10KΩ- 10KΩ, leading the output cable to the Pi after the 20KΩ part. This gave me a signal of around 2.6V. It's also really important to connect the '+' - cable of your battery holder box to this resistor partition (with a 10K resistor in between). Otherwise the signal starts to float. See image4
- The capacitor enables the Hall Effect Sensor to always read a clean signal. Otherwise the sensor would for instance read the signal three times, when actually only one time the magnet has passed the sensor. This is called 'ontdenderen' in dutch. See image 5
- It's also best to solder a resistor to the button. This way you won't get in any trouble when for instance you didn't configure you're GPIO pin as 'INPUT_PULLUP'. See image3
Step 6: Website


The website consits of three main pages:
- Home:
This page gives you a small introduction and a summary of the contents of the website See image1
-Speedometer:
On this page, the first form is used to personalize your speedometer. The second one is used to visualize your data. After you press 'Teken grafiek' you are redirected to a page 'Speedometerchart' where your data has been visualized. See image2, image3
- Contact
Small contact form to ask any questions. See image4
Step 7: Coding


GitHub: https://github.com/VincentVanbecelaere/Speedometer
Notes:
- I found it quite useful to read the signal from both the button and the hall effect sensor by using 'add_event_detect()' instead of manually writing code to read this signal. This way, you don't have extra code inside the 'While True'-loop slowing the application down. This also means that signal is read cleanly every single time. See image1
- I had quite a hard time finding out how to execute a certain block of code every x - seconds (every minute in my case). First I used 'threading' but this proved not to be a solution since it just kept on running the code every x - seconds and I actually also needed it to stop after a while. I found my solution in converting the time (datetime.datetime.now()) using strftime to a format of 'hours:minutes:seconds'. After this I could simply extract the minutes part and run my code every time the minute went '+1' or '-59'. I did forget the '-59' part at first but actually running my code showed my I had forgotten it. See image2
- To draw the chart I used a javascript script found on: https://developers.google.com/chart/. See image3
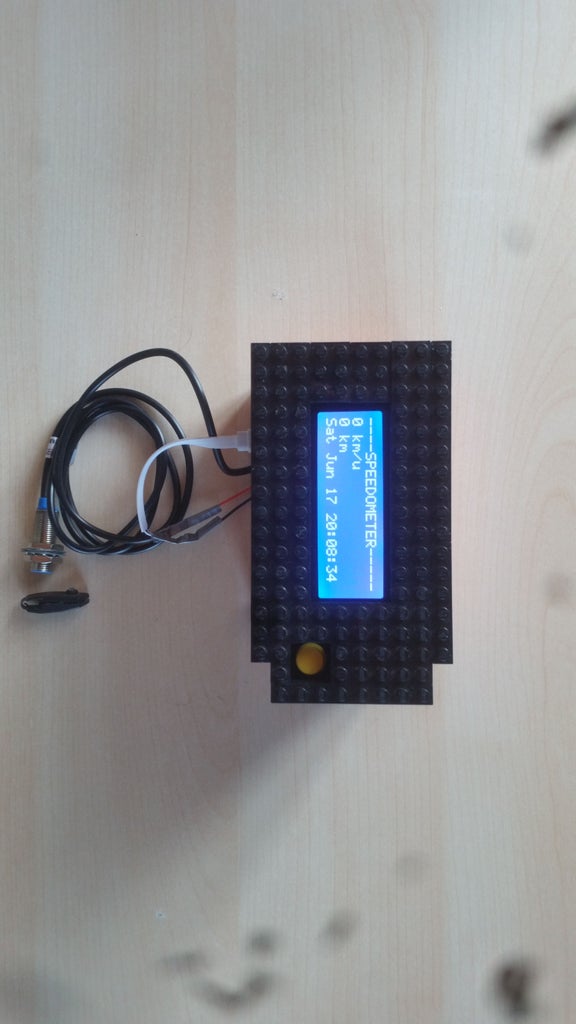
Step 8: Housing
The housing of the speedometer is made entirely out of lego bricks. I will not go into specifics on this part since it's quite straightforward.
Step 9: How It Works


Default:
* Database:
- Table ‘Snelheidsmeter’ contains an entry with ID=1, Naam= “Speedometer”, Beschrijving= “Raspberry Pi 3 Model B”.
- Table ‘Gebruiker’ contains a default entry with ID=1, Naam=”default”, Voornaam=”default”, Leeftijd=0, DiameterWiel = 0.
- Table ‘SnelheidsmeterGebruiker’ contains an entry linking the entry of ‘Snelheidsmeter’ to the entry of ‘Gebruiker’ (ID=1, SnelheidsmeterID=1, GebruikerID=1)
- Table ‘Sessie’ is empty
- Table ‘Deelsessie’ is empty
Neither of the entries in tables ‘Snelheidsmeter’, ‘Gebruiker’ and ‘SnelheidsmeterGebruiker’ should be deleted. Otherwise the application will crash on starting a session (after personalization the entry in ‘Gebruiker’ and ‘SnelheidsmeterGebruiker’ becomes irrelivant). This means however, that at the moment (before personalization), distance and speed will be calculated using the value of ‘Gebruiker.DiameterWiel’ (0), which results in them both being zero all the time.
* Application:
- Start session:
The application starts by asking to start a session. On this startscreen it shows the default ‘Voornaam’ and default ‘DiameterWiel’ found in the database table ‘Gebruiker’ (this will be different after personalization). See image1
- Measering speed and total distance:
After pressing the button one time, the speedometer starts running and displays your current speed and distance. These will at the moment still be zero because you have not yet personalized the application. The application has now saved the starttime of your session (which it will later enter in the database). It also starts saving ‘deelsessies’ every minute. This means that every minute it will save the starttime and endtime of the minute and the total distance covered during that minute (this will also be later inserted in the database). See image2
- End session
After pressing the button a second time, the application stops measuring speed and distance and shows you that the session has ended. The application has now saved the endtime of your session. At this time, the application will start writing to the database. It will create a new entry in the table ‘Sessie’ using the starttime (saved previously) and the endtime (saved here). This will be linked to the last created ID in the table ‘SnelheidsmeterGebruiker’, which will be the default one. The application will also write every ‘deelsessie’ (saved while cycling) to the database, linking them to your ‘Sessie’ written just seconds ago. After a time of 3 seconds the application will again ask to start a session and so the loop goes on and on (Or I sure hope so ;-) ! ). See image3,image4,image5
Personalization:
Link to Website: http://pivincent.local:8080/
To personalize the application you should submit the form
found on the website: page ‘Speedometer’. If for some reason you submitted the wrong data or for instance you just bought yourself a new bike, you can simply resubmit the form. See image6
After personalization:
* Database
- Table ‘Gebruiker’ now contains a new entry with the values entered in the form. See image7
- Table ‘SnelheidsmeterGebruiker’ now contains a new entry linking the entry of ‘Speedometer’ to newly entered entry of ‘Gebruiker’. See image8
* Application (on restart!)
-Start session:
The application now shows your previously entered 'Voornaam' and 'DiameterWiel'. See image9
-Measuring speed and total distance:
The application now calculates your speed and total distance based on your previously entered 'DiameterWiel'. See image10
Visualizing your data
It's always nice to have your data visualized in some way and that's exactly what's possible with this project. To visualize your data simply go to the website: page 'Speedometer', section 'keuzemenu'. Choose the day of which you want the data visualized and simply press 'Teken Grafiek'. This will give you a barchart that visualizes your total distance coverd for that day, starting with the starttime of your first session and ending with the endtime of your last session. See image11,image12
Other practical information
From a practical point of view: To get the speedometer up and running a single battery should still be inserted. To do this carefully (!) remove the bottom half (red) from the top side (black) and insert the battery in the battery holder box. The easiest way to remove the bottom half from the top half is by putting your fingers in the little hole on the side and carefuly pull it down. To measure speed simply hold the magnet close to the Hall Effect Sensor.
Step 10: About Me
Currently I'm still a student NMCT at Howest (Kortrijk Belgium). To learn more about me and my projects feel free to visit my webpage: http://student.howest.be/vincent.vanbecelae1/portfolio/


