Introduction: Raspberry Pi and Arduino: Building Reliable Systems With WatchDog Timers
Summary: In this Instructable we look at how to build more reliable computer systems using WatchDog timers. We show how to set up and use the Raspberry Pi and Arduino internal watchdog timers. We also explain why an external WatchDog Timer is a better choice in many, but not all, systems.
See more on WatchDog Timers in Solar Power applications on www.switchdoc.com.
Step 1 - Introduction to WatchDog Timers
Step 2 - How to Set Up the Raspberry Pi Internal WatchDog Timer
Step 3 - How to Set Up the Arduino Internal WatchDog Timer
Step 4 - Internal Versus External WatchDog Timers / Issues with Internal Timers
Step 5 - Adding an External WatchDog Timer to your Project
Step 6 - Suggestions for Educators and Conclusion
Objectives
In this Instructable you will learn how:
- What are WatchDog Timers and Why they are Cool
- How To use the Raspberry Pi Internal Watchdog Timer
- How to use the Arduino Internal WatchDog Timer
- Compare and Contrast Internal Versus External WatchDog Timers
- How to use an External WatchDog Timer
- Suggestions for Student Experiments with WatchDog Timers
Step 1: Introduction to WatchDog Timers
Introduction to WatchDog Timers
Computers sometimes lose their way. A power glitch, RFI (Radio Frequency Interference), hanging peripherals, or just plain bad programming can cause your small computer to hang causing your application to fail. It happens all the time. How often do you have to reboot your PC? Not very often, but once in while your Mac or PC will freeze making you have to power cycle the computer. Raspberry Pi's will sometimes freeze because of a task not freeing up sockets or consuming other system resources and from power supply fluctuations. Arduinos sometimes freeze because of brownouts on the power line or a short power interruption or because of running out of system resources such as RAM and/or stack space, which is a very limited resource in an Arduino. Sometimes even programmers (gasp!) make mistakes.
See the WatchDog Timer and Computer Block Diagram above.
In small computers, you can give your device the chance to recover from faults by using what is called a WatchDog Timer (WDT). A WDT is an electronic timer that is used to detect and recover from computer malfunctions. If the computer fails to reset the timer (also called “patting the dog”) on the WDT before the WDT timer expires, the WDT signal is used to initiate either corrective actions or simply to reboot the computer.
Will the use of a WatchDog Timer make your computer project more reliable? The answer is yes. The proper use of a WatchDog timer can make your computer reboot when it gets lost. A known problem with some Python libraries on the Raspberry Pi is that some of those libraries don't properly release sockets and after a long period of time (days generally - not weeks) the Raspberry Pi will hang or thrash because it is out of resources. A properly designed program could detect this and reboot the computer, but a WatchDog Timer can be used to cover a whole multitude of sins with one fell swoop.
In Project Curacao, we use a WatchDog Timer to reset the Battery Power Watchdog in case of a brownout or an RFI upset event.
In our WeatherPi Instructable (https://www.instructables.com/id/Create-Your-Own-Solar-Powered-Raspberry-Pi-Weather/) we use the WatchDog Timer to make sure the Raspberry Pi power is shut off after a "shutdown -h now" halt and also to detect the computer getting lost. More reliablity!
Step 2: How to Set Up the Raspberry Pi Internal WatchDog Timer
Summary: In Step 2 of this Instructable we look at how to set up the Raspberry Pi internal watchdog timer. We also talk about the issues with the Raspberry Pi internal WatchDog and explain why an external WatchDog Timer, such as the SwitchDoc Labs Dual WatchDog Timer is a better choice in many, but not all, systems.
Setting up the Raspberry Pi Internal WatchDog Timer
First of all a definition. Wto is defined as the maximum amount of time the WatchDog timer can count before it needs to be reset (in other words, when it will reboot the computer if the computer goes away. The BCM2835 System on a Chip that powers the Raspberry Pi has a WDT on board. It has 20 bits and counts down every 16us for a Wto of 16 seconds. This means you have to write to the internal WTD earlier than every 16 seconds, or the WDT will fire.
Run the following command to load the internal WatchDog kernel module:
$ sudo modprobe bcm2708_wdog
For Raspbian, to load the module the next time the system boots, add a line to your /etc/modules file with "bcm2708_wdog". $ echo "bcm2708_wdog" | sudo tee -a /etc/modules
Now run "lsmod" and look for the line in below:
bcm2708_wdog 3537 0
This verifies that the WatchDog module was loaded successfully. Now modify /etc/modules and add bcm2708_wdog
to load the module on boot by running the following command:
sudo echo bcm2708_wdog >> /etc/modules
Then we use the watchdog(8) daemon to pat the dog:
sudo apt-get install watchdog chkconfig
sudo chkconfig watchdog on
sudo /etc/init.d/watchdog start
The watchdog(8) daemon requires some simple configuration on the Raspberry Pi. Modify /etc/watchdog.conf to contain only:
watchdog-device = /dev/watchdog
watchdog-timeout = 14
realtime = yes
priority = 1
To set the interval to pat the dog every four seconds: interval = 4
Finally:
sudo /etc/init.d/watchdog restart
Whew! This sets up the internal Raspberry Pi WatchDog.
Testing the Internal Raspberry Pi WatchDog
To test the Internal WatchDog, set it up as above. Next, edit a file called forkbomb.sh and put the following commands in the file:
#!/bin/bash
swapoff -a :(){ :|:& };:
Execute the forkbomb.sh file:
sudo sh -x forkbomb.sh
Your Raspberry Pi will eventually reboot. A fork bomb works like this: The function is invoked twice and the pipeline is backgrounded; each successive new call on the processes spawns even more calls to ":" (the function). This leads rapidly to an explosive use of system resources, slowing response to a halt and killing the ability of the Raspberry Pi to pat the watchdog timer. If you don't turn the swap drive off then the fork bomb has to fill that also, which makes the bomb much, much slower.
Problems with the Internal Raspberry Pi WatchDog
However, there are a number of problems with the internal WatchDog. The internal WatchDog does NOT power cycle the system. It reboots the Raspberry Pi. This means that it does not restart in all conditions. Especially in low power / brownout conditions often experienced with Solar Powered Systems (see our Solar Power Instructable here).
If the Raspberry Pi takes longer to bootup than 14 seconds (or to whatever value you set Wto), the WatchDog can fire which puts the Raspberry Pi in an infinite bootup sequence. This can happen. I have done it.
If you halt the Raspberry Pi (sudo shutdown -h now), the Raspberry Pi will never reboot. If your program does this by accident, you are finished.
I have found the internal WatchDog to be unreliable. I never could track it down, but it feels like some kind of conflict between user space and kernel space. There are some situations where the Pi will be unresponsive, but the heartbeat may still occur. High load situations for example.
The internal WatchDog is not completely independent of the Raspberry Pi. Theoretically, this should not matter, but the Raspberry Pi running Linux is a complex system.
These are a few of the issues that can be resolved with an external WatchDog. However, it doesn't mean the internal WatchDog is useless, just limited.
Step 3: How to Set Up the Arduino Internal WatchDog Timer
Summary: In Step 3 of this Instructable, we look at how to set up the Arduino internal watchdog timer. We also talk about the issues with the Arduino internal WatchDog Timer and explain why an external WatchDog Timer, is a better choice in many, but not all, systems.
Setting up the Arduino Internal WatchDog Timer
The Arduino is a much simpler machine than a Raspberry Pi. However, it is actually easier to hang an Arduino than it is a Raspberry Pi because all the code is single threaded on the Arduino. Single threaded means that there is only one program running at a time on the Arudino (with the exception of Interrupts, in a manner of thinking). The point is if you only have one thread running at a time, any hang up on that thread will stop the computer. Naturally, there are other problems that can cause your code to crash and Arduino to lock up. Timeouts on peripherals, power issues, RFI, etc., etc. Bad code using the millis() function is a classic problem. You need to handle the rollover at 49.5 days if you aren't using a real time clock.
How to use the Arduino Internal WatchDog (if you can make it work)
First of all a definition. Wto is defined as the maximum amount of time the WatchDog timer can count before it needs to be reset (in other words, when it will reboot the computer if the computer goes away).
There are a lot of things that will keep the internal WatchDog from working in the Arduino, so beware.
Here is a way to work with the internal Arduino WatchDog timer. First of all, the Wto of all the Arduino models is a MAXIMUM of 8 seconds. Keep that in mind. Having a longer Wto covers a lot more sins in my opinion (Wto is 16 seconds on the internal Raspberry Pi WatchDog – which still isn't long enough for our taste), so the Arduino Wto is a bit short. We often have serial processes that run longer than 8 seconds in our designs. Yes, you can incorporate patting into the code, but when you are using external libraries, that is a pain.
To experiment with your Arduino WDT , build a new sketch in the Arudino IDE. WARNING: If you are using an ArduinoMega 2560 or similar device, you may “soft brick” your device. See comments in the problems section below. My Arduino UNO from SainSmart worked fine with this sketch. Start with
#include <avr/wdt.h>

 #define RESETWATCHDOG
void setup()
{
	  Serial.begin(57600);
          Serial.println("");
          Serial.println ("------->Arduino Rebooted");
          Serial.println("");
          wdt_enable(WDTO_8S);


}


void loop()
{

#ifdef RESETWATCHDOG
	wdt_reset();
#endif

	Serial.println("Arduino Running");
	delay(1000);

}
Run the sketch and let it run for 30 seconds or so. You should never see the “Arduino Rebooted” message again after reboot. Then, comment out the RESETWATCHDOG statement like this:
// #define RESETWATCHDOG
Now when you run the sketch, if your WatchDog is working, then you should see the Arduino Reboot every 8 seconds or so in the serial monitor.
Problems with the Internal Arduino WatchDog Timer
Use of the Arduino Internal WatchDogTimer is problematic at best. The Arduino WatchDog Timer has a Wto of 8 seconds so if you are downloading a new sketch and the old sketch has the WatchDog enabled, then you can get into an infinite reboot sequence. This is called “soft bricking”. The Arduino is then pretty much worthless (without a lot of work), but it is still running. WatchDog expires, bootloader starts, bootload works for a while, WatchDog expires, etc., etc. etc. Some boot loaders now disable the WatchDog appropriately, but beware there are a lot of Arduinos out there (like the Mega 2560 - of which we are big fans) that still don't work. You can update the bootloader but it is not an easy job. This is a problem we have run into several times.
- The internal Arduino WatchDog does NOT power cycle the system. It reboots the Arduino via the Reset Line. This means that it does not restart in all conditions. Especially in low power / brownout conditions often experienced with Solar Powered Systems. I have seen this in Project Curacao.
- There are problems with the bootloader (see above)
- The internal WatchDog Timer is not completely independent of the Arduino. If your code jumps to a piece of code disables the WDT, you are finished. Try overwriting your stack to see what interesting things can happen to code in a small embedded system such as the Arduino.
- The maximum Wto is 8 seconds. You can easily be in routines, such as serial communication for more than 8 seconds. Figuring out all of the possibilities and putting wdt_reset() calls in the right spot is difficult and with some serial routines, impossible.
Step 4: Internal Versus External WatchDog Timers / Issues With Internal Timers
Internal Versus External WatchDog Timers
Summary: In Step 4 of this Instructable we look at the differences between an Internal and External WatchDog Timer. We also review the issues with the Arduino and the Raspberry Pi Internal WatchDog explain why an External WatchDog Timer, such as the SwitchDoc Labs Dual WatchDog Timer is a better choice in many, but not all, systems.
The Bigger the Dog the Bigger the Bite
What is an External WatchDog Timer? It is an independent timer that is separate from the package or CPU entirely. Sometimes (such as with the SwitchDog Labs WatchDog) an entirely separate board.
What is an Internal WatchDog Timer? It is a timer that is internal to the CPU and intimately related to the CPU (such as the Arduino Internal WatchDog Timer and the Raspberry Pi Internal WatchDog Timer).
In the case of the Raspberry Pi and an Arduino, an External WatchDog Timer has a much bigger bark than an Internal one. Why do we say this? Because there is NO WAY that the internal software, however buggy, can stop an External WatchDog Timer from doing its work, where an Internal WatchDog Timer can be shut off by software. In some designs, shutting off the Internal WatchDog Timer makes sense. In others, it doesn't.
Of course, if you want to shut off an External WatchDog Timer via software, you could by using a GPIO pin to control a relay or a transistor, but generally, you don't want to do that if you don't have to.
Problems With Internal WatchDog Timers
Summarizing the problems with Internal WatchDog Timers from Step 2 and Step 3:
- The internal WatchDog does NOT power cycle the system. It reboots the computer. This means that it does not restart in all conditions. Especially in low power / brownout conditions often experienced with Solar Powered Systems. Without some clever circuitry, sometimes the Raspberry Pi or Arduino will not come back with just a reset. Solution: An External WatchDog Timer can keep hitting the device until it does come back, or better yet, can power cycle the computer which will bring it back when the power levels are less brown.
- You can stretch out your Wto to a lot more than 16 seconds to cover all the possible bootup sequences. Wto is defined as the maximum amount of time the WatchDog timer can count before it needs to be reset (in other words, when it will reboot the computer if the computer goes away. Solution: A circuit like the Dual WatchDog Timer goes all the way to a Wto of 240 seconds. That is even long enough for a Windows machine to boot. Well, most of the time.
- If you halt the computer, you are finished. The internal WatchDog will not reboot. Not so much a problem with the Arduino, but a bigger problem with the Raspberry Pi. Solution: An External WatchDog is independent of what you do with the software inside. You can't screw it up.
- On the Raspberry Pi , there are situations where the CPU is loaded up too much for your program but might still do the process patting the watchdog thus keep patting the dog. On the Arduino, since the the patting is done all on one thread, this is less of an issue. Solution: An External WatchDog is independent of what you do with the software inside. You can't screw it up.
Now, please understand, we don't hate Internal WatchDog Timers. In any system design, we always look to use the internal one first. Over the past 20 years, we find ourselves drifting away from using the Internal WatchDogs because of the issues above, and just maybe, we don't have to think so hard during the design. Fewer variables to control. More defined behavior. We can see what is going on by looking at the LEDs. Even without our glasses on.
Step 5: Adding an External WatchDog Timer to Your Project
Summary: In Step 5 of this Instructable we look at setting up an External WatchDog Timer witht he Arduino and also with the Raspberry Pi. We use the SwitchDoc Labs Dual WatchDog Timer, which is a good choice for an External WatchDog Timer in many systems. Finally, we look at a real world problem of RFI (Radio Frequency Interference), which really hits the Project Curacao Box.
External WatchDog Timers for Raspberry Pi/Arduino Systems
A solution to all of the potential problems and issues with the Internal WatchDog Timers discussed in the previous 4 steps of this Instructable is to use an External WatchDog Timer. As we were exploring this set of problems with Project Curacao, we decided to build our own External WatchDog timer. Designing our own timer gives us a fixed set of parameters not dependent on other sofware processes (in the Raspberry Pi case) and which Arduino we are using (in the other case). And then there were the significant power system issues as Project Curacao is Solar and Wind Powered and has brownout issues (hey, it gets cloudy in the tropics too!).
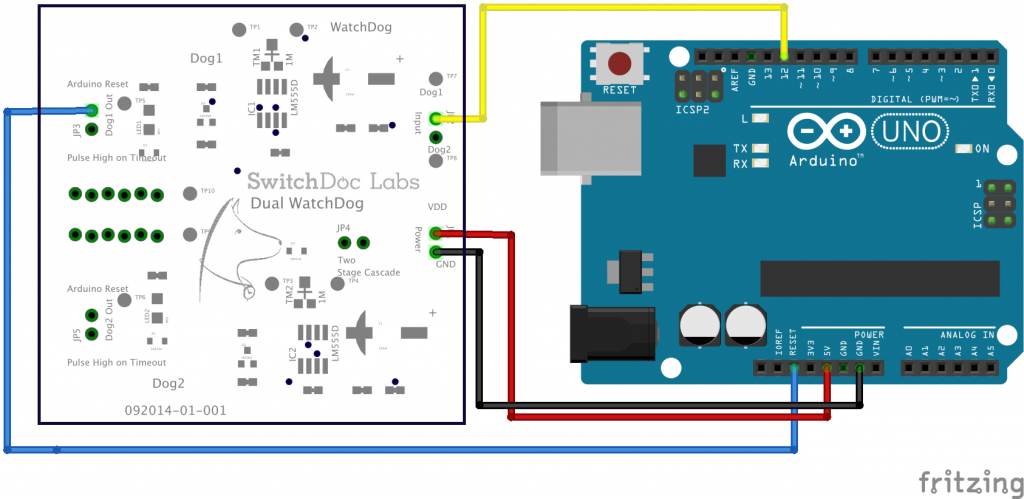
The Code for "Patting The Dog" in Python and C To “pat the dog” or trigger the External WatchDog Timer, you need to use the following code. Since the line has to be held in high impedance mode and then just taken to ground when you pat the dog, the code for the Arduino looks like this:#define RESET_WATCHDOG1 9
void ResetWatchdog1()
{
pinMode(RESET_WATCHDOG1, OUTPUT);
delay(200);
pinMode(RESET_WATCHDOG1, INPUT);
Serial.println("Watchdog1 Reset");
}
And in Python for the Raspberry Pi, the code looks like this: #define RESET_WATCHDOG1 18 def resetWatchDog(): GPIO.setup(RESET_WATCHDOG1, GPIO.OUT) GPIO.output( RESET_WATCHDOG1, False) time.sleep(0.200) GPIO.setup(RESET_WATCHDOG1, GPIO.IN)
You put these functions in your code such that you pat the dog more often than Wto. Wto is defined as the maximum amount of time the WatchDog Timer can count before it needs to be reset (in other words, when it will reboot the computer if the computer goes away.
You can download the entire specification for the SwitchDoc Labs Dual WatchDog Timer here: DualWatchDog_101914-V1.3.
Setting Wto on the SwitchDoc External WatchDog Timer
You can adjust Wto from about 220 seconds to 30 seconds.
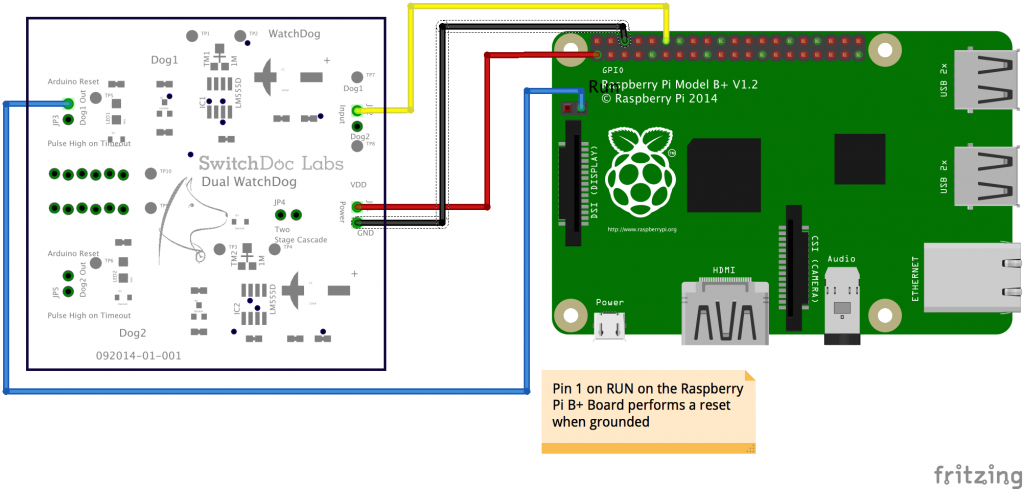
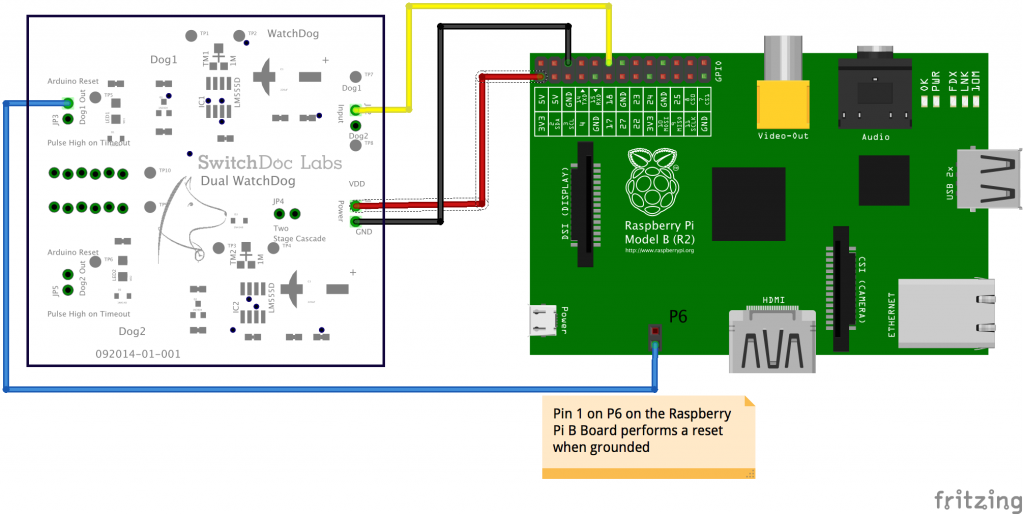
Using an External WatchDog Timer with the Arduino Dual WatchDog and ArduinoUsing an External WatchDog Timer with the Raspberry Pi
 Dual WatchDog with Raspberry Pi B+
 Dual WatchDog with Raspberry Pi B (and A)
Radio Frequency Interference - A Real World Problem
The significant problem we discovered in Project Curacao with RFI (Radio Frequency Interference) was when the Amateur Radio folks powered up their worldwide radio contest in October and November on 28MHz. Our box is connected to a radio tower in Curacao. And connected to a 15 meter line which just happens to be about 3 wavelengths of 28MHz, making a very good antenna. Things looked good up until the radio contest!
The wavelength of 28MHz radio waves is about 5 meters. We had a 15 meter line. Not a bad antenna for receiving 28MHz signals. Assuming that it is about 12 meters effective we have a nice 1/2 wavelength (2.5 wavelengths actually) staring at the input to the Arduino. And the WeatherRack (seen in the distance below) is connected directly to the tower where the 28MHz signal is being transmitted.
New Solar Panels on Top of the Project Curacao Box - WeatherRack in Background
Could be an issue, for sure. We sent questions to the Radio Gods about what kind of voltages could I expect. One God (Geoff H.) replied, saying up to 2V. That is pretty close to 2.5 Volts which will start triggering things.
The second God (Jeff M.) indicated that it could be all the way up to 3V and that the contest in the past weekend was not just on 28 MHz. It was an all-band contest, on the 160, 80, 40, 20, 15, and 10 meter bands.
SwitchDoc Dual WatchDog Board Installed in Project Curacao
During daylight hours on the contest weekend, transmitting will have been on 10m (28.3 – 29.0 MHz), 15m (21.2 – 21.4), and 20m (14.15 – 14.3 MHz). During nighttime hours on the contest weekend, transmitting will have been on 160m (~1.8 – 1.9 MHz), 80m (~3.6 – 3.9 MHz), 40m (~7.05 – 7.25 MHz) and 20m (~14.15 – 14.3 MHz).
Lots of little signals running around our box with the big new wire (antenna) connected.
This contest took the Project Curacao down for the count.
Yet another reason to use an External WatchDog Timer because the RFI was putting the Arduino in a state that required a on and off power reset.
Step 6: Suggestions for Educators and Conclusion
Conclusion
WatchDog Timers can improve the reliability of your Arduino and Raspberry Pi projects. Internal WatchDogs have limitations in both the Arduino and Raspberry Pi but can still improve your project reliability. For those issues (such as Brownouts, power loss, coding errors and RFI) that aren't handled well by the Internal WatchDog Timers, a better solution is to use an External WatchDog Timer.
Suggestions for Educator Experiments
- Hooking up an Arduino with a simple program patting the dog. Show what happens when you don't pat the dog (the LED on the Dual WatchDog Board will flash when not patted)
- Do the same with a Raspberry Pi
- Write an Arduino program that purposely goes into an infinite loop, see the WatchDog reset the Arduino


