

Introduction: RaspiCase: a Layered Pi Case


(version en español aqui)
Well, after investigating which use can i give to my new Raspberry Pi, buyed at raspipc.es , i realized that with the Xbian operative system for the Pi can have a media center, which will give me access to my NAS files, access to my USB hard disk drive and access to some popular streaming web pages....even i can use Air Play with mi Xbian for only 45€.
But, the problem was that my three childs has this amazing small electronic component at his fingertips :) so i decide to make a encolosure for the Raspberry.
Here in Leon (spain) we have a Fab Lab, so i made a design to allow anyone to make this case at any fablab/makerspace/techshop. I investigate the kind of case there was in the market, but none give nice finish, except two designs:
Pibow: http://shop.pimoroni.com/collections/pibow
Plypi by Stephen: http://singlelensreflections.blogspot.ca/
The last one was the one i wanted, but this designer had handcrafted it, so there was no digital design of his creation. So i decided to a similar case to Plypi, but as simply as Pibow....and here is the result.
Step 1: Making the Case

Here is the brief of all the pieces we need to build a Raspicase.
¿Which materials i need? lets see...
- 1 MDF table (also called Medium Density Fibreboard) 3mm thickness. You can use any other material, but for this design its important that has 3mm thickness.
- 4 screws M3 (3mm diameter) and MORE longer than 30mm (this is the case width). Also 4 nuts and 4 washers for this screws.
- A laser cut machine. I use the one in Fab Lab Leon, an Epilog Mini 45W.
¿How can i do it?
At this instructable you can find the files to use with the laser cut. You can use one of this files:
- 3DM file (Rhinoceros)
- DWG (Autocad)
- DXF (any design software)
There ar two strategies: one for engrave the logo and the marks, and other to cut the pieces.
Here are the parameters i use in an Epilog Mini 45W to do it:
- Engrave: Speed 60% and Power 60%
- Cut: Speed 17%, Power 90% and Frequency AUTO.
This are the parameters i use to engrave and cut MDF 3mm thick, with a nice finish and easy separate. If you use any other laser cut (or you want to saw it by hand), this parameter could change in some way.

Step 2: Building the Case


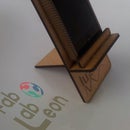
As you could see, any layer of the case has a number. The building will start from the base (the layer with the text "Fab Lab Leon"). This layer goes with this text downward. in this layer we put the screws, to get all the layer before well aligned.
Then we put the layer labeled as 1 over it, after this the layer number 2 and here we put the Raspberry Pi over the layer number 2 (without the Sd card). After this we continue adding layers secuentialy, and finishing with the layer with the Fab Lab Logo.
When we have all the layers added, we put the washers and the nuts, and this is all! we finish the building.
Remember, i design it from scratch, so if you like it and you want to use it, would be nice to share it and remember where you get this case :)


