

Introduction: Reclaimed-Drawer Router Table


Hello all!
So I was walking home one day when I found an old discarded drawer in a field near my house. I only had to take one look at it to know exactly what I wanted to make. Having recently acquired my own plunge router, I figured it wouldn't be too terribly difficult to turn the drawer into a makeshift router table!
The following shows my process in making this, for those who wish to try it, or for those who are simply curious. I can already think of over a dozen modifications that I can (and more than likely will) add to the table as upgrades, and will list a few (or more) of them at the end. Not knowing a whole lot about router tables going into this project, I made it all up as I went, using mostly scraps and hardware I had on hand.
I welcome any and all questions, and will explain my reasoning for any design element you may choose to question! ;)
Step 1: Tools and Materials
Tools:
-Plunge Router
-Drill
-Jigsaw/Hole Saw
-Steel Rule
-Compass
Materials:
- (1) Old drawer (this one measured 91/2"x131/2"x171/2")
- (3) 5mm 8 x 30mm Machine Screws
-(1) 2"x5/8"x17" Scrap Wood
-(2) 1/4"-20 3" Bolts
-(2) 1/4"-20 Star Knobs
Optional:
-Spray Paint
-Shop Vacuum
Step 2: The Drawer and Router


So now that I had my idea, the first thing I had to do was make sure the router would even FIT in its new home. I stood the drawer (hereafter referred to as table) up and held the router in place for a second, sizing it up while checking to make sure all the controls and adjustment areas could still be reached. I tried to make sure to keep it as far back as possible to allow for the largest possible work area above.
Step 3: Prep Base for Layout


After determining exactly where the router would be positioned, I proceeded to unscrew the base plate. While leaving it still on the router, I attached rings of blue painter's tape (my fix-all for taping) to the base.
Step 4: Layout Holes for Screws


After moving the router back into its desired location, I pressed the unit upwards into the underside of the table's top surface. The tape rings kept it held in place without making it difficult to remove, allowing me to easily transfer the location of the mounting screw holes to the table.
Step 5: Drill Mounting Screw Holes


With the base attached to the table, I needed to drill holes for the machine screws to pass through the top and into the router's mounting holes inside. I made sure to get screws with enough length to make it all the through the table and router base.
After flipping the whole unit over, I drilled 13/64" holes into the table from the inside, using the existing holes in the router base as a guide. I then turned the whole thing back around and counter-bored 3/8" holes, which then had to be enlarged (3/8" was my largest bit), about a 1/4" deep, to get the screw heads below the table's surface.
Once all the holes were drilled and counter-bored, I checked make sure that the weight of the router would actually be supported by screwing in the actual router. With that done I moved on to the rest of the layout.
Step 6: Top Surface Layout


In laying out guides and cut lines on the table top, I only needed to know where to put a fence, where the router base would extend to, and how much clearance I would need for my largest router bit to fit through the table.
For the router base, I simply unmounted the router from the table, and removed the router base once again. I placed it on top of the table, using the mounting screws as registration pins by inserting them through the base into the holes I previously drilled. After tracing around the outside of the the router base, I traced the inside opening and removed the base from the table. This gave me a visual representation of where my router would be underneath the surface.
For the bit clearance, I only needed to mark the router bit's center point, which was easy with this router, since the opening has corners that I could draw a line through to find the center. Then I measured the diameter of my largest bit, which in this case was rounded up to 11/2" for the larger of my two round-over bits. Using this measurement, I was able to mark a circle with a compass that would later be cut out to allow the bit to pass through it.
The fence location was to be indicated by a straight line drawn across the entire back side of the table top, about 1" from the edge.
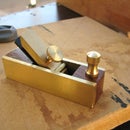
Step 7: The Fence


I made my router table's fence by drilling two 1/4" holes in a 12" long (17.5" in second version) piece of 2"x5/8" scrap wood I had, each about an inch from the ends. I then inserted 1/4" dowel centers into the holes which I would later use to layout an adjustment slot.
With the dowel centers in the fence, I lined it up on the layout line I made earlier, and pressed down just hard enough to mark the location of the two holes that my fence locking bolts would go through.
Step 8: Adjustment Slot


I wanted to make the fence adjustable, so I set one of the marked points as the pivot point, wherein the other would run along a slot cut into the table. Lacking a sufficiently sized compass, I found that the easiest way to mark the arc for the slot was to use the other dowel center to scribe an arc where the slot would be.
To accomplish this, I first lined the fence up with the edge of the circle drawn earlier for the router bit. Once there, I pressed down on the fence to mark another center point. With these two points marked, I was able to swingthe fence between them to scribe an arc directly onto the table.
Knowing that the slot would have to fit a 1/4" bolt, I moved pivot point 1/8" to either side of the original point and scribed two more arcs. With everything marked out, I drilled 1/4" holes on all three center points, and then cut out the slot and bit opening. I used a jigsaw to cut both the slot and opening, but it would advise using a hole saw or even a large Forstner bit, if you have either one. Sadly, I don't. =c
Now, it is probably worth noting that I made these cuts after the sun had set, and without an alternate light source (my "workshop" is a small corner of the yard underneath a peach tree), I lost a fair bit of accuracy when cutting, as I was unable to see my layout lines. Please exercise caution and use safe building practices when working with any tools. That being said, I didn't do half bad for cutting in the dark, eh? 'xD
Step 9: Final Assembly


I attached the fence using some old 1/4" bolts I had, which I fed up from inside the table and secured with plastic knobs on top of the fence. A quick check to make sure the fence could swing easily when unlocked, and I was good to go!
With the fence in place, all I had left was to mount the router, hook a vacuum hose up to the dust port on the router, and pop in a bit! I ran a few test cuts, and quickly began to understand how this simple setup turned an already versatile tool into an indispensable workhorse. I works great, and considering I paid about 1/100 of what I could have, am extremely pleased with the result! I can tell this rig is going to see a LOT of use in the near future!
Well there you have it! With a few leftover parts, and a bit of ingenuity, we've once again proven that one man's trash, is another man's, uh, workshop! xP
Thanks for stopping by! Until next time!
Feel free to comment below! =)
Step 10: Upgrades!

I thought for those who might be interested, I would post the progress of this router table, including the following planned upgrades! (entries striked out have been completed)
-Cut a matching clearance hole in the fence-Using the long sides of the drawer as the table top
-Making a split side fence
-Moving the fence knobs behind the fence
-Support for a miter gauge
-Improved dust collection, including surface dust
-Ability to raise the router with more ease and accuracy
-Custom router plate to increase bit range
-Add feather boards
-"Presets" Gauge/Peg holes (RandomIdeaMan)
After flipping the whole on it's side, I got myself some cheap hole saws at Harbor Freight (not bad, but I may have to sharpen them and/or true up the mandrel) to cut the bit clearance hole. I had also built a simple circle-cutting jig for the router and used it to cut a much cleaner arc for the fence bolt.
I painted the sides blue, from a dream I once had where I owned a cozy little workshop full of bright blue generic looking machine tools.


