

Introduction: Refilable Aerosol Can


This Instructable will show you how to create a simple refillable aerosol can with just a few materials and tools. It can be made in 24-hours, although the actual assembly is about 30-minutes. The rest of the time is to let epoxy harden and cure.
Step 1: Refillable Aerosol Can


You will need the following items:
- Short tire valve ($4 for 2 plus extra valves at Walmart)
- An empty steel aerosol can
- JB Weld or other high quality epoxy
You will need the following tools:
- Dremel type of tool (optional)
- Wire brush attachment (optional)
- Vice or Vice Grip pliers
- Utility knife
- Awl (sharp point) or ice pick
- Sand paper
- Disposable gloves
- Tire valve removal tool (about $3 at Walmart\hardware\sporting goods store)
- An air compressor with a tire fill attachment or a standard bike tire pump.
- Dental or other type of syringe for filling the can
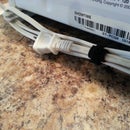
Step 2: Empty Pressure and Poke Your Holes


Make sure you empty all pressure out by holding the nozzle down until no pressure is left.
Using your Awl, poke 2 small holes in the sides of the can where you want them. I put one at the top and one at the bottom. I am fairly sure you can put both of them at the bottom about an inch apart.
Step 3: Prepare the Tire Valve


Clamp your valve in the vice. Don't forget to wrap the threads on top of the valve with tape to protect them. I have rubber protectors on my vice (the orange in the picture).
It is very easy to cut yourself here. BEWARE, be patient and careful.
Cut away the rubber from the tire valve. The rubber is tougher than you would think.
You will end up with a little bit of the rubber on the bottom of the valve.
Use your Dremel with the wire brush attachment (the stainless steel bristles seem to work best). Using a slow speed remove the rest of the rubber attached to the valve. The wire brush works very well, but you can also use sand paper to remove the excess rubber. It just takes longer.
Step 4: Expand the Holes in the Can


Using the awl, slowly expand the size of the holes until they fit the cleaned valve almost exactly.
Clean out the material that was inside the can originally is a good idea here. If not, you can clean it out after the valves have been installed.
Step 5: Roughen Area Around the Hole

Using a course grade sandpaper, roughen the shiny area around the holes and the end of the valves that epoxy will be touching. This will help the epoxy adhere to the shiny surfaces.
Step 6: Install the Tire Valves


Clean the area around the hole and the bottom of the valve. I used mineral spirits.
Mix the epoxy (in this case JB Weld) per instructions.
Cover the area around the hole with the epoxy. Make sure you do not cover the holes completely. Any excess epoxy over the center of the hole could cover the end of the tire valve in the next step.
Install the valve into the hole and slightly rotate the valves to ensure the valve does not have any gaps in the epoxy. Be careful not to get epoxy on the tire valve threads. I used the valve cover cap that came with the package of valves and made sure I didn't adhere the cap to the valve.
I used a glove covered finger to smooth out the epoxy a little bit. (Not really necessary, but I like my projects to look somewhat nice after the effort).
Place the can facing up and stabilize it. Leave the project undisturbed for 24-hours to let the epoxy harden and cure.
Step 7: Test the Can

Add about 10-lbs of air to one of the valves.
Check for leaks. I used a small amount of dish washing detergent and water around the base of the valves to test for air leakage. Bubbles will form around the area of the leak.
If you find a leak around the base of the valve, you can either remove the valve, clean the valve and hole and start again. Or add more epoxy.... :)
Step 8: Fill Can and Be Free of Consumer Waste


To fill the can with whatever material you wish:
The core tool has a little slotted post for valve removal and installation.
Remove both of the valve cores (the red banded thing in the third picture).
Using a dental syringe was the best way I found to fill the can. Place the can sideways with the valves positioned up.
Fill. Removing both valve stems will allow your fill material to enter the can. If you only remove one of the valves you will have pressure equalization issues and it will be a very slow and messy fill operation.
Replace the valves.
Add about 10-lbs of air pressure.
Voila!
You may have to experiment with the type of can and the material you want to spray. I found that the can I used in this Instructable does not spray light oil very well. It only sprays something with water like consistency.
Also be aware that the type of material you add to the can may damage the can and spray nozzles. For example, acetone may melt the plastics the can valves are made of. I would suggest only using these type of can to spray inert or non-hazardous materials like detergents and household cleaners.


