

Introduction: Reflections on Pi(e)


REFLECTIONS ON Pi(e) - Apple and Cherry Pie
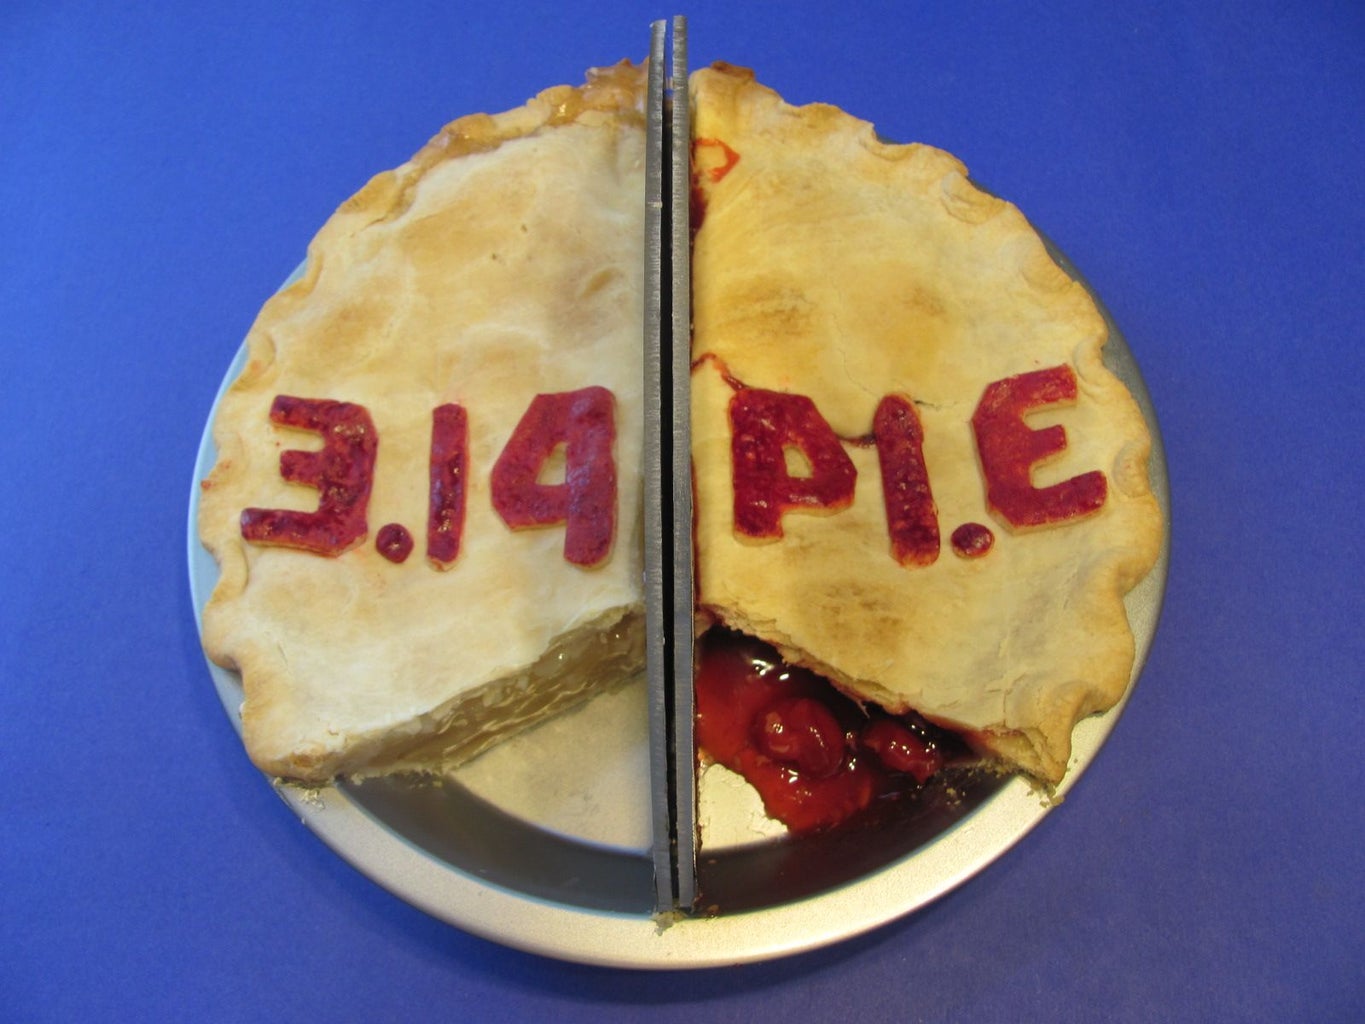
Pi, that unique number that starts 3.14..., really is PI.E, (in mirror image) -- Take a look and see for yourself.
After running across a post about the 'reflective nature' of Pi and Pie ('3.14' is the mirror image of 'PI.E'), I just knew I had to make a Pie that would 'reflect' well on Pi and reveal this relationship. But to do so I needed to create two projects: A special pie pan anda special pie.
Before we get to make yummy pie we need that special pan. A pan that will allow us to mount two opposing acrylic mirrors to showcase the 'reflective' relationship between pie and pi.
The mirrors divide the pie pan which provides the opportunity for two different flavors of pie, one on each half! In this case apple and cherry!
Link to video
Step 1: Materials and Tools for the Pan


The special pie pan is a modification of a regular 'tin' pie pan allowing us to mount two opposite facing acrylic mirrors. No, the mirrors don't go in the oven, but the pan has a 'slot-type' Mirror Holder mounted in it to hold them in proper placement after the pie is baked.
MATERIALS NEEDED:
1 - Nine-inch metal pie pan
1 - Another metal pan wide enough to span the pie pan (to cannibalize for sheet metal)
2 - pop rivets (uncoated, 1/8" dia., thin grip range)
1 - 9" x 11" piece of acrylic mirror (1/8" thick)
1 - Scrap Cardboard to make templates
TOOLS NEEDED:
Aviation Snips (sheet metal shears)
Saw (band saw or coping saw; not shown)
Drill Motor
1/8" drill bit
Pop Rivet Gun
Hammer
Scissors
Awl
Needle-nose pliers
Marking pen
Scrap wood to drill on
Ruler (not shown)
Sand paper
Eye Protection (not shown)
Gloves (to protect against sheet metal cuts; not shown)
Scrap 1/4" thick material (I used plywood; to bend metal against; not shown)
Circle pattern (to trace a circle the diameter of the Mirror Holder width; a bowl or other round item; or a compass; not shown)
If you have difficulty finding mirrored acrylic here is at least one source: http://www.tapplastics.com/product/plastics/cut_to_size_plastic/acrylic_sheets_mirror_clear/521
Step 2: Cannibalize the Extra Pan for Metal for the Mirror Holder


Cut up the secondary baking pan to get a piece of sheet metal that will be used to make the Mirror Holder.
This sheet metal should be wide enough to span the inside top edge of the pie pan and measure X inches [ x = twice the depth of the pan + 1-1/2" ( 3/4" rise above pan lip on each side) + 1/4" (for the thickness of the two 1/8" acrylic mirrors)]. Mine was 9" x 4-1/4".
CAUTION - YOU WILL BE CUTTING THIN SHEET METAL WHICH CAN ACT LIKE A KNIFE AND PRODUCE SEVERE CUTS. BE CAREFUL AND WEAR GLOVES.
MAKE SURE THE METAL CUTS ARE CLEAN AND CONTINUOUS SO THAT THERE ARE NO SHEET METAL 'SLIVERS' REMAINING ON THE EDGE. IF NECESSARY USE SANDPAPER OR EMERY CLOTH TO INSURE A SMOOTH SAFE EDGE.
WEAR EYE PROTECTION WHILE USING TOOLS.
Step 3: Make a Template of the Cross Section of the Pie Pan


Take the scrap cardboard and make a template that follows the cross section of the pie pan. This template will be used to cut a similar shape into the sheet metal making up the Mirror Holder.
It may take several tries to get a template that matches the walls of the pie pan well.
Step 4: Mark the Mirror Holder Sheet Metal for Cutting


Mark a center line down the long dimension of the sheet metal. Make two additional lines 1/8" above and below the center line to take into account the thickness of the mirrored acrylic.
Next take the cardboard template of the pie pan cross section and align it on the line farthest from the center and trace it onto the sheet metal. Do this above and below the center line (essentiall for each side of the folded Mirror Holder).
Step 5: Cut Out the Mirror Holder Sheet Metal and Form It Into Shape


Cut out the Mirror Holder from the sheet metal following the lines you have drawn using the cardboard template.
To fold up the sides of the Mirror Holder take the scrap 1/4" thick material (plywood) and line it up on the center line drawn on the sheet metal. While pressing down firmly, fold up the sheet metal on each side of the 1/4" material.
Check fit the Mirror Holder in the pie pan. You may have to make some minor adjustment trims to get it to fit well. Remove only tiny bits of material at a time -- you can't put it back after you cut it off :-)
Square up the top corners (cut off the sharp tips) of the Mirror Holder so that left and right edges above the pie pan are vertical and extends square above the lip of the pie pan. Round the corners.
CAUTION - YOU WILL BE CUTTING THIN SHEET METAL WHICH CAN ACT LIKE A KNIFE AND PRODUCE SEVERE CUTS. BE CAREFUL AND WEAR GLOVES.
MAKE SURE THAT ALL METAL CUTS ARE CLEAN AND CONTINUOUS SO THAT THERE ARE NO SHEET METAL 'SLIVERS' REMAINING ON THE EDGE. IF NECESSARY USE SANDPAPER OR EMERY CLOTH TO INSURE A SAFE EDGE.
Step 6: Fasten the Mirror Holder to the Pie Pan


Take the Mirror Holder and place it in the center of the pie pan. Take the pan with the Mirror Holder and place it on the scrap wood. Take an awl and place it in the Mirror Holder about 1 inch from the bottom inside edge of the pan. Tap the awl with the hammer to make an indentation simultaneously in the Mirror Holder and the pie pan. This will mark the location of one of the mounting holes.
Remove the Mirror Holder from the pie pan and place it on the scrap wood for drilling. Use the drill motor and 1/8" drill bit to drill a mounting hole at the indentation. Repeat this for the pie pan. Note that we are doing this for only one mounting hole so we can mount the Mirror Holder at one end before drilling the other holes in order to prevent alignment problems. BE CAREFUL TO APPLY GENTLE PRESSURE WHEN DRILLING, AND KEEP A FIRM GRIP ON THE METAL PIECES TO KEEP THE DRILL BIT FROM GRABBING THE SHEET METAL OUT OF YOUR HAND.
Fit a pop rivet through the holes in the bottom of the pie pan and Mirror Holder and use the pop rivet gun to pop the rivet in place to secure the two together.
Place the assembly on the scrap wood and make a second indentation with the awl and hammer at the opposite side of the Mirror Holder. Drill the second mounting hole through both the Mirror Holder and pie pan at the second mounting location indentation. Pop rivet together.
Take the time to wash the pie pan with warm soapy water (careful that top edge may be sharp) to make sure it is fit for baking.
Step 7: Create a Mirror Template and Cut Out the Acrylic Mirrors


Create a cardboard template for the mirrors by taking the pie pan cardboard template that matches the crosssection of the pie pan and trace it onto the bottom edge of a new piece of cardboard. This is so the shape of the bottom edge of the mirrors will follow the contour of the pie pan and fit down into it.
Take this new mirror template and line it up on the bottom of the pie pan so that notches can be marked to make space for the pop rivets in the bottom of the pan.
Next take the circle template (a mixing bowl in my case) and trace onto the mirror template to create the nice arching curve of the top edge of the mirrors.
Cut the mirror template out of the cardboard and use it to trace the pattern onto the acrylic mirror stock. Remember to flip the template over when marking the pattern for the second mirror so the mirrors will line up in case the patern is not symetrical. Cut out the mirrors using a coping or band saw.
Test fit the mirrors into the Mirror Holder in the pie pan. Smooth cut edges with sandpaper.
The specail pie pan is now complete! Admire your handiwork! :-)
Step 8: Materials and Tools to Make the Pie


The pie is of somewhat typical construction (except for having to work around a divider down the middle of the pan!).
Not that I am inept in the kitchen, but considering that I decided to have two different fillings, I opted for the easy way out and used store-bought pie fillings (out of a can -- gasp). Store-bought pie crusts are probably also considered heretical too, but in the interest of time and because of proven performance (I'm stretching them a bit more and in ways not usually done) I opted for pre-made crusts also.
MATERIALS NEEDED:
1 - 21 oz. prepared Apple Pie Filling
1 - 21 oz. prepared Cherry Pie Filling
3 - Prepared Pie Crusts
1 - Egg White (using as an adhesive; not shown)
1 - Food Coloring (Color of your choice, I tried liquid and paste and settled on paste; not shown)
TOOLS NEEDED:
Special Pie Pan (Your handiwork)
Letter and Number cookie cutters (PIE & 314)
Small paint brush
Can opener (shameful)
Wax paper
Spatula
Oven (not shown)
Aluminum Foil
Paper Towels
Hot Pads
Cooling Rack
Timer
Step 9: Make the Pie


Instead of placing the bottom pie curst in the bottom of the pie pan as would be traditionally done, each crust is used on one side of the pie with the crust being folded over onto itself like a turnover.
Place a piece of folded paper towel over the bare edge of the Mirror Holder to keep it from cutting the crust. Place the crust into the pan starting at the lip of the pan and laying it into the pan and up against the Mirror Holder. Carefully press the crust down into the pan so that it takes the shape of the pan and there are no air bubbles. Take particular care to be extra gentle in the corners where the Mirror Holder meets the side of the pie pan in order to not poke a hole. Trim the excess pie crust from the bottom crust at the lip of the pie pan so that it does not extend over.
Add the Cherry Pie Filling (not all of it will be used). Fold the crust over the filling and tuck the edge of the top crust under the bottom crust edge. Remove the paper towel (Do I have to say this? I guess so lest someone somehow find a way tobake it in and blame me).
Press the crusts together, then flute.
Most two-crust pies use either slits in the top crust or an open-lattice-type or other decorative-top crust to allow steam and/or liquid to escape as the pie bakes. I did not want to have 'pie juice' ooze all over my 'canvas' so I tried leaving the top crust solid. Instead of slits in the crust I decided not to seal the crusts together or flute on one side right next to the Mirror Holder to see if it would allow sufficient venting to keep the top crust intact. It appears that this scheme worked for the Apple side but was not as successful for the Cherry side as it cracked slightly.
Repeat the same filling and sealing process for the Apple filling side.
I noticed that the Mirror Holder ends near the pie pan narrowed slightly (bent inward, either during fabrication or from the weight of the pie crust and/or filling) and felt that this could cause the baked crust to crack when the mirrors were inserted. I decided to cut two thin strips of sheet metal 1/4" wide and of a convienient length and bend them into a loose 'Z' shape. These 'Z's were inserted into the Mirror Holder near the pan edge and remained in place during the baking process to keep the Mirror Holder spaced 1/4" appart. They were removed after baking.
Step 10: Make the Numbers/Letters


The numbers and letters were cut out of the third pie crust with cookie cutters. I tried all 6 characters but ended up actually using only '4', '1' and 'E'. Each had to be slightly modified to get the shape shown to effectively portray the proper number/letter in the forward and reverse image view. You'll have to freehand the decimal points! :-)
After carefully cutting out the crust characters they were trimmed and then placed on wax paper and 'painted' with food coloring using a paint brush. I tried liquid and paste (cake decorating) food coloring and settled on the paste as it seemed to give better coverage.
The backs of the characters were painted with egg white to adhere them in position and placed on the top crust.
The pie is now ready for baking. Great Work!!!
(Remember - No Acrylic Mirrors in the Oven. They will melt! Wait until the pie is baked and cool to install them.)
Step 11: Bake the Pie


Preheat the oven to 425°F and bake the pie for 15 minutes. Then place a pie crust shield over the edge of the crust to prevent it from burning (build directions below). Reduce the oven temperature to 375°F and bake for an additional 30 minutes.
These baking instructions are a compromise between the Apple and Cherry pie filling baking instructions and seem to have worked well. If you use a different filling or only one filling I suggest following the baking instructions given with your recipe.
Since the pie was provided with two openings under the fluting to allow pressure relief I placed a sheet of aluminum foil in the oven to catch any spillage.
PIE CRUST SHIELD:
Take a piece of aluminum foil larger than the pie pan. Place the pie pan face down on the foil and trim the foil to within about 1" of the pie pan. After cutting out the circle fold the foil upward to the edge of the pan. Then flip the pan over and cut out the center of the foil keeping about 1" away from the edge of the pan. Flair the foil hanging down over the edge of the pan slightly to make it easier to place it over the hot baking pie. Place on the pie after the initial 15 minutes of baking, as noted above.
Step 12: Install the Mirrors and Enjoy!


After the pie is baked place it on the cooling rack until cool.
Take the acrylic mirrors and place them back to back and then slip them into the Mirror Holder. If the mirrors separate too much at the top you may wish to consider applying some double stick tape between them to hold them together.
The REFLECTIONS ON Pi(e) pie is done!
Congratulations! I hope you enjoy making this as much as I did!

Participated in the
Serious Eats Pi Day Pie Contest

Participated in the
UP! Contest


