

Introduction: Remote-control Car Graffiti


This instructable shows you how everybody can create really cool graffiti works.
You can make them on the floor or on paper, whatever you like, just by controlling a remote-control car.
You'll have much fun and it's really easy!
You can see the results from my experiments here:
Hope you enjoy it!
Ruud
Willem de Kooning Academie, Netherlands
http://www.wdka.nl
the make class!
http://blog.wdka.nl/make
Step 1: Materials


This is the stuff you need:
- A remote-control car! Probably everybody has one from the days you were young...it doesn't have to be a big and powerfull one, but it should be able to carry between 200 and 400 grams.
Make sure you also got the batteries!
- Paint!
- Ducktape
- some matches
- one or more small plastic drinking bottles! depends on how many different colours of paint you want to use.
Step 2: Preparing the Drinking Bottles for Paint


Take the small drinking bottles, you have to make sure they're not too big, so the car will keep driving!
Take the lid from the bottle and drill or cut a small hole in it.
make the hole like 0,5 cm wide. This is where the paint is gonna float through
When you're finished, you can check the hole by filling the bottle with some paint (that you mixed with water if you want to) and see if the paint runs smoothly through the hole, at the speeds that you want!
Step 3: Create a Not-leeking System


We dont't want much of the paint to come out of the bottle before we start driving, because there is a hole in the lid...so we'll make some kind of stop that can be put in the hole, which we can take out just before driving.
Take out your matches. check how many you need to fill the little hole you drilled in the lid. You probably need 5 or 6 if you drilled a hole that's 0.5cm wide.
Use the ducktape to tape the matches together.
Do some tests, so there won't be much paint leeking.
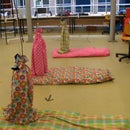
Step 4: Attaching the Paint-bottles


First you fill the bottles with paint. Make sure the paint isn't too thick, it has to be pretty fluid, otherwise the paint won't come out through the hole fast enough. I mixed my paint with a little bit of water.
After filling the bottles, you put the lid on it and fill the hole with the taped matches.
Than you can attach the bottles to the car using ducktape. Just tape around the bottle and tape it to the car.
Make sure you attach them at the middle of the car, so the car won't flip over or backwards. If you use only one bottle, make sure you devide the weight as eaqually as you can over the car.
I used orange paint, as support to the Dutch football-team at the European Championships, but unfortunately they're already out of the tournament...
Step 5: Driving - Painting!
Now you're ready to drive!
Pick a nice location, on the street for example, I drove over some large papers...and you're ready to make some art!!
Here you can see my result:


