

Introduction: Repair Your Clogged Coffee Maker


Don't throw away your coffee maker just because it only makes steam and has stopped gurgling water up into the brew basket. I have repaired a couple coffee makers by forcefully spraying water into the "fill area".(Unplug first of course). This clears the pipes going down into the heating element area. This method didn't work on my expensive MR-COFFEE machine. So i was forced to remove the cover and find what was clogging it up. This is not very hard to do and you don't need many tools.
OTHER BRANDS are built similarly to the Mr. Coffee. If you are trying to fix some other brand or model all you need to do is find out what is clogging the hose --- as I describe here --- and your repair should be similarly easy.
Step 1: Preparation to Fix Coffee Pot

SAFETY first, so unplug the coffee pot and LET IT COOL DOWN (if you had it on)! This will help you avoid burning yourself on the hot-plate. Next....dump out all the water left in the water-resivoir into your sink. Try to be rather thorough to get ALL the water out because it will be necessary to turn the machine upside down to remove the bottom..... and you don't want puddles of water dropping into the display-board-section.
Step 2: Tools You Will Need:

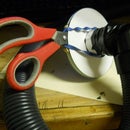
You don't need many tools but one of them is somewhat difficult to find... the SECURITY torx bit. I bought my set of SECURITY-torx-TIPS at harbor freight tools for only a few dollars. The security torx is just a standard torx screwdriver bit with a HOLE in the middle and a little pin. You will have difficulty removing 2 of the 6 screws on the bottom because they are "security" type torx. The other 4 screws
are standard phillips. Another way to get the 2 security torx screws out that might work is to use a SOLDERING IRON. Just heat up the torx screw untill the plastic melts then pull the case apart. Of course, you will need to have all the other screws out first!
Step 3: Down-spout Removal & Fix

The downspout hose is easy to remove. Just pull on it! The other hose is the UP-spout.
Step 4: Something Looks Funny Here!


Other coffee pots just have a hose... but the Mr-coffee has a VALVE inside the hose. It is a valve that controls the water flow... but this valve is very small and clogs easily. Mine had a small piece of coffee residue sticking to it that kept the valve clogged. Just remove the gunk... and that fixes the clog! To remove the valve... just squeeze the hose and it pushes right out. When installing the valve, be sure to put it back RIGHT SIDE UP. The next step shows a close up of the valve so you can see what to look for.
Step 5: VALVE Cleaning and Replacing:

Notice the little ball inside the valve. It sits on top of a few little pegs that hold it up so water can flow around it. This is right side up. If you turn it around the other way, then no water will flow. If you install it backwards, just re-do the whole procedure and turn it around.
Step 6: Finish Up the Repair.

Re-attach the downspout and put the bottom back on. When I finished my "simple" repair, the coffee pot would not turn on properly! It seems I got some water into the display-board area. So i quickly unplugged the appliance. No harm was done because I dried the upper-board out, using my wifes hair-dryer. DON'T OVERHEAT it... I just mildly heated the front and sides of the coffee pot for about an hour. This evaporated the moisture inside the front control panel. Alternatively, if you have this difficulty you could also just set the coffee pot aside and let it sit for a few days for the moisture to evaporate. If you suspect any water got into the upper display/control circuits, then let the coffee pot sit to dry out for a couple days before plugging it back into the electrical outlet.


