

Introduction: Replace the Top Screen of a Nintendo DS (without Opening Up the Bottom Half)


Do you have a DS Lite that needs repairs? HA HA HA SUCKERS. Er, head here for NDSL specific repairs.
I'm warning you, though, any repairs to the NDSL requires a specialty (tri-wing) screwdriver, and the top screen needs a soldering iron!
If anyone tries out these instructions: could you give me a holler? (Comment, PM or email me at my user name at gmail dot com.) I want to get a sense of the success rate.
Pre-caution: This is a fairly wordy instructable. Most questions you might have, and problems you might run into are likely addressed in the body of the instructable (or within the comments). That means you need to read, and re-read carefully.
Actual intro!: Is the screen your Nintendo DS cracked? Don't throw it out, repair it. (And then sell it to help cover the cost of getting a new DS lite.) It is not expensive, nor all that difficult, to replace the screens on a Nintendo DS.
I found PowerGamingParts.com's guide to DS repair to be pretty useful, but I didn't need to disassemble the whole contraption, since I was replacing the top screen only. (Opening up the bottom half also requires a specialty screwdriver which I didn't have.)
I'm sure there's good directions for replacing the top screen without disassembling the bottom half, but I haven't found them. And since I'm feeling productive, I present to you documentation of what I did to replace the top screen.
Go poke around on the internet to find a source of replacement screens. A quick Google search turns up prices in the 40$ range, but Ebay has cheaper. Most screens will be "top/bottom" screens--they can be used to replace either, but the bottom screen does require an additional touch sensor overlay.
Tools needed:
-Basic manual dexterity (Take a look at the photos to see the scale at which you'll be manipulating things)
-Small philips head screwdriver
Useful tools:
Board (on which to place all your components)
Tape( to keep little parts from going missing)
Wood/plastic/something blocks (see steps 2 & 3 for photos of it in action)
Disclaimers/warnings:
These directions are reasonably devoid of dangerous actions, so if you break things or burn your house down, it's your own fault.
If your DS won't power on after repairs: it's probably an error related the the ribbon cables. I will repeat this litany often: go to step 2, look closely at the photos and the comments on the photos. Look at the comments on this instructable and see if anyone else had similar trouble, and what they did. Then go back and check your work! And if that still isn't solving the problem, you can message me and I'll make sympathetic noises but probably not have any additional information that isn't posted all over this instructable already. (Sorry?)
Step 1: Open the Case


Remove battery!
Gently remove the 4 screw covers on the front face of the top section of the DS.
Unscrew all 4 screws.
Gently pry apart the two halves of the shell. Set aside the top of the top.
Remove the screws holding down both green boards. (You don't have to remove the second board, but I found that it gives me more slack on the wires and makes removal of the ribbons (next step) easier.
Hint: get a piece of paper or something and tape/stick your various removable components to the paper. This will deter screws from getting lost. Scribble some labels on the paper next to the various components, too.
Hint: work on a sufficiently large, sturdy, mobile surface. Eventually I found a 1ft. sq. piece of plexiglass. This allowed me to pick up the mess of disassembled components and move it out of the way of other things, all without disturbing the pieces & layout.
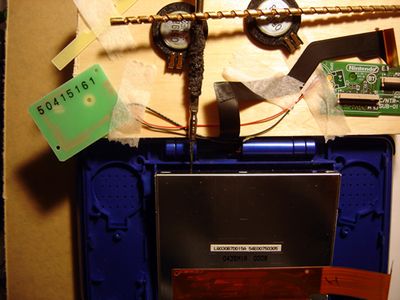
Step 2: Detach the Ribbons


READ THIS:
Here's the most difficult part of the whole process. You are manipulating small, DELICATE items. Breaking these clips will pretty much render your repair attempt useless! You need to be very careful here.
If I find any way to fix a broken clip, I will post it, but so far I haven't and no one else seems to have any ideas either.
The actual steps:
Flip the green board with the ribbons over.
You need to detach all three ribbons (a really small one is under one of the others).
-Two of them are pretty simple--you flip the black bar up. Gently.
-The final (tiny) ribbon is more obnoxious--you need to pull the little clip out enough to unlock the ribbon. (Gently.)
**Apparently this step is exceedingly easy to bork. The big ribbons are unlocked by flipping the bar up, but the tiny ribbon's lock must be slid out. Out. Not up. See photo & comments.
It is possible to do this one side at a time, but this tends to tear up the plastic somewhat, and there's not much plastic there in the first place, so you need to be careful. (Very careful.)
If you have tweezers or really fine point pliers, or a fork with the proper tine spacing, you should slide the clip in one go.
If you have trouble getting things to power up at the end, this is the likely culprit! Look closely at the photos of how the ribbons are locked in & removed.
The tiny ribbon and the broader one over it are attached to the screen and will be removed, and therefore can be damaged as much as you want. The other, remaining ribbon, will connect to your new screen, so please don't damage it.
Disengage all three ribbons, and you're good to continue on!
Step 3: Remove the Broken Screen


Move all the various bits and pieces of the DS out of the way.
(Hint: I used a piece of wood approximately the same thickness as the DS and placed my components there. This way the wires were given enough slack so as not to damage them. And I gently taped my pieces to the board to prevent anything from falling off/getting lost.)
Towards the hinge side of the screen is a little wedge of plastic with a notch. Pry this up. It should come up easily.
Pry up the screen. There is adhesive around the edges of the screen face, so it's going to resist a bit. Gentle even pressure should be sufficient to pry the screen off, just don't damage any of your other components. (The screen is broken already, so you probably don't care as much about it.)
Step 4: Reassemble With New Screen in Place
Take your new screen, and make sure there's a little adhesive around the edges. I used two layers of double sided tape trimmed to fit. This is just to ensure that the screen doesn't slide around.
mizW also reminds you to make sure any protective film on the screen needs to be removed! (But be careful you don't leave any giant fingerprints on your pristine screen.)
Place screen in, making sure it retains the same ribbon orientation as the original screen.
Start reversing your steps!
**Place the new ribbons in the proper slots on the green board. Lock them in (either flip the bar down, or slide the clip in).** These ribbon cables are very important! Make sure they're going in the right slots, and that they go all the way in before you lock them.
My original "ribbon 2" had a bit of adhesive holding it to the back of the screen. I imitated this with the new screen with a little bit of double sided tape.
Make sure your speakers are in place.
Replace the screws in each board.
Pop the top of the shell back on.
Flip open the DS and replace the 4 screws holding the shell together.
Stick the screw covers back on.
Replace the battery.
Power her up!
*Final Fantasy victory theme*
You're done!
Unless you're not.
If your DS does not turn on, odds are that you've done something wrong in replacing the ribbons. Go back to step 2 and look at the photos. Scoll and look at all the comments--plenty of people have reported their problems and how things turned out. Finally, go and recheck that the ribbons are inserted when the latch is unlocked, aligned properly, firmly in place, and locked in. If this doesn't fix your problem, I really don't know what will.


