

Introduction: Restoring Your Broken XBee


Just a while ago, I had a problem of bricking my xbees. I was using moltosenso IRON and I accidentally loaded the wrong firmware on it. For this tutorial, I will use series 2 XBees (not proven to work yet on series 1) and restore them to their original state. Most all problems with not showing up on the com port, not being able to communicate once you have loaded some random firmware are all causes of bricking your XBee. I have watched some videos on this, and I had to search around for the best possible outcome. This probably will restore your broken XBees, and be the easiest tutorial.
Feel free to leave any questions in the comments section.
Note: This will work with XBee-Pros.
Step 1: Parts

All you need is an
XBee Explorer (or other xbee FTDI board)
1 Jumper wire
Bricked XBee S2
A PC running the newest version of X-CTU
Step 2: Settings for X-CTU


Plug in your XBee to the Explorer and the Explorer into your computer. Then open X-CTU. Click the correct port of your Explorer. It will probably be named USB Serial Port. If you did what I did to my XBees, your XBee will show up on the devices tab of X-CTU, but with a test will show an error message. This is error message is okay, for it is with this problem you have the best chance of restoring them. Set the baud rate to 115200, but leave the rest of the settings the same.
Step 3: Modem Configuration Tab


Next, go to the modem configuration tab. As most X-CTU users know, this is where you configure your modem to be in AT or API mode, or a router, coordinator, or end device. Make sure to check the always update firmware box next to the read button. Next click the read button, and it still should display an error message. Click okay to get out of this message. Click the drop down box on the left that will say something like XB24-ZB but click on the XB24-B (or XBP24-B if you are restoring an XBee Pro) On the drop down box to the right of that it will say ZNET 2.5 COORDINATOR API. Even if this is not what you are configuring, you still have to leave it like this because it is the easiest setting for you to restore your XBee.
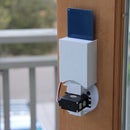
Step 4: Reseting the XBee


Now click the write button on X-CTU. It should give you an error message, but do not click out of this one. Flip over the XBee Explorer. Now, take your jumper wire and touch RST (not RTS) to the GND pin of the Explorer for about a second. Take away the jumper wire. The error message should go away! It will start to load the firmware on. Once the error message comes up again, repeat the above step again. Now your XBee has been restored!
Step 5: Configuration for Your Project


Since you may have a different firmware that you want to use, I will go over changing this. Change the drop down menu on the left to XB24-ZB (for regular zigbee configuration), or XBP24-ZB for XBee pros. Change the right drop down bar to best fit your project. Click Write, and it will write the xbee with that firmware. On some of my XBees that I had to restore, it came up with the error message again. If this comes up again, connect GND to RST (not RTS) on the Explorer together with a jumper wire for about one second. This error message should go away.
Step 6: Important Notes

Here are a few problems you might run into
Getting the error message again
XBee not showing up on the COM port
To solve error 1, touch the RST (not RTS) pin to GND briefly on the Explorer.
To solve error 2, you will have to do this instructable over again.
I hope you've enjoyed my instructable and please feel free to leave comments or questions.
P.S. I'm 11 years old!

Participated in the
Make It Real Challenge


