

Introduction: Resurrecting Vintage Clocks


Those of you who follow my Instructables probably have noticed that I like to take something old and non-functional and save it from the scrap heap by giving it life once again. I love to frequent flea markets and the challenge of fixing that which others have thought unfixable.
During my outings I'm always on the lookout for an old clock, particularly old alarm clocks and mantle clocks.
Why clocks? First, the mechanical nature of old clocks intrigues me -- I mean they have gears, and sprockets, and springs, and levers -- all sorts of neat stuff that, when working as designed, actually captures the passage of time! Second, except for rare expensive clocks, when an old clock quits working, most people assume it is done for.
What I have learned over the years is an old clock can generally be fixed -- often very easily. And, if it can't be fixed, AND it is of a style that is interesting, it can always be converted to a quartz movement, but I only do that as a last resort.
This Instructable won't make you an expert in clock repair, nor will it cover the details of clock repair, but I will try to go over what I generally find wrong with these old clocks and how I get them running.
Step 1: Misaligned Gear Trains

The first thing I do when I look at a clock is to look for evidence of damage to the case. If a case is cracked or broken, quite often a gear train has popped loose inside the clock. The clock if the photo below is a good example. It is an old General Electric clock from the '50's, and refused to run when plugged into the wall, On the back of the case was a large crack, indicating it had been dropped. Upon removing the case, I found the set of gears that had popped out of place, popped them back in, and the clock has now been running constantly (and keeping perfect time) for the past 3-4 years.
The case on this clock was plastic, and I fixed the crack (not shown) on the back with super glue. Super glue tends to work well on old plastics. I glue the crack shut, then fill any small gaps with more super glue. If the crack is on the front of the clock housing, I then overfill the crack, sand it smooth, and paint the entire housing. If it is on the back or the bottom, I simply glue the crack.
Step 2: Sometimes Things Get Bent
This clock was found in an antique shop in New Mexico, and I paid substantially less than what the clock was actually worth, because it would not run. I noticed that there was a small dent in the wood of the case (indicating the clock had been dropped). What I found wrong was that when the clock had been dropped, the thin brass mount where the pendulum attached had been bent slightly. Straightening this mount fixed the clock. The pendulum on this clock, by the way, is hidden in the back of the clock.
Step 3: Sometimes Things Get Dirty and Dry

One of the most common problems with old wind-up clocks is that they get dirty and need lubrication. A good indication that this may be the problem is to look at the fast/slow adjustment lever on the back of a wind-up clock. It it has been adjusted most or all the way to the "fast" setting, more than likely it just needs a bit of cleaning and lubrication.
I typically clean these old movements by first removing the movement from the housing, shooting some WD-40 around all moving parts (to blast away grit and solidified oil), then lightly oiling it with a very fine machine oil (such as sewing machine oil). In most cases this will get these old wind-up clocks running again.
Occasionally a mainspring will get dirty or develop a light coat of rust. WD-40 tends to fix this as well. Many people believe a clock can be overwound, but there is no such thing. Clocks were made to be wound completely. If it's not running, more often than not it is either a lubrication problem on the balance wheel, or a dirty or rusted mainspring.
Step 4: Sometimes Parts Have Fallen Off Inside the Clock

Once in a while I have run across a balance wheel that has popped out of its mount, probably from being dropped. These are relatively easy to get back in place, but the hard part is pre-loading the balance wheel spring. These springs are about as thick as a human hair, and must be installed with the appropriate amount of tension. The only way I've found to get the tension right is by trial and error. The clock highlighted in the photo had such a problem. I started out by tensioning the spring with only one winding, then kept increasing the tension until the clock once again kept time correctly. Then I oiled it, and it has worked fine ever since.
Step 5: Clock Runs Fine, But the Case Is a Disaster


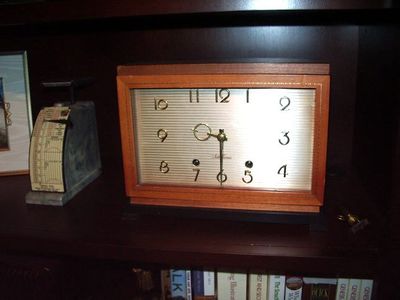
When a wooden clock case falls onto hard times, they tend to deteriorate quickly. The clock in photo 1 had such a case. The old varnish was flaking off, and there were deep scratches everywhere. I stripped the case, found some beautiful mahogany underneath the old finish, and applied several coats of tung oil.
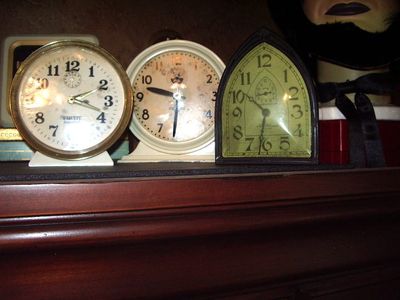
Photo 2 shows an interesting electric clock. This clock chimes once on each hour. There was nothing wrong with the clock motor, but the case had about an eighth inch of grime all over it. All I had to do to this case was clean it, then apply a coat of paste wax.
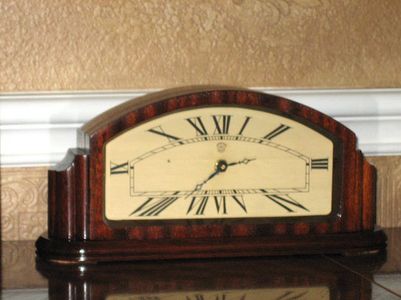
The clock in photo 3 had a case that was a disaster. It had apparently been stored where water dripped on it. The wood was split, the finish was awful, and parts of the case had begun separating. I stripped the case, glued everything back together, then re-stained and varnished the case.
The clock in Photo 4 is also an electric clock, and is covered in leather. The clock motor worked fine, but the leather was coming unglued, and the dial cover was getting cloudy. I used a fine metal polish to clean up the dial cover, glued down the leather, cleaned it, and then finished the leather with neutral shoe polish.
Most of these clocks looked like disasters when I acquired them, but buried underneath was vintage beauty.
Step 6: Sometimes You Just Can't Fix It....


Some old clock movements are just too far gone to be fixed. Gears are too worn, parts are missing, or things are just too bent and beat up for restoration. When I come across a clock like this, if it has an interesting case, I remove the old movement and replace it with a quartz movement, but only as a last resort. If the clock is repairable, I repair it. If it is not possible to repair it or if it is just not worth repairing -- if I like the case I will install a quartz movement. Quartz movements are inexpensive and reliable.
Where possible, I always try to retain the clock's original hands. Quite often this requires a bit of machining to get the hands to fit right on a quartz movement. Where this is not possible, sometimes I will drill out the hole in the original hands and bond them to the hands designed for a quartz movement. If one of the clock's original hands is missing or too damaged to use, I try to match the original hands as close as possible with either new hands, or hands from my growing pile of extra's.
Step 7: Other Tips


The glass or plastic dial cover of a clock can usually be polished with a fine metal polish (I use Semichrome). Just rub it in like you were polishing a piece of metal, then buff it off with a soft cloth. It will remove most fine scratches, and remove 50 years worth of built up gunk.
Fine metal polish is also good for cleaning up the case of plastic and metal clocks. Automobile polish can also be used. If a plastic clock housing has a lot of scratches, I have even been known to begin with automotive rubbing compound, then work my way down to finer polishes.
If a clock is missing its lens, sometimes you can mold one from the clear hard plastic containers that food often comes in. If the lens is flat, simply cut one out. If it is curved, sometimes you can make a wood mold in the shape you need and use heat to mold a new one from these plastic containers. It is not easy, but it is doable with practice.
If you enjoy working on clocks, save the parts from clock movements or entire clocks that are not fixable. It is always nice to have an available supply of extra parts, screws, hands, lens, winding keys, etc.
With electric clocks, always replace the old cord. Old cords become brittle with age, and can be dangerous.
Wind every clock in your collection periodically. This helps to keep the lubricated parts working. I don't run every clock all the time, but I do try to run each one periodically. With electric clocks, I run them constantly.
In terms of tools, a good set of jeweler's screwdrivers is your friend. Also, a regular set of small screwdrivers and a good pair of needle nose pliers is handy. A precision oiler is a must.
Step 8: Where to Find Clocks & What to Look For


Old clocks are everywhere. I have found them at flea markets, tag sales, antique shops, thrift shops -- anywhere used items are sold. In terms of cost, I've paid as little as 25 cents for an alarm clock and as much as $30 for a mantle clock. I usually find the best deals at thrift stores, and the highest prices at antique shops, although you can usually bargain at an antique shop if you're interested in a clock that doesn't run.
When you find a clock that you like, first see if it works. If it is a windup clock, I first try to see if I can move the hands through an entire day (to make sure a gear has not been stripped). The next thing I do is wind it a little bit, shake it back and forth and see if it will begin ticking. If it ticks, I set it down and come back in about 5 minutes to see if it is still ticking. If it is fully wound and does not tick, I see if I can manually start the balance wheel (sometimes you can spin the balance wheel by reaching a toothpick through the fast/slow adjustment window) Next, I look at the fast/show adjustment to see if it has been moved all the way to the fast marker. I then look for bumps and bruises on the case. All these observations are made to give me some idea as to what it will take to get the clock working, as mentioned in the previous steps.
On electric clocks, if the cord looks safe, I plug them in. They generally either work or they don't! If they work, I listen to see if they're making any unusual noises. Loud noises in an electric clock tend to indicate the motor is either worn out or its lubricants have hardened. Again, this is to get an idea of what it might take to get the clock working again.
I also check to see if there are any missing controls on the back of the clock -- missing stems and winding keys. I won't necessarily pass up a clock that I like because of a missing stem or key, but I like to know before I buy.
I look at the finish on the clock's case. Metal clocks can be repainted, plastic clocks can either be polished or repainted, and wood clocks can be refinished. If a wooden clock case has large missing chunks of its venier, I'll often pass on them. Outside of missing venier, the condition of a wood clock's finish doesn't bother me, because it is easily fixable.
The lens of the clock can be a showstopper for me if it is broken or missing. While it is possible to make a new lens, it is a lot of work, and I really have to want the clock to be willing to take on that task.
While this is by no means intended to be a detailed lesson on clock repair, I hope you have found it helpful. Resurrecting an old clock can be both enjoyable and frustrating, but if you enjoy a good challenge, bringing back a 50 year old clock from the dead can be fun!


