

Introduction: Rideable 'Skid'board


Combining our passion for creating one-of-a-kind skateboards, with the inspiration of all these amazing pallet related projects being posted to Instructables, we decided to try and build a unique skateboard to share with the community.
We use skids to import/export goods all the time at the shop, but there are always extra pallets that have reached their expiry date and all of these projects are such a great way to make use of the scrap material.
To make the 'skidboard' we used the following tools and materials:
Tools:
Hammer (with nail pulling claw)
Drill
Handheld Palm Sander
Edge Sander
Jigsaw
Miter Saw
Clamps
Handheld Router with 1/2" Roundover Bit
Materials:
Wood Screws
Wood Glue
Stain
Paint Roller
Outdoor Protective Finish
Skidboard Hardware:
Wheels, Trucks, Griptape (spray or adhesive sheets)
Step 1: Disassemble Skid for Wood


By far the hardest part of this project (and probably most pallet related projects), is taking apart the skid to get the raw material needed. For these particular pallets, we used a basic Claw Hammer to help pry and hammer the planks apart.
Once we had the material needed for the board (three 3" planks), we used the hammer to drive the nails out from the bottom side, and then pried the nails out from the top side. Some of the nails were inevitably rusty and bent, and took a bit of extra work to get out.
There were also some of the pallets used that were put together with industrial staples. These ones were much harder to disassemble, but we were able to with the same hammer and a little extra elbow grease. Because the staples are harder to fully remove, we simply cut off the ends with a chop saw before working with the material.
Step 2: Layout Material


Once we had our three planks of material needed for the deck, we laid them side by side and marked out our desired length of the deck. We did our best to cut off the worst of the material (holes, splits, etc), but leaving some of the defects is part of the charm when working with material like this.
After determining what part of each plank to use, and cutting them all to the same length we are ready to glue them together to make one solid board.
Step 3: Laminate Wood for Deck


Laminating the planks together requires a tight fit and some clamping. Ideally we would use a jointer to get each side of the wood flat, but the planks we used were fairly straight and we were able to get them fitting together nicely with just a little sanding.
Collect all of your clamps together and have your wood glue handy. Glue the edges of the wood that will be clamped together, and evenly spread out the glue with your finger. For each joint, bring the two surfaces together and rub them back and forth to help get any bubbles out of the glue and help get a nice tight fit.
Start clamping the lengths of wood together, carefully keeping them in place and as flat as possible. Try to evenly space your clamps, and if needed you can put some clamps on the top and bottom to help keep the boards aligned as they dry.
We let these dry overnight, but 4-6 hours is probably enough for a flat lamination like this.
Step 4: Cut Out Deck Shape


When the boards finished drying, we took off all of the clamps and started to layout our final shape. To do this, we first marked a centerline on the board using the RockitRuler truck alignment tool, and used it to place our simple paper outline template to the deck.
We then traced the outline to the surface of the board, and cut it out with a jigsaw.
Step 5: Sand/Drill Deck


With a combination of an orbital sanders, edge sander and a handheld router with a 1/2" roundover bit, we were able to get the deck surface smooth and ready for finish.
Using the RockitRuler and the centerline we marked on the bottom of the deck for our paper template, we were able to layout the truck holes perfectly square to each other. With a 3/16" drill bit and a countersink attachment, we drilled the truck holes for the bolts to mount through.
Step 6: Wheels Wells/Kick Tail


To add a couple features to the board, we wanted to sand in some wheel wells and install a kick tail.
WHEEL WELLS:
Wheels wells are used to help prevent getting wheel bite on a board without cutouts. To determine where the wheel wells needed to be, we put the trucks in place on the deck and drew a semicircle where the wheels were most likely to make contact. A good rule of thumb for this (on longboard trucks) is to line up the center of the wheel well with the inside truck holes. **On street deck trucks, it would line up closer to the axle.
Once we had the position of each wheel well laid out, we took it to our edge sander and removed material from the deck using the rounded end of the sander. This is not the most precise way to cut out wheel wells, but with some patience you can get them fairly accurate to each other.
KICK TAIL:
For the kick tail, we used a piece of the pallet that was naturally rounded on one side, and cut it to the width of our deck. We sanded it smooth, then used the angle of the wood to mount the kick in place at the back of the board using wood blue and screws.
Step 7: Stain and Finish


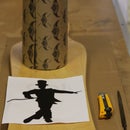
To finish the skidboard, we rolled on and wiped off some dark brown stain to the surface of the wood.
After the first coat of stain dried, we taped off a small area at the front of the board and cut out a quick flame stencil. With a metallic red spray paint, we sprayed the exposed area to create a flame graphic and did the same on the kick tail with a 'Roarockit Built' stencil we had laying around.
We finished the board with three layers of outdoor clear coat (Krylon Triple Thick to be exact), and added some clear spray-on grip (Monster Paint brand) to the topside for traction.
Step 8: DONE!


We mounted the board with Paris 150mm Trucks and some used Sector 9 wheels... and she's ready to ride!
Making your own skateboard is meant to be fun. Although we didn't press this deck with our Thin Air Press vacuum bag system, we still used a lot of the same tools, materials and experience from all of our other builds. We hope this project inspires you to 'get on board' and create something that is creative and truly unique :)

Participated in the
Pallet Contest


