

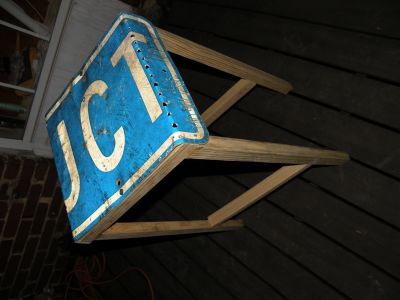
Introduction: Road Sign Stools


Given a heavy, yet healthy, obsession with road signs, I created these stools for my new apartment. They use a simple metal-bending technique to turn down the sharp edges of the signs and simultaneously brace the legs. You can see some of my other projects that use signs and this bending technique here: https://www.instructables.com/id/Road-Sign-Coffee-Table/ and here: https://www.instructables.com/id/Nine-Square-Chair/.
I got my signs at the surplus pile at the state highway engineer's yard. Aluminum signs are very hard to recycle because the coating on the signs is expensive and difficult to get off, therefore making them unprofitable to melt down. Old signs are sometimes just thrown in a big pile and forgotten about . . . all you need to do is ask. I found three the same size, 15" x 21".
Don't steal signs. They are expensive, paid for with your tax money, and you could potentially create a dangerous situation by removing an important sign from the street.
All the wood was found 2" x 4" scrap that I milled down to about 1-1/4" square. The only expense was the screws, 3" drywall or similar, that ran me about two bucks for half a pound.
You will need these materials:
Road signs
Approx. 16' of wood per stool
3" drywall or wood screws
#10 washers
wood glue
sandpaper
You will need these tools:
Miter, circular, or jigsaw
Impact driver and/or drill
Hammer
Step 1: Framin'


The frames for these stools are very simple. Start with some scrap 2" x 4"s and mill them down on a table saw to 1-1/4" or 1-1/2" square.
To make the top of the seat square, take the short dimension of the sign, in this case 15", and make that the length of the top piece of your "A" frame.
Cut the legs to your desired length with a 5 degree miter to get a nice taper effect. A rule of thumb is that a stool should be a around 8 inches shorter than the surface where you will be sitting. So, for a 42" bar, make your stool 36" tall; for mine, designed to match up with a standard 36" kitchen counter, I made them 28".
Make the miters at each end of the legs parallel to one another so the stool will sit flat. Measure up from the floor 6-10 inches for the crossbar brace.
Attach everything with one long screw and a healthy dose of glue. Pre-drill for your screws with an 1/8" bit to prevent splitting, and counter-sink your screws so the heads are flush.
Knock down all the sharp edges with some sandpaper.
Step 2: Signin'


To create the seat, bend the signs into a "U" shape.
Begin by measuring the long side, in this case 21". This makes the sign 6" longer than it is wide. To make a square, 15" x 15" seat, measure in 3" inches from each end and strike a line across.
Space your holes at 1" on center on each line. Drill an 1/8" pilot hole, then go back, alternating 1/4" and 3/8" holes. The alternation isn't necessary, but I did it for visual interest. Feel free to just do all the same size holes.
While you're at it, punch the holes for the screws to attach the sign to the frame, three along the edge of what will eventually be the seat top, and two on each side of the turndown.
Step 3: Bendin'


To bend the sign, place a 2" x 4" along the seam, stand on it, and beat it with a hammer until it goes. Over-bend the sign to nearly 90 degrees so it will fit tightly to the stool frame.
Step 4: Assembly


Start by pinning the sign to two A-frames via the middle screw hole. Align the A-frames and get the other twelve screws in, flushing the sign edge to the frame as you go. Use 1-1/4" screws with a #10 washer for superior old, as the aluminum is so springy it can snap and pull out screws if it doesn't feel like cooperating.
Pop in a cross-bar with two long screws per side and some glue.
Take a rounded bastard file and hit each of the holes along the seams so they won't scratch or snag clothing. A couple quick strokes per will do. Also make sure to sand or file the coating on the sign where it cracks; the sharp plastic there is actually more of a scratch hazard than the aluminum itself. Older painted signs don't have this problem.
Clean them off with some dish soap and a sponge, then a final swipe with Windex and have yourself a well-deserved seat.
Finalist in the
Woodworking Contest
Participated in the
Gorilla Glue Make It Stick Contest


